Creating a macOS Mojave USB installer is essential for installing, upgrading, or repairing macOS. Whether you're performing a clean installation, fixing boot issues, or installing Mojave on multiple devices, a bootable USB installer can make the process much easier.
This article will guide you on how to create a macOS Mojave USB installer and how to download the macOS DMG file.
How to download the macOS Mojave DMG file?
If your Mac supports macOS Mojave, you can directly download the macOS Mojave DMG or macOS installer and open it to install or upgrade without needing to create a bootable USB installer.
Here is a list of devices that are compatible with macOS Mojave.
- MacBook (2015 and later)
- MacBook Air (2012 and later)
- MacBook Pro (2012 and later)
- Mac Mini (2012 and later)
- iMac (2012 and later)
- iMac Pro (2017 and later)
- Mac Pro (2013 and later)
Note: If your Mac doesn't support macOS Mojave, follow:
Download macOS on Unsupported Macs
Install macOS on Unsupported Macs
Theoretically, Macs that support macOS Mojave can download it from the App Store. However, Apple prioritizes users to upgrade to the latest macOS versions, and Mojave usually doesn't appear on the homepage.
So, you need a specific Apple official link to download Mojave, or you can use iBoysoft DiskGeeker for Mac to easily get the DMG file. Once downloaded, double-click the DMG to mount the installer, open the setup, and follow the on-screen instructions to complete the installation or upgrade.
By iBoysoft DiskGeeker for Mac, you can download the Mojave DMG file, as well as macOS 15 Sequoia, macOS 14 Sonoma, macOS 13 Ventura, macOS 12 Monterey, macOS 11 Big Sur, macOS 10.15 Catalina, and macOS 10.13 High Sierra. 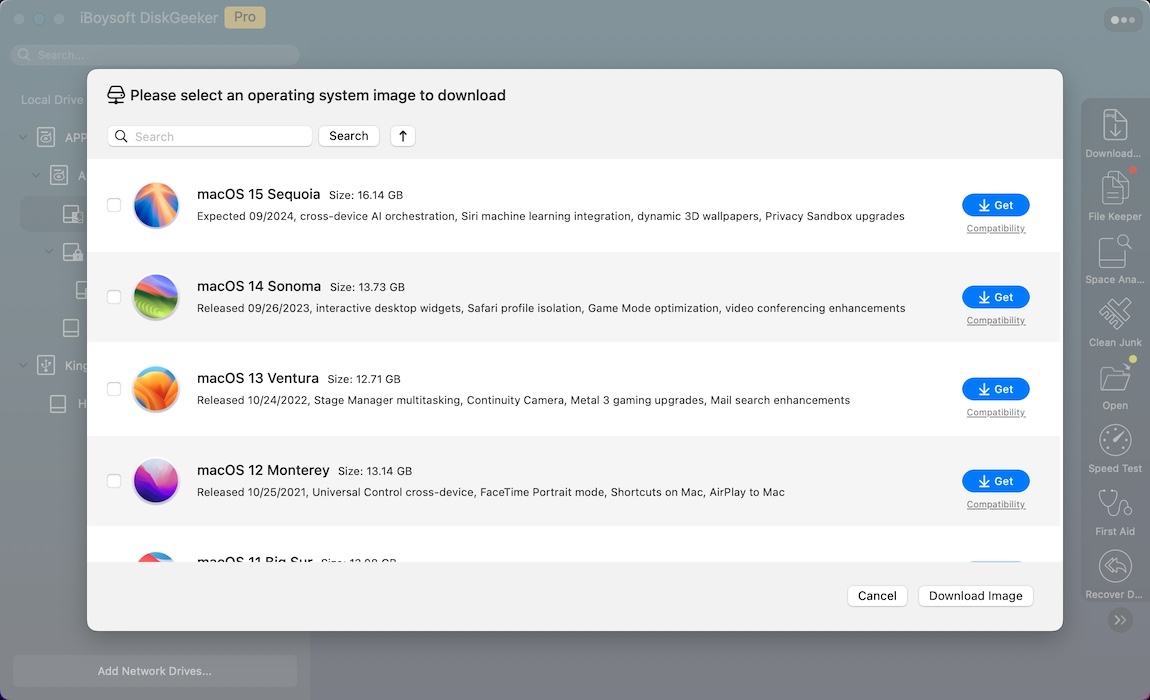
If your Mac doesn't support macOS Mojave, you won't be able to run the installer directly. In this case, you need to create a macOS Mojave USB installer. Let's continue reading to find out how to do it!
Share the way of creating macOS Mojave DMG files with more people!
How to create a bootable macOS Mojave USB installer?
To ensure a smooth installation and avoid potential issues, it is recommended to make the following preparations before creating a bootable macOS Mojave USB installer.
- Ensure your Mac is healthy. Make sure your Mac is in good working condition with no disk errors or system malfunctions. If there are any issues, it's recommended to fix them first.
- Backup your data. Before performing any actions, back up all your important data. You can use Time Machine or other backup tools to ensure your data is safe.
- Available USB drive. Prepare a blank USB flash drive with at least 16GB of capacity to create a bootable macOS Mojave USB installer.
- Stable network connection. Ensure your Mac is connected to a stable internet connection to smoothly create the Mojave USB installer.
Once you're ready, the easiest and most efficient way to create a bootable macOS Mojave USB installer is by using iBoysoft DiskGeeker for Mac.
This tool allows you to effortlessly create a bootable installer without Terminal command. Simply follow the instructions in the app, and you'll have your USB installer ready in no time.
Here is how to create a Mojave USB installer using iBoysoft DiskGeeker for Mac.
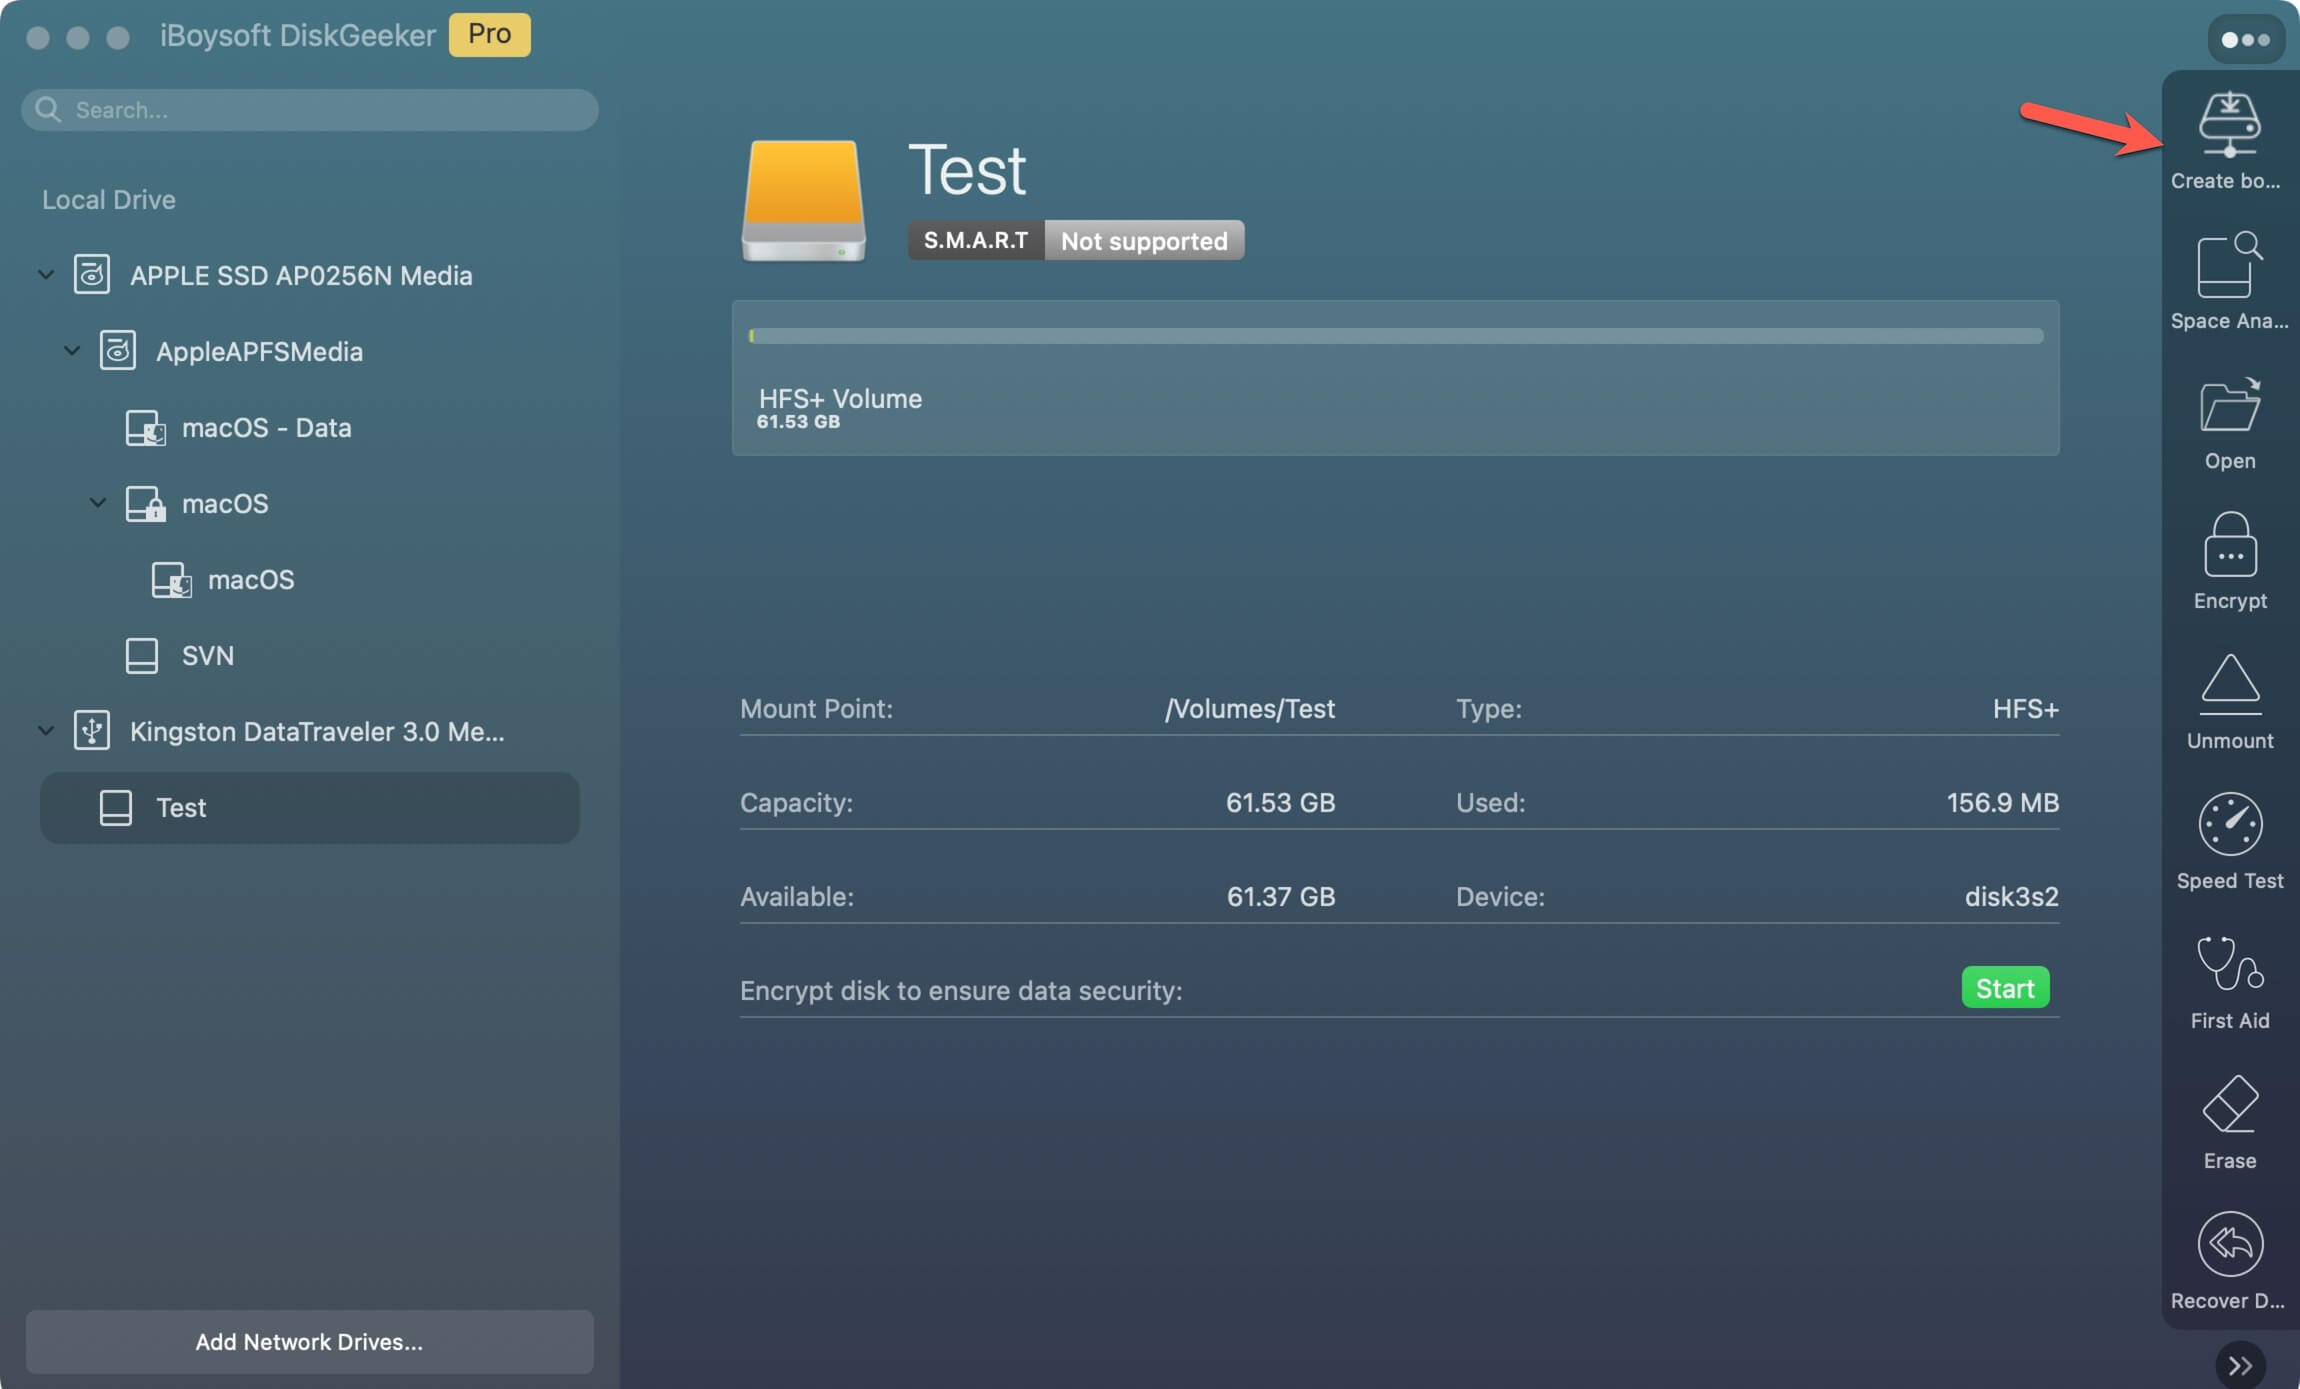
- Download and install iBoysoft DiskGeeker for Mac.
- Plug your external hard drive into your Mac, choose a volume, and click Create boot disk in the main interface. (If your external disk doesn't have any volume, you can select the disk and click Create boot disk.)
- Click Continue to let your selected volume be formatted.
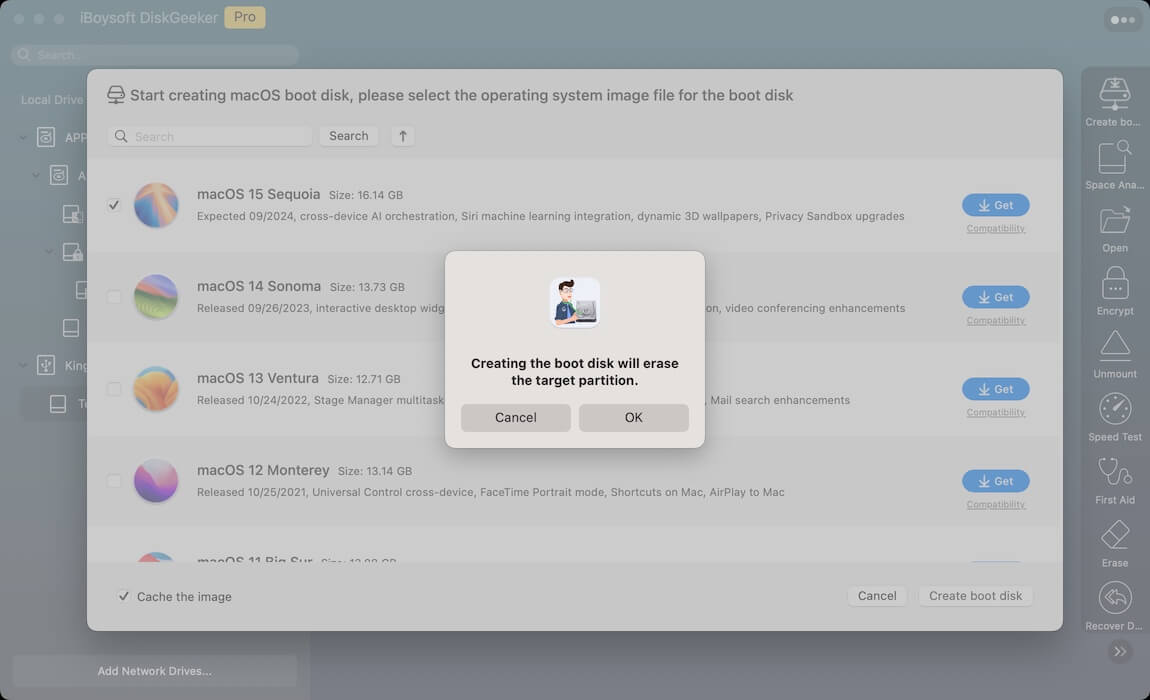
- Select macOS Mojave and click Create boot disk.
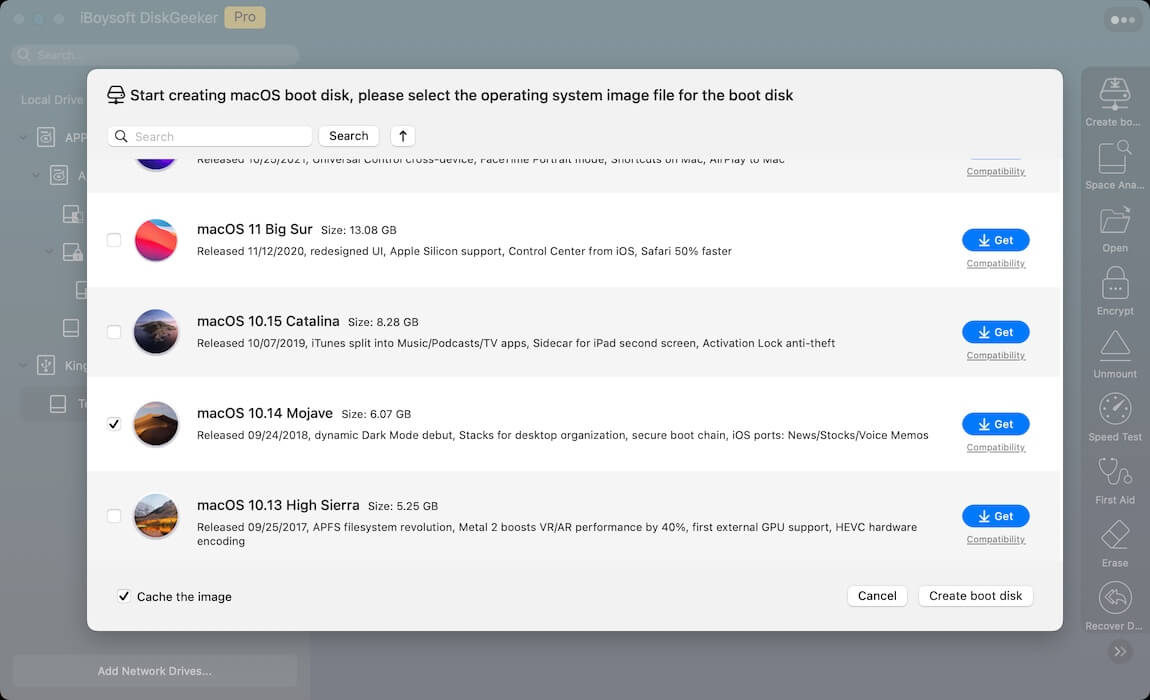
- Click OK when the message “Creating the boot disk will erase the target partition.” occur.
- Wait for the macOS Mojave DMG file to finish downloading. Once the download is complete, the boot disk creation will start automatically.
When you see "Boot disk creation completed," the Mojave USB installer has been successfully created.
If you insist on using Terminal to create a bootable USB installer, you are prone to encountering these errors:
The bless of the installer disk failed
The copy of the installer app failed
Get stuck on "Making disk bootable"
Share the methods of creating a bootable macOS Mojave USB installer with your friends if you find it useful!
How to use the macOS Mojave bootable USB on Mac?
Once you have successfully created the macOS Mojave bootable USB, you can use it to install or upgrade macOS Mojave on your Mac.
On an Intel-powered Mac:
- Insert the bootable USB into your Mac, and then turn off your Mac.
- Turn it on, then immediately press and hold the Option key.
- When you see the Startup Manager screen, select the USB drive that contains the macOS Mojave installer.
- Click the arrow or press Return to boot from the USB drive.
- The macOS Mojave installer will launch. Follow the on-screen instructions to either install or upgrade to macOS Mojave.
On an Apple Silicon Mac (M1, M2, etc.):
- Insert the bootable USB into your Apple Silicon Mac. After that, turn off your Mac.
- Turn it on and immediately press and hold the power button until the Startup Options screen appears.
- Select the USB drive that contains the macOS Mojave installer from the list of available bootable volumes.
- Click Continue to boot from the USB drive.
- The macOS Mojave installer will open. Follow the on-screen instructions to install or upgrade macOS Mojave.
Note: If your Mac was previously running a newer version of the system, make sure to back up your data to avoid potential issues during the installation process. Additionally, if you encounter problems, check your Mac's firmware and security settings to ensure a smooth installation.
Share this article with more people if you think it useful!