After your Mac starts up, you may encounter a prompt asking you to enter a password to unlock a volume or partition, such as:
- Enter a password to unlock the disk "Macintosh HD".
- Enter a password to unlock the disk "Macintosh HD - Data".
While you can click the Cancel button to temporarily bypass the message, it will keep popping up every time you reboot your Mac. In this article, we'll dive into the reasons why you may need to enter a password to unlock a disk, and how to remove "Enter a password to unlock the disk "Macintosh HD" or "Macintosh HD - Data."
Why do you need to enter a password to unlock the disk Macintosh HD (Data)?
Normally, if a non-system volume or partition connected to your Mac is formatted with APFS (Encrypted) or encrypted with FileVault, it will trigger the message "Enter a password to unlock the disk "disk_name" after your Mac boots to the desktop.
That being said, no message will pop up requiring you to unlock the system (Macintosh HD) or data (Macintosh HD - Data) volume of your Mac on a regular boot even if they are encrypted.
However, if you receive either "Enter a password to unlock the disk "Macintosh HD" or "Enter a password to unlock the disk "Macintosh HD - Data," it typically means that your Mac was previously owned by another person and it's not or improperly erased, your Mac is connected to another Mac as an external hard drive or your Mac's security chip is having different signatures than what's expected by the firmware.
You may find yourself falling into one of the following scenarios when seeing the notification:
- You used the same account as the previous owner to log into Mac except for changing the name and iCloud.
- The second-hand Mac was erased without deleting the Macintosh HD - Data volume of the previous owner.
- You are the only owner of your T2 Mac but your password isn't working, having trouble starting up your Mac.
- You are trying to access an internal hard drive that was externally connected to your Mac.
- The notification suddenly appears after you updated your Mac.
- You are accessing one Mac through another Mac via Target Disk Mode.
Regardless, you can disable the notification with the fixes explained in the next section.
Share the information with more people!
How to remove 'Enter a password to unlock the disk 'Macintosh HD' or 'Macintosh HD - Data'?
The password that's needed to unlock "Macintosh HD" or "Macintosh HD - Data" is your admin password or account login password.
If you own the Mac or know the password of the previous user, you can enter it and check the box next to "Remember this password in my keychain" to unlock the disk and prevent the "Enter a password to unlock the disk" message from showing up again.
If the password doesn't work, try disabling FileVault if you have it enabled. Suppose you still can't disable the "Enter a password to unlock the disk" alert, continue with the following solutions.
Delete the Macintosh HD - Data volume
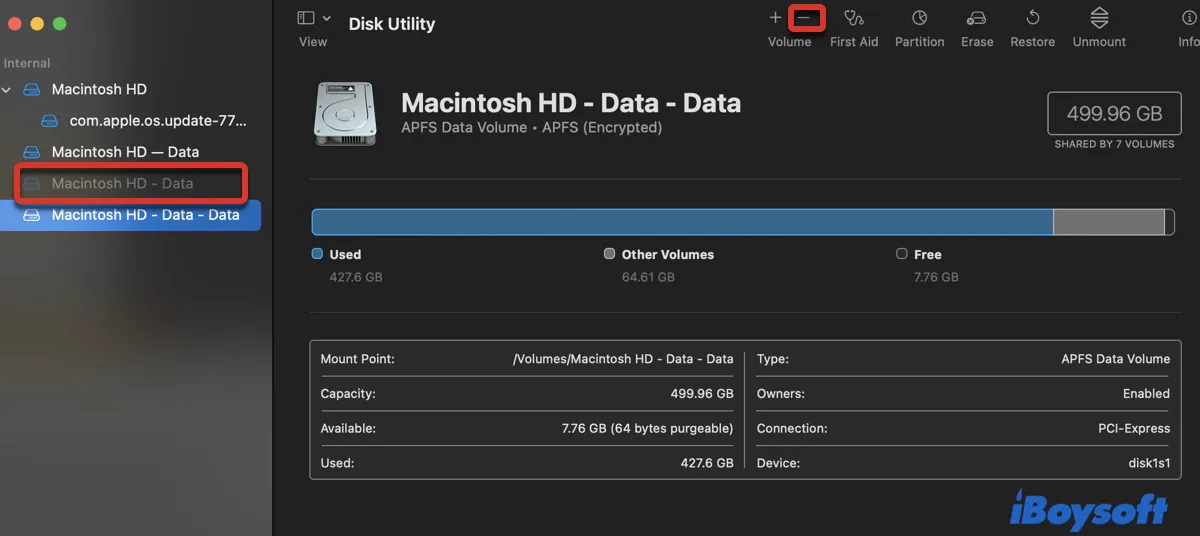
If you received "Enter a password to unlock the disk ”Macintosh HD - Data" on a used Mac, you should take a look at Disk Utility to see if the startup disk is properly erased. Chances are that it's not and there's one Macintosh HD - Data volume that was set up by the previous user and one newly created Macintosh HD - Data - Data volume that belongs to your account.
In this case, you can delete the unnecessary Macintosh HD - Data volume to remove the message.
- Open Finder, then launch Disk Utility from the Applications/Utilities folder.
- Select the grayed Macintosh HD - Data volume.

- Click the delete button ( - ) above Volume.
- Click Delete the confirm the action.
Reset the NVRAM
If your Mac keeps asking for a password despite you having input the correct information, you can reset the NVRAM (nonvolatile random-access memory) to eliminate the notification. By clearing the corrupt NVRAM, you should be able to use your Mac as usual.
How to reset the NVRAM on Intel-based Macs:
- Shut down your mac.
- Hit the power button, then immediately press and hold the Command + Option + P + R keys.
- Release the keys after about 20 seconds, during which you may hear the startup sound or see the Apple logo twice.
Reset Password in Recovery Mode
If the issue persists, you can reset your password in Recovery Mode. Here, we'll introduce two ways to do it. You can select the one that suits your needs.
First, you need to enter macOS Recovery by following the appropriate steps below.
On an Intel-based Mac: Shut down your Mac, then press the power button and immediately press and hold Command + R keys until seeing the Apple logo.
On an Apple Silicon Mac: Turn off your Mac, then press and hold the power button until seeing "Loading startup options" and select Options > Continue.
Then you may need to select an account and enter the administrator password. Choose one of the two ways below to reset your password, depending on whether you can enter macOS Recovery.
If you're able to access the Utilities window where the Terminal app resides, use the following steps:
- Select Utilities > Terminal from the menu bar.
- Type the following command and press Enter.resetpassword
- Type your new password, give it a hint, and click Next.
- Click Restart.
If you can't enter macOS Recovery, you need to click "Forget all passwords?", then use your Apple ID credentials or the FileVault Recovery key to create a new password.
Erase the startup disk and reinstall macOS
Another way that can disable "Enter a password to unlock the disk" no matter if it's Macintosh HD or Macintosh HD - Data is to properly erase your Mac and reinstall the operating system. This will delete all data on your Mac, so you should back up your Mac with Time Machine or other means beforehand to avoid data loss.
How to remove "Enter a password to unlock the disk " Macintosh HD" or Macintosh HD - Data":
- Boot into macOS Recovery.
On an Intel-based Mac: Shut down your Mac, then press the power button and immediately press and hold Command + R keys until seeing the Apple logo.
On an Apple Silicon Mac: Turn off your Mac, then press and hold the power button until seeing "Loading startup options" and select Options > Continue. - Select the administrator account and enter its password. (If you don't have the admin password or the password fails to work, use "Recovery Assistant" described below.)
- Select Disk Utility and Countine from the macOS Utilities window.
- Click View > Show All Devices.
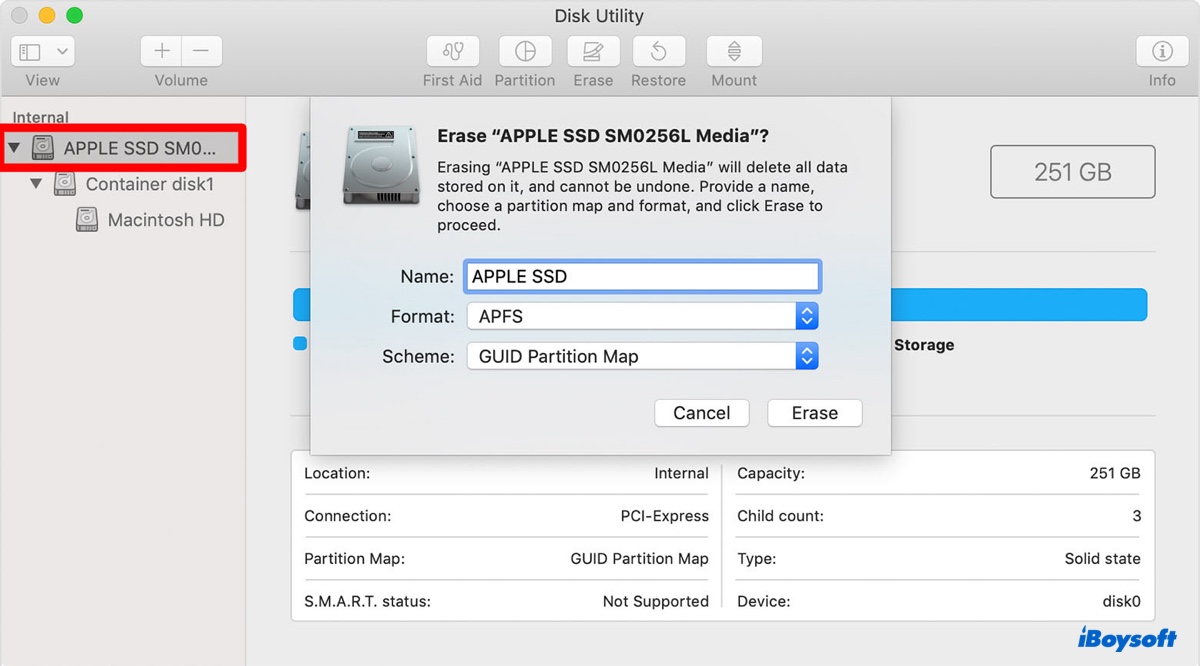
- Select your startup disk (Apple SSD) rather than the Macintosh HD volume.

- Click the Erase button.
- Name your internal hard drive.
- Set format to APFS and scheme to GUID Partition Map.
- Click Erase again.
- Exit Disk Utility and click "Reinstall macOS (version).
- Follow the onscreen instructions to reinstall macOS.
If you can't access Recovery Mode, take the following steps instead.
How to unlock encrypted Mac hard drive without password:
- Click "Recovery Assistant" in the top left of the window.
- Select "Erase Mac" and confirm it.
- Once your Mac is erased, restart your Mac into Recovery Mode and reinstall macOS.
Tips: If you get "Enter a password to unlock the disk" when using an external hard drive or flash drive, you can either input the password and enable "Remember this password in my keychain" to bypass the notification or reformat the drive with a file system that doesn't have encryption.
Click the button below to help others disable the "Enter a password to unlock the disk" notification.