
Like your iPhone, iPad, or even your Apple Watch, Mac's display would turn off automatically if it detects no operations made on it after a certain amount of time. By doing so, the device can save its battery life so you can get the most out of it.
Although the intention of this behavior is good, it can be annoying sometimes. Does the display of your MacBook go to sleep when you leave if for just a few minutes? Are you tired of typing your admin password to unlock your Mac again and again? Don't fret! We are here to help.
In this article, we will tell you how to change screen timeout on Mac with a step-by-step guide, so that you can be free of the said annoying situation. Also, if you want to know how to completely turn off the screen timeout on your Mac, you can find the answer here. Read on for more!
Why should I change screen timeout on Mac?
When your Mac is not charged, the default screen timeout on it is 2 minutes. When the device is connected to power, it would be 10 minutes. No matter whether 2 minutes or 10 minutes, our needs can never be measured by the time interval.
Let's say you are giving a presentation to your clients, in this case, 10 minutes is just a blink of an eye. Try to imagine how awkward it is when you are giving your speech, your Mac device goes to sleep. So, to meet specific needs, we can change screen timeout on Mac to free us from various annoying and embarrassing situations. Fortunately, you can do it easily with the how to change screen timeout on MacBook guide in this post.
How do I change the inactivate timeout on Mac?
Since macOS Big Sur, Apple has replaced the Energy Saver with Battery in System Preferences. For Macs running the earlier operating systems (before Big Sur), you can change the screen timeout in Energy Saver. But for Macs running macOS Big Sur or later versions, like macOS Monterey or macOS 13 Ventura, you can change it in Battery.
In addition, despite increasing or reducing the screen timeout on Mac, you can either completely turn it off, thus letting your Mac stay on forever unless it is running out of battery, or change the Screen Saver timeout on your device. Without further ado, let's see how to adjust screen timeout on Mac in detail.
Like this post? Share it with your friends now!
How to change screen timeout on Mac?
Change screen timeout on Mac
Here's how to change screen timeout on Mac:
- Make sure your Mac runs macOS Big Sur or later macOS versions.
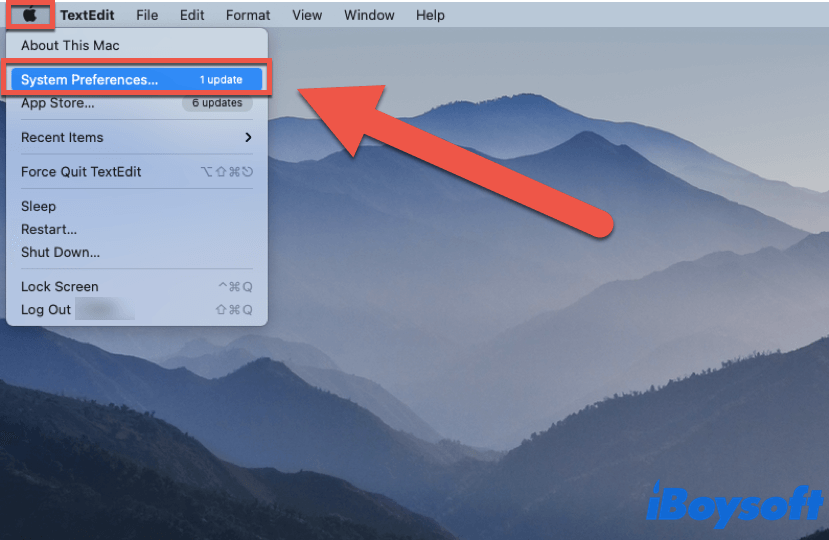
- Click the Apple icon in the Apple menu at the top-left corner of your screen, and select System Preferences.
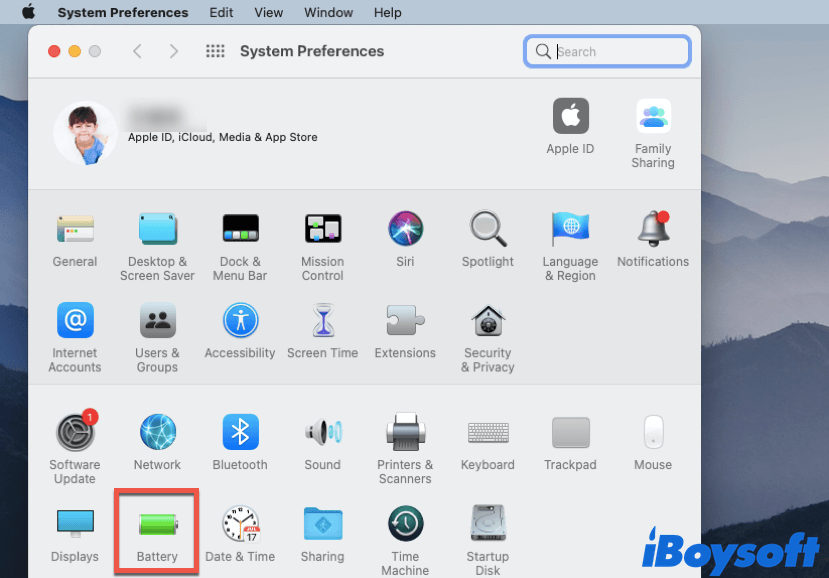
- In the System Preferences window, click on Battery, then click Battery in the left column.
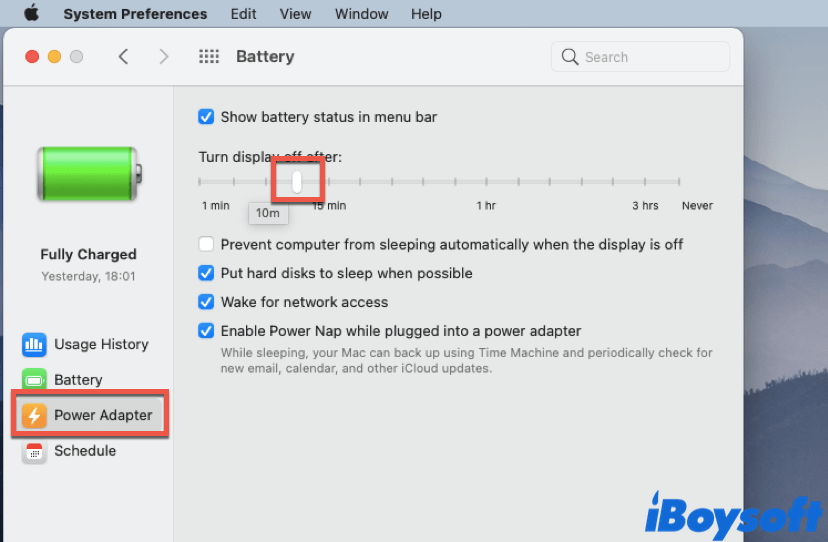
- Drag the "Turn display off after" slider to your preferred duration.

Now, your Mac's display will turn off after the time duration you just set. This guide changes the screen timeout when your Mac is not connected to a power source. If you want to know how to change it when your Mac is plugged into a power adapter, move on.
Change screen timeout when Mac plugged into a power adapter
- Go to System Preferences > Battery.
- Select the Battery tab in the left panel.
- Select the Power Adapter tab this time in the left column.
- Drag the "Turn display off after" slider, and place it to a preferred time duration.
Now, when your Mac is plugged in, its display would turn off after the time duration you just set.
Disable screen timeout on Mac
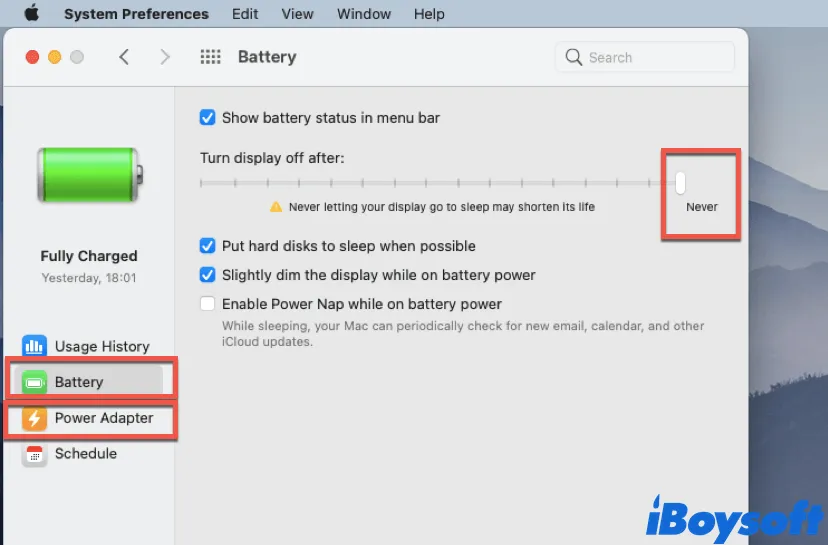
You may wonder if there's a way to make your Mac's display always stay on by setting the screen timeout Mac. The answer is yes. You can do so by following these steps. But do note that if your Mac stays active all the time, the battery drain will be fast, connect it to a power source if necessary.
- Go to System Preferences in the Apple menu, and click Battery.
- Click Battery on the left, and drag the "Turn display off after" slider to the Never position.
- Click Power Adapter, and drag the slider to the Never position again.
Think this article is quite helpful? Share it on social media!
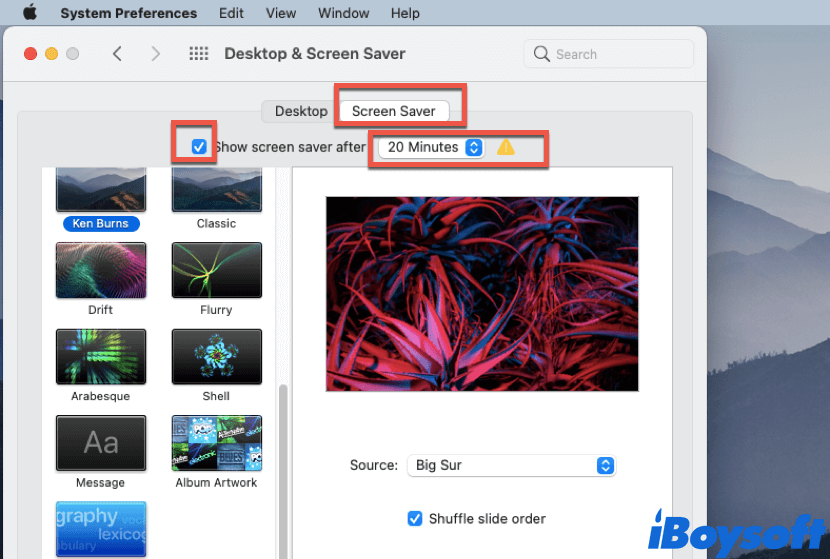
How to change Screen Saver timeout on Mac?
Apart from how to change screen timeout on Mac, this article tells you the way to adjust Screen Saver timeout. If you've set it before, the screen saver appears on your Mac screen after a certain amount of time, instead of turning off directly. Here's how to modify the Screen Saver timeout on Mac:
- Go to the Apple menu and open System Preferences.
- Click Desktop & Screen Saver, then click the Screen Saver tab on the top.
- Make sure the Show screen saver after the checkbox is ticked.
- Click on the drop-down box next to Show screen saver after, and select a preferred time interval.
Conclusion
In this article, we talk about the screen timeout on Mac, and tell you how to change screen timeout on Mac. With the proper settings, you can be left undisturbed when you are working with your computer. Hope this guide can help.

[Solved] Mac/MacBook Won't Wake Up From Sleep on macOS 12/11
This post fixes the Mac/MacBook that won't wake up with verified solutions. Fix MacBook running macOS Monterey/ Big Sur that won't wake up from sleep. Read more >>
FAQ about how to change screen timeout on Mac
- QHow do I get my screen to stay on longer on Mac?
-
A
To get your screen to stay on longer on Mac, you can change the screen timeout on your Mac computer in the Battery in System Preferences. You can also make your screen always stay on in there.
- QWhy does my Mac go to sleep so fast?
-
A
When your Mac is not charged, the default screen timeout on it is 2 minutes. When the device is connected to power, it would be 10 minutes. This is because macOS is designed for maximum power efficiency. As a result, when you stop using your Mac after a certain amount of time, it will go to sleep automatically.
- QHow do I keep my Mac screen from going black?
-
A
To keep your Mac screen from going black, you can go to System Preferences, click Battery, and click the Battery tab on the left column, then drag the slider to the Never position.