Updates: macOS Tahoe was released on September 15, 2025. To download the ISO file for the public version, follow this article instead: macOS Tahoe ISO File Download.
To understand macOS Tahoe better, read macOS Tahoe bugs and issues.
If you have any issues when downloading or updating to macOS Tahoe, follow these feasible solutions:
If you're a developer, an IT expert, a tech enthusiast, or someone who's eager to test out the upcoming major release, macOS 26 Tahoe, you'll need a risk-free environment to experience it.
This is where virtual machines like VMware or VirtualBox come in. They allow you to install macOS Tahoe beta on Windows, Linux, or Mac computers without partitioning the internal hard drive. (Want to install macOS Tahoe Public version on Windows? Read: How to install macOS Tahoe on a Windows PC)
To run macOS Tahoe beta on a virtual machine, it's essential to download the macOS Tahoe beta ISO file. (Need other formats of macOS Tahoe installers? Follow: macOS Tahoe download center)
Note: The safest way to get the macOS Tahoe ISO file is with the help of iBoysoft DiskGeeker for Mac. It has a library of bootable DMG files, including macOS Tahoe, which you can use to convert into a bootable ISO file with the following steps:
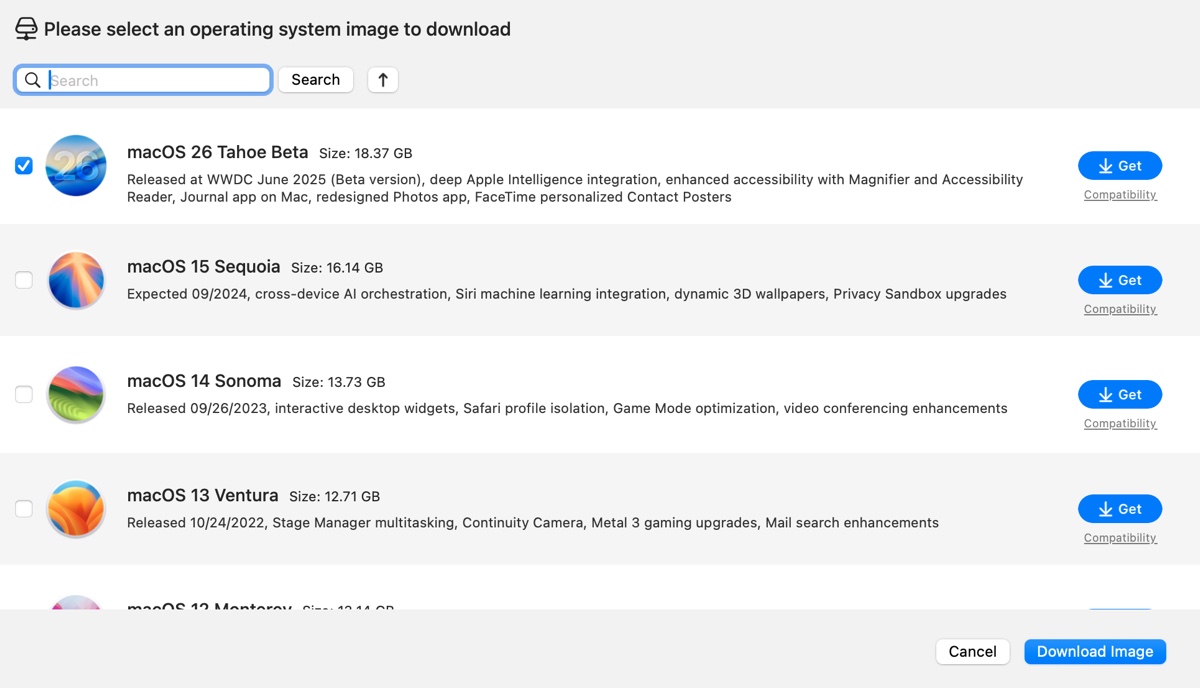
Step 1: Free download and install iBoysoft DiskGeeker.
Step 2: Click Download Image from the Shortcut section.

Step 3: Select macOS 26 Tahoe Beta and click Get.

Step 4: After the macOS Tahoe beta DMG file is downloaded, launch Terminal.
Step 5: Execute the command below to convert the macOS Tahoe DMG file to a CDR file.hdiutil convert dmg_file_path -format UDTO -o ~/Desktop/Tahoe.cdr
To get the path of the DMG file, simply drag and drop it to Terminal.
Step 6: Rename the Tahoe.cdr file to a Tahoe.dmg file.mv ~/Desktop/Tahoe.cdr ~/Desktop/Tahoe.iso
What's a macOS Tahoe beta ISO file?
A macOS Tahoe ISO file (.iso) is a disk image file used to install macOS Tahoe on virtual machines, such as VMware or VirtualBox. Once it's installed, it allows you to run macOS Tahoe alongside your main operating system, no matter whether it's Windows, Linux, or macOS.
It's especially useful for people who need to test, develop, or run macOS Tahoe in an isolated environment without changing their actual computer.
How to download macOS Tahoe 26 beta ISO directly?
If you prefer to download macOS Tahoe ISO file directly, click the proper links below. These resources are created for VMware and VirtualBox.
Share the links for macOS Tahoe ISO free download with others!
How to create macOS Tahoe beta ISO file manually?
If you want to create the macOS Tahoe ISO file manually, iBoysoft DiskGeeker can greatly save your time, as it provides the DMG file.
However, if you prefer to start from scratch, you can take the following steps:
Prerequisites: Have more than 25 GB of free space on your Mac that's logged in as an administrator and can access Terminal.
Step 1: Download the macOS Tahoe beta installer
Click the link below to download the latest macOS Tahoe full installer. Double-click the InstallAssistant.pkg file, then follow the instructions on the screen to add the "install macOS Tahoe beta.app" to your Applications folder.
Download macOS Tahoe installer
Step 2: Create an empty disk image for macOS Tahoe beta
In Terminal, execute the command below to create a 20 GB disk image named "Tahoe" in the /tmp directory, with a single unformatted partition and formatted using the HFS+ file system with journaling.
hdiutil create -o /tmp/Tahoe -size 20000m -volname Tahoe -layout SPUD -fs HFS+J
Command breakdown:
hdiutil: This is a command-line utility in macOS used for creating, manipulating, and converting disk images.
create: This subcommand tells hdiutil that you want to create a new disk image.
-o /tmp/Tahoe: -o specifies the output file path for the disk image. /tmp/Tahoe is the location where the disk image will be saved. The /tmp directory is typically used for temporary files.
-size 20000m: This option sets the size of the disk image. 20000m indicates that the size of the disk image will be 20,000 megabytes (or approximately 20 GB).
-volname Tahoe: This option sets the volume name of the disk image. Tahoe is the name that will appear when the disk image is mounted.
-layout SPUD: This option specifies the partition layout for the disk image. SPUD stands for "Single Partition, Unformatted Disk," which is a layout suitable for most uses.
-fs HFS+J: This option sets the file system for the disk image. HFS+J refers to the HFS Plus file system with journaling enabled, which is commonly used in macOS for its robustness and performance.
Step 3: Create a bootable macOS Tahoe beta installer
Execute the command below to create a bootable installer for macOS Tahoe beta on the volume named "Tahoe."
sudo /Applications/Install\ macOS\ Tahoe\ beta.app/Contents/Resources/createinstallmedia --volume /Volumes/Tahoe
It'll ask for your login password. When required, type it in and hit Enter.
Command breakdown:
sudo: This command runs the following command with superuser (administrator) privileges.
/Applications/Install\ macOS\ Tahoe\ beta.app/Contents/Resources/createinstallmedia: This is the path to the createinstallmedia utility within the macOS installer application for "macOS Tahoe beta." The backslashes (\) are used to escape spaces in the file path, allowing the command line to interpret it correctly.
--volume /Volumes/Tahoe: This option specifies the target volume where the bootable installer will be created. /Volumes/Tahoe refers to the mounted disk image (or external drive) named "Tahoe" that was created in your previous command.
Step 4: Unmount the macOS Tahoe volume
Run the following command to unmount the disk image or volume named "Install macOS Tahoe beta" from the /Volumes directory in macOS.
sudo hdiutil detach /Volumes/Install\ macOS\ Tahoe\ beta
Step 5: Convert the DMG file to CDR format
With the bootable DMG file in hand, you can then convert it into an ISO file in the CDR format with the following command:
sudo hdiutil convert /tmp/Tahoe.dmg -format UDTO -o ~/Desktop/Tahoe.cdr
Command breakdown:
sudo: This prefix stands for "superuser do" and is used to execute a command with elevated privileges.
hdiutil: This is a command-line utility in macOS used for managing disk images. It can create, convert, attach, detach, and manipulate disk images and their associated properties.
convert: This subcommand of hdiutil indicates that the command is intended to change the format of a specified disk image.
/tmp/Tahoe.dmg: This is the input file, which is a disk image in the DMG (Disk Image) format, located in the temporary directory (/tmp). The name Tahoe.dmg suggests that it is related to the macOS Tahoe version being discussed.
-format UDTO: This flag specifies the desired output format of the disk image. UDTO stands for "Universal Disk Image in CDR format." This format is often used for creating disk images that can be burned to CDs or DVDs.
-o: This option specifies the output destination of the converted file.
~/Desktop/Tahoe.cdr: This is the output file path and name where the converted image will be saved. The ~ symbol represents the current user's home directory, and by appending /Desktop/Tahoe.cdr, the command saves the file on the user's desktop with the name Tahoe.cdr.
Step 6: Rename .cdr to .iso
The final step is to rename the CDR extension to ISO.
mv ~/Desktop/Tahoe.cdr ~/Desktop/Tahoe.iso
Command breakdown:
mv: This is the command itself, short for "move." In Unix-like systems, mv is used to move files or directories from one location to another. If the destination file name is different from the source, mv also renames the file.
~/Desktop/Tahoe.cdr: This is the source file that we want to move or rename. The tilde (~) symbol represents the home directory of the current user. Within the user's home directory, the path specifies that the file Tahoe.cdr is located on the Desktop. The .cdr extension indicates that this is a Corel Draw image file or a disk image file format used by Apple's Disk Utility.
~/Desktop/Tahoe.iso: This is the destination file name. The command is moving Tahoe.cdr from the Desktop to the same location (the Desktop) but renaming it to Tahoe.iso. The .iso extension indicates that this file will now be recognized as an ISO (International Organization for Standardization) disk image, which is a widely used format for disk images.
Share the steps to create macOS 26 Tahoe beta ISO file!
FAQs about macOS Tahoe beta ISO file
- QHow to download macOS Tahoe full installer?
-
A
You can download the macOS Tahoe full installer from Apple's server.
- QHow to get macOS Tahoe update?
-
A
In the beta period, you can get macOS Tahoe from System Settings/Preferences. If you're running macOS Ventura or later, open System Settings > General > Software Update, then choose macOS Tahoe 26 Developer Beta next to Beta Updates.