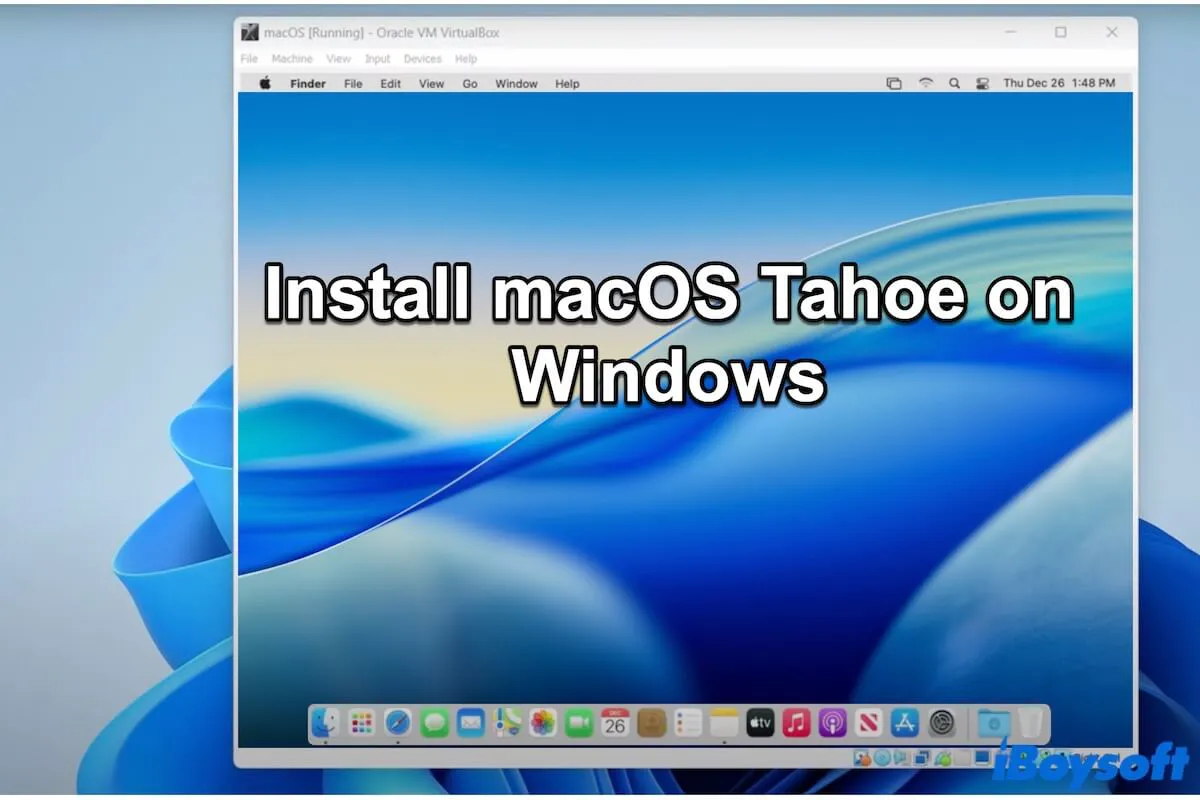
You want to explore the latest macOS Tahoe but are frustrated by having only a Windows computer. However, with the assistance of virtual machine software like VirtualBox or VMware, you can install macOS Tahoe on a Windows PC.
Here, we'll show you the simplest method to install macOS Tahoe on your Windows computer - using VirtualBox. Just follow our clear, step-by-step instructions to set it up, and you'll run macOS Tahoe on your Windows laptop in no time!
How to install macOS Tahoe on a Windows computer with VirtualBox
There are only 7 steps to install macOS Tahoe on your Windows PC with VirtualBox. Let's dive into each step carefully.
Step 1. Complete the necessary preparations
The following are necessary for a successful macOS Tahoe installation on your PC. Don't miss any of them.
Check and ensure your PC meets these basic requirements
- RAM: Minimum 4 GB. Since virtual machines are memory-intensive, 8 GB or more is recommended for better performance.
- Storage: At least 80 GB of free disk space. Extra space helps macOS Tahoe run more smoothly.
- CPU: Minimum 2 cores. Allocating more cores will significantly improve speed and responsiveness.
- System settings:
- Ensure Virtualization is enabled:
Right-click on the Task Bar, choose Task Manager > Performance > CPU, and you'll see the Virtualization status here.
- Disable Memory Integrity and Hyper-V:
Search for "Core Isolation" in the search box and turn Memory Integrity off.
Open Command Prompt and run it as an administrator.
Enter the command below: bcdedit /set hypervisorlaunchtype off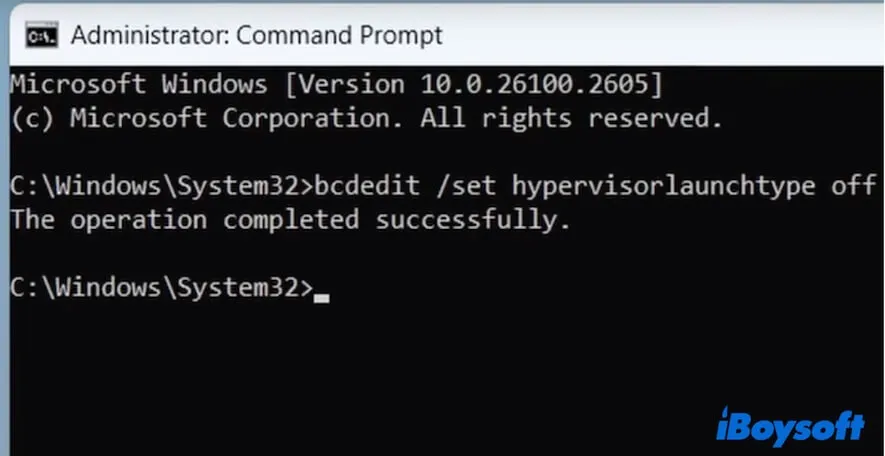
4. Restart your PC to apply all the changes.
Free up more space on your computer
Installing macOS Tahoe on your PC requires downloading the ISO file, installing VirtualBox, and completing some setup steps. Since the process uses a lot of storage, insufficient disk space can cause the installation to fail.
To avoid issues, clear out unnecessary or junk files to free up disk space. The more available storage your PC has, the higher the chances of a smooth installation and stable performance.
Cleaning up a computer that's full of files is a hard and time-consuming job. You can use the system cleanup feature of iBoysoft DiskGeeker for Windows to help you. It can automatically scan the unnecessary files on your PC for one-click deletion.
Here's how:
- Download, install, and open iBoysoft DiskGeeker for Windows on your computer.
This tool will immediately search for junk files in the system. - Browse the scanning results and choose the junk files you want to delete.
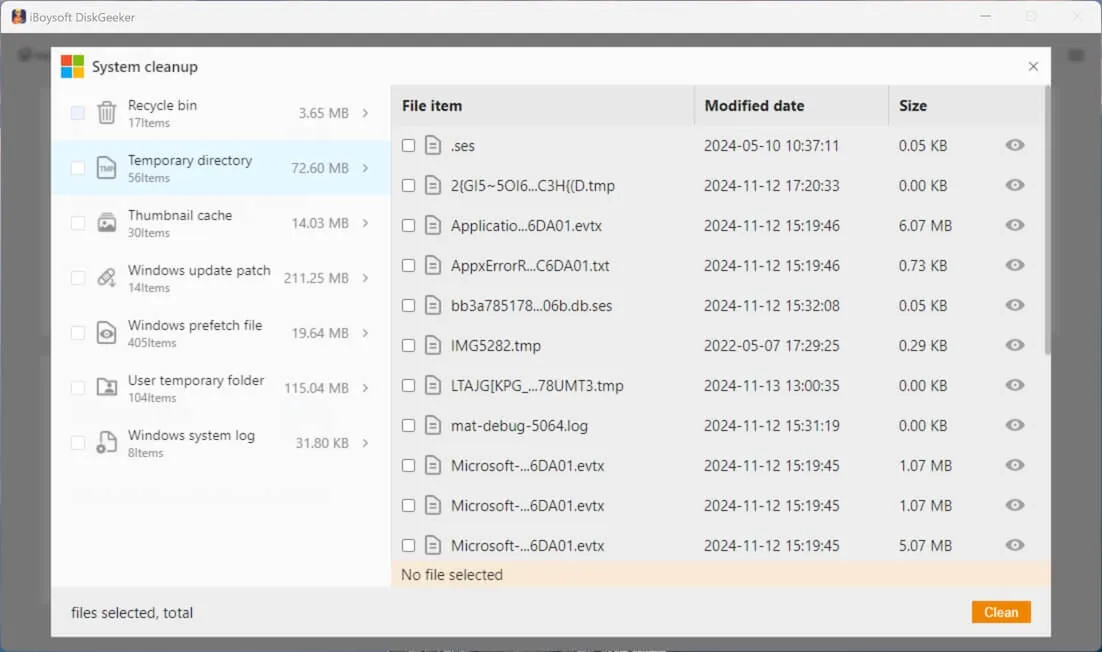
- Click "Clean" to directly delete them from your PC.
Share this easy-to-operate system junk file cleaner for Windows with others.
Step 2. Download the macOS Tahoe ISO file
The macOS Tahoe ISO file is a disk image that contains the macOS Tahoe installer in a virtual machine–friendly format, making it easy to install macOS Tahoe on VirtualBox on Windows without a physical Mac or USB.
⬇️ Download macOS Tahoe ISO (Size: 19. 53 GB)
Step 3. Download and install VirtualBox and its extension pack
Notably, VirtualBox supports these Windows versions. Ensure your Windows computer supports it.
- Windows 11
- Windows 10
- Windows Server 2019
- Windows Server 2022
How to download and install Oracle VM VirtualBox on your PC:
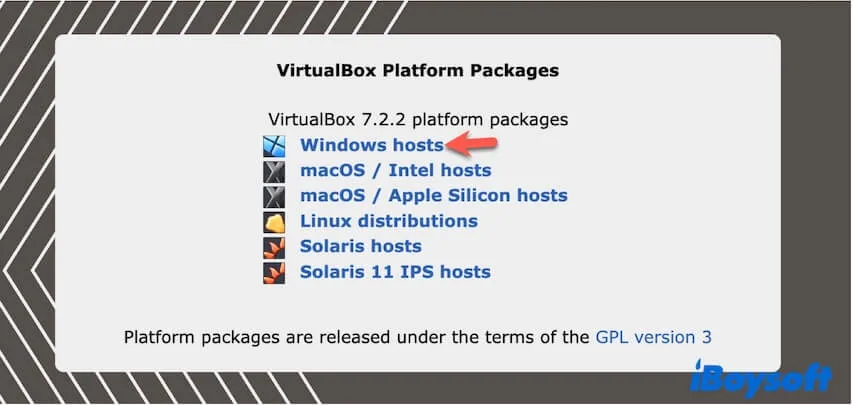
- Access the VirtualBox downloads page.
- Click "Windows hosts" to download the VirtualBox Platform Package for Windows.
- Right-click the .exe file and select "Open."
- Follow the on-screen steps to install VirtualBox on your PC.
How to download and install the extension pack onto VirtualBox:
The VirtualBox Extension Pack is used to enhance the capabilities of VirtualBox. It adds advanced features to the base VirtualBox installation, such as USB 2.0/3.0 support, VRDP, webcam passthrough, AES disk encryption, PXE boot ROM, and cloud integration, making VirtualBox more powerful and versatile.
- Open the VirtualBox downloads page.
- In the VirtualBox Extension Pack section, read the license and click "Accept and download" to download it.
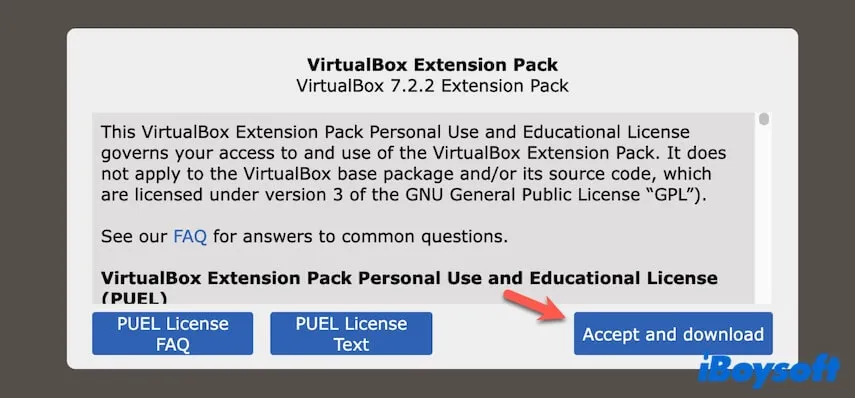
- Follow the on-screen guide to install the extension pack in VirtualBox.
Step 4. Create a virtual machine for macOS Tahoe
After you've downloaded the macOS Tahoe ISO and installed VirtualBox, you can get down to creating a virtual machine (VM) for macOS Tahoe.
Here are the steps to create a macOS Tahoe virtual machine with VirtualBox:
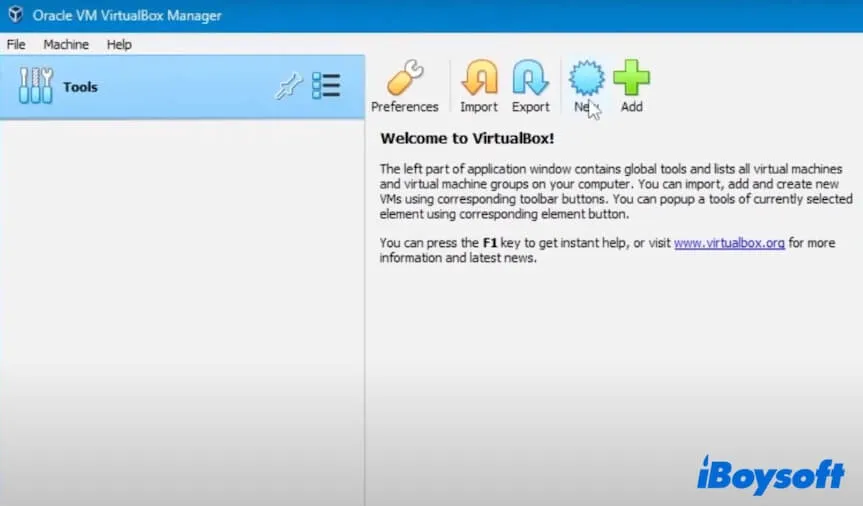
- Open VirtualBox on your computer.
- Click on "New" on the toolbar.
- Type a name for the virtual machine, like macOS 26.
- Keep the default location for the virtual machine in the Folder field or change it.
- Click the ISO Image drop-down menu and select "Other" to select the macOS Tahoe ISO file from your PC.
- Keep the Type field as "Mac OS X" and the Version field as "Mac OS X (64-bit)."
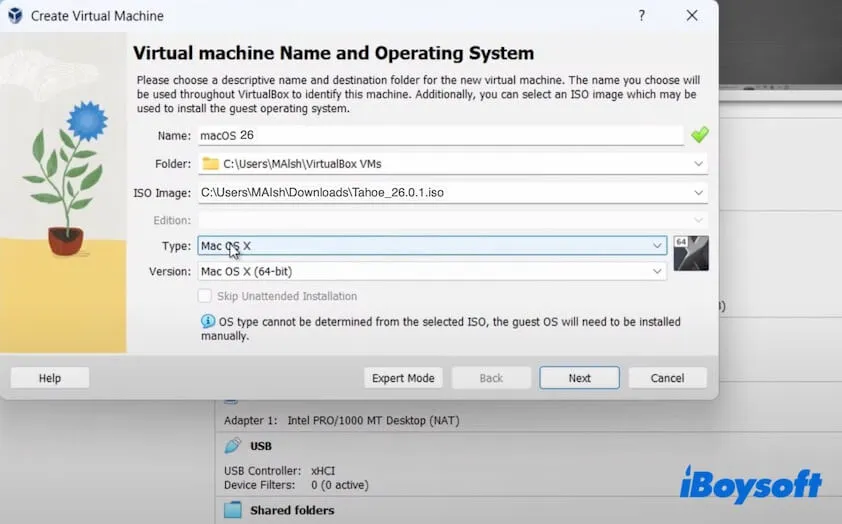
- Click "Next."
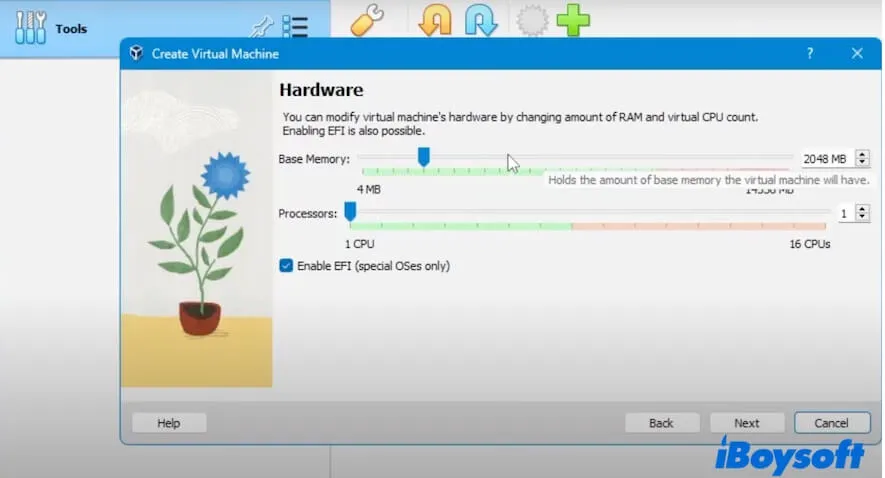
- In the Base Memory section, move the slider to the far end of the green field.
Notably, please do not move it to the red area, as it represents the basic memory required for running Windows. - Configure the processors to at least 2 CPUs.
Likewise, do not move the slider to the red area, which represents the processors that the current Windows should use. - Check "Enable EFI (special OSes only).
- Click "Next."
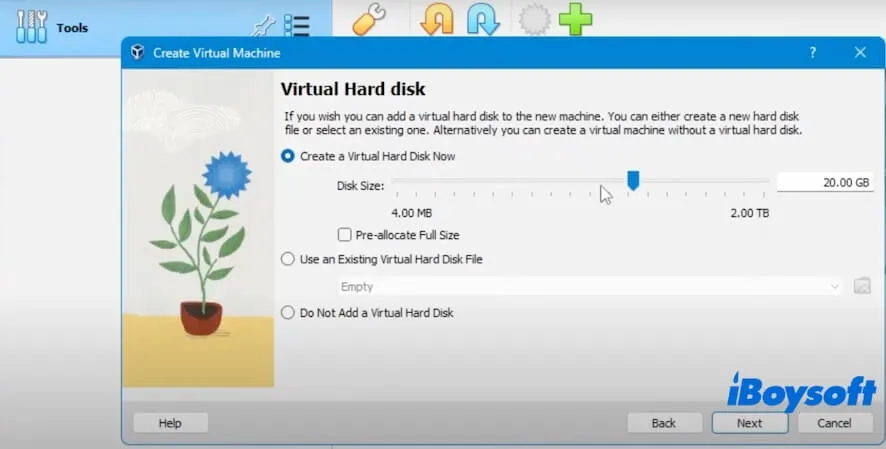
- Tick "Create a Virtual Disk Now".
- In the Disk Size field, move the slider to 80GB or higher.
A bigger virtual disk size generally leads to better and smoother performance for your macOS Tahoe VM. - Click "Next."
- Please wait for a moment to allow the process to complete.
Step 5. Customize the settings for the macOS Tahoe virtual machine
It's essential to adjust a few key VirtualBox settings. Proper configuration ensures the macOS Tahoe virtual machine installs smoothly on VirtualBox and operates reliably on your Windows computer afterward.
- Open VirtualBox, select the macOS Tahoe virtual machine you've just created from the sidebar, and click "Settings" (or "Preferences").
- Select "System." In this field, you should:
- Move the slider of Base Memory to the far end of the green area.
- Ensure only "Optical" and "Hard Disk" are checked in Boot Order.
- Ensure these three options of Extended Features are checked: "Enable I/O APIC", "Enable Hardware Clock in UTC Time", and "Enable EFI (special OSes only)"
- Click "OK."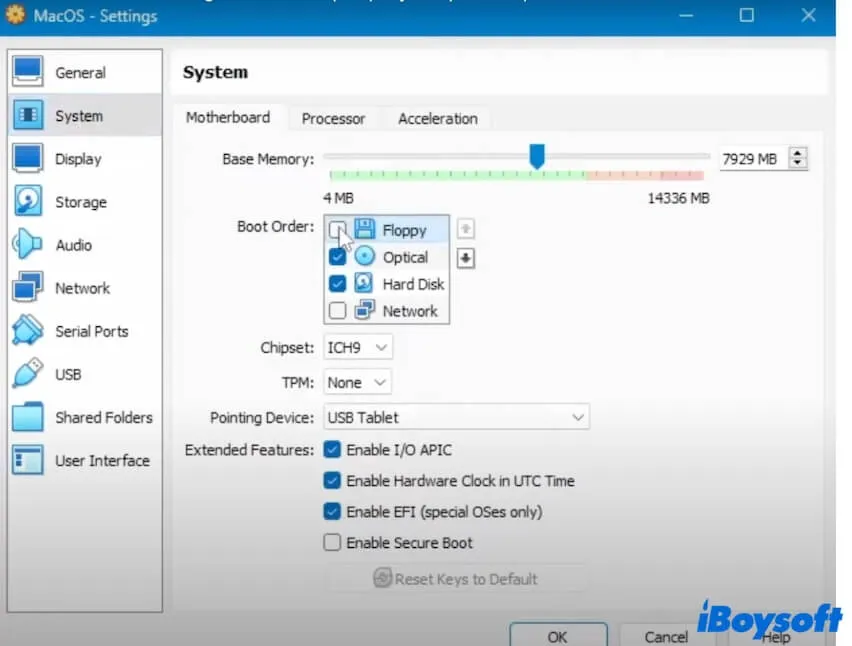
- Click on "Display" on the sidebar.
- For Video Memory, drag the slider to the maximum size - 128 MB.
- For Extended Features, check "Enable 3D Acceleration."
Click "OK."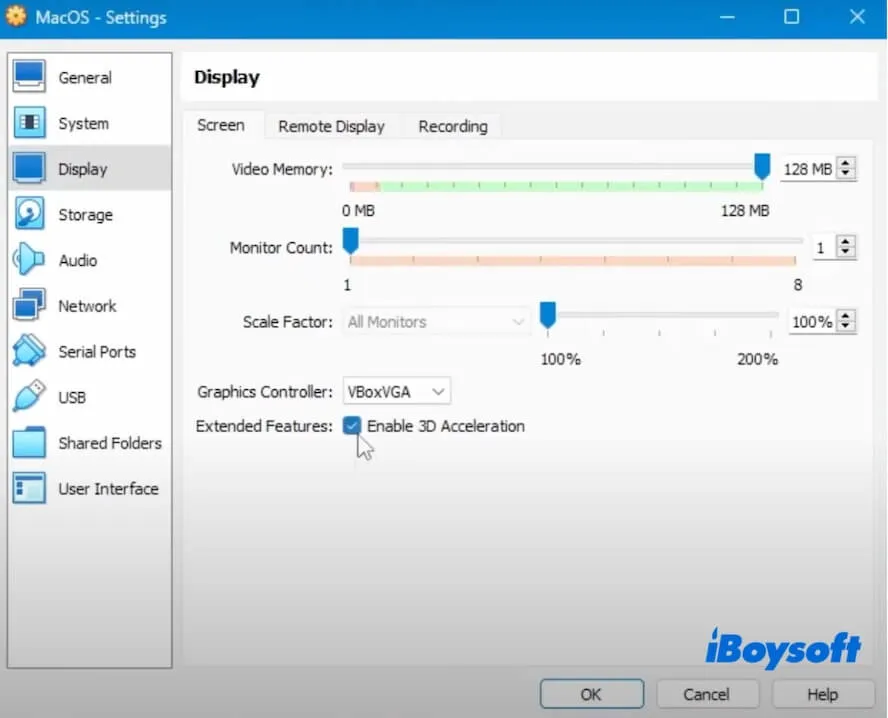
- Select "Network" on the sidebar.
- Under Adapter 1, check "Enable Network Adapter."
- Under Adapter 2, choose "Bridged Adapter" from the drop-down menu
- Click "OK."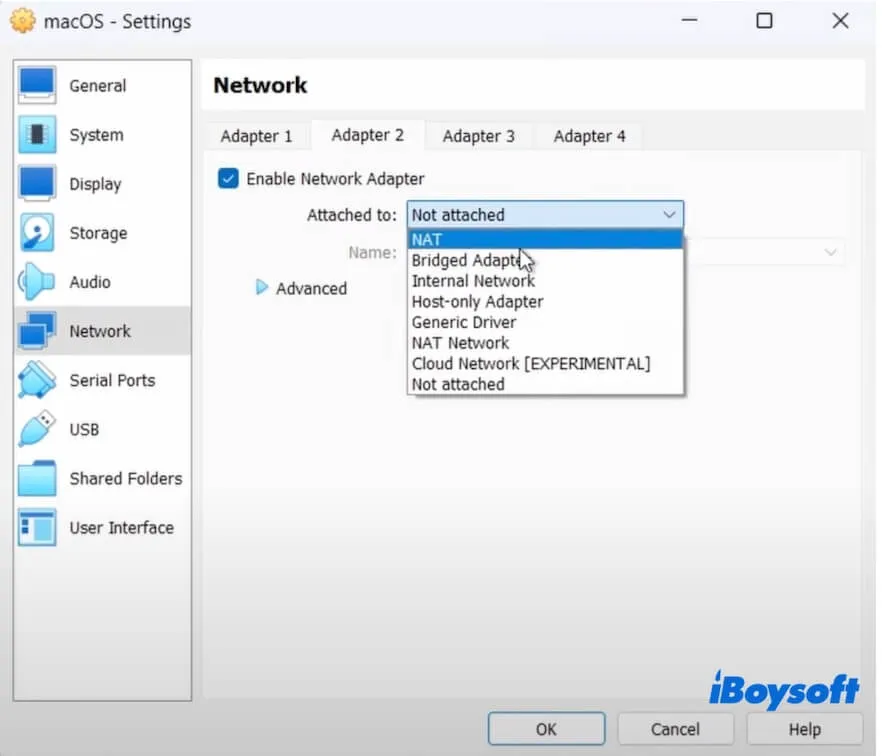
- Click on USB in the sidebar.
- Change to "USB 3.0 (xHCI) Controller" or another that you use.
- Click "OK."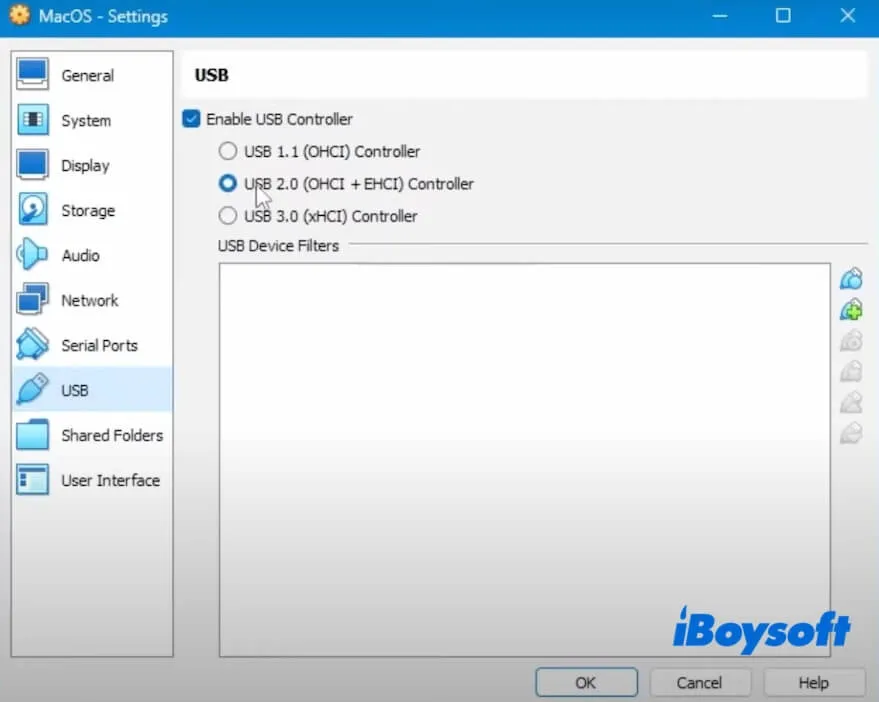
- Close VirtualBox.
Step 6. Run commands in the Command Prompt for installation readiness
To let VirtualBox fully support installing the macOS Tahoe virtual machine, you should run the specific command lines in CMD first. Running these commands can also help prevent common installation errors and ensure the virtual machine runs properly.
Since the required commands differ depending on your CPU, start by identifying your processor type. Go to Settings > System > About on your Windows PC to check it.
Then, follow these steps to run the corresponding command lines:
- Enter cmd in the Windows search bar on your PC.
- Select "Run as administrator" to open Command Prompt.

- Enter the commands below into the Command Prompt window.
Note:
You should replace macOS 26 with the name of your macOS 26 virtual machine. If yours is the same as mine (macOS 26), just keep it.
If you installed VirtualBox elsewhere, replace the path "C:\Program Files\Oracle\VirtualBox\" with your actual location.
For the AMD processor:
cd "C:\Program Files\Oracle\VirtualBox\"
VBoxManage.exe modifyvm "macOS 26" --cpuidset 00000001 000106e5 00100800 0098e3fd bfebfbff
VBoxManage setextradata "macOS 26" "VBoxInternal/Devices/efi/0/Config/DmiSystemProduct" "iMac19,3"
VBoxManage setextradata "macOS 26" "VBoxInternal/Devices/efi/0/Config/DmiSystemVersion" "1.0"
VBoxManage setextradata "macOS 26" "VBoxInternal/Devices/efi/0/Config/DmiBoardProduct" "Iloveapple"
VBoxManage setextradata "macOS 26" "VBoxInternal/Devices/smc/0/Config/DeviceKey" "ourhardworkbythesewordsguardedpleasedontsteal(c)AppleComputerInc"
VBoxManage setextradata "macOS 26" "VBoxInternal/Devices/smc/0/Config/GetKeyFromRealSMC" 0
VBoxManage modifyvm "macOS 26" --cpu-profile "Intel Core i7-6700K"
VBoxManage setextradata "macOS 26" "VBoxInternal/TM/TSCMode" "RealTSCOffset"For the Intel processor:
cd "C:\Program Files\Oracle\VirtualBox\"
VBoxManage.exe modifyvm "macOS 26" --cpuidset 00000001 000106e5 00100800 0098e3fd bfebfbff
VBoxManage setextradata "macOS 26" "VBoxInternal/Devices/efi/0/Config/DmiSystemProduct" "MacBookPro15,1"
VBoxManage setextradata "macOS 26" "VBoxInternal/Devices/efi/0/Config/DmiBoardProduct" "Mac-551B86E5744E2388"
VBoxManage setextradata "macOS 26" "VBoxInternal/Devices/smc/0/Config/DeviceKey" "ourhardworkbythesewordsguardedpleasedontsteal(c)AppleComputerInc"
VBoxManage setextradata "macOS 26" "VBoxInternal/Devices/smc/0/Config/GetKeyFromRealSMC" 1 - Press "Return."
- Close Command Prompt.
Step 7. Install macOS Tahoe on VirtualBox on the Windows computer
Now that everything is ready, let's move on to installing macOS Tahoe on VirtualBox on a Windows PC.
- Open VirtualBox.
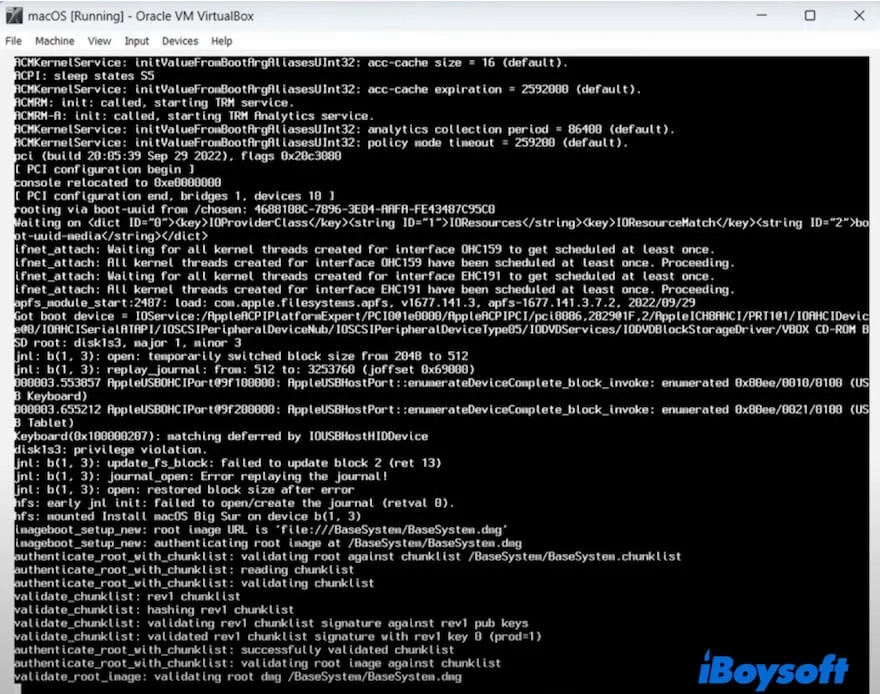
- Select the macOS Tahoe virtual machine you've just created from the sidebar and click "Start."

- Wait for the installation process to end.
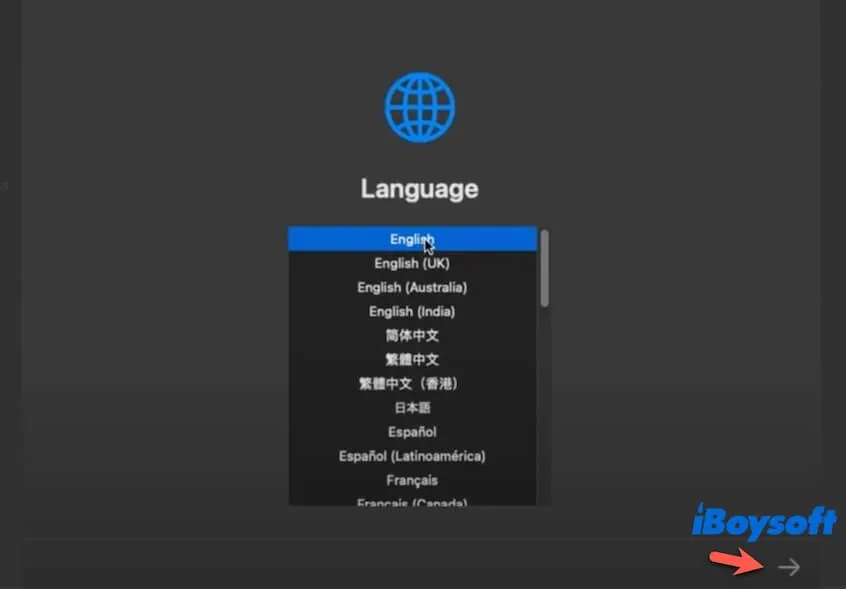
- Select your desired language, like English, and click "Next."
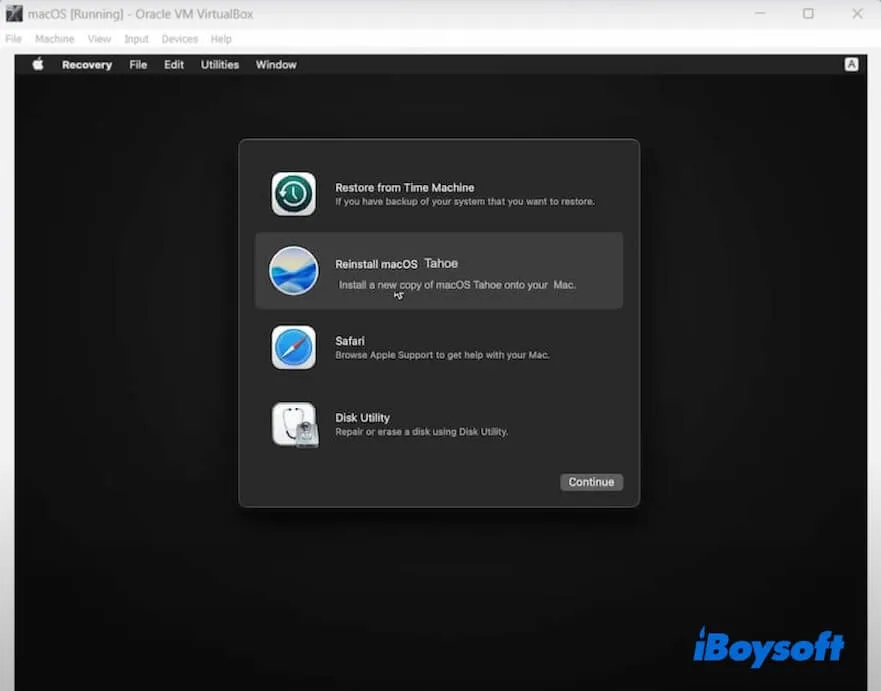
- Select "Disk Utility" on the screen.
- In the Disk Utility window, select the top-level VBOX HARDDISK Media on the sidebar, and click "Erase."
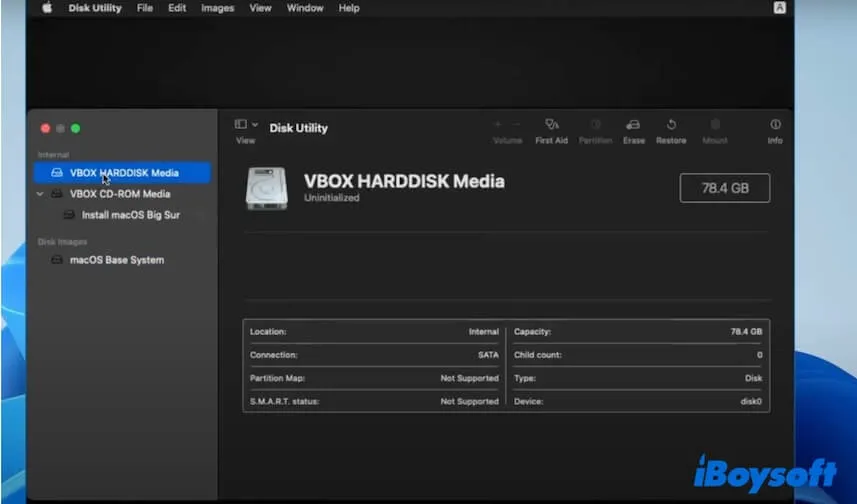
- Enter a name, choose APFS format, select "GUID Partition Map" scheme, and click "Erase."
- After the erasure process is done, click "Done."
- Click "Disk Utility" on the top menu bar and select "Quit Disk Utility."
- Select "Reinstall macOS Tahoe", click "Continue," and follow the on-screen instructions to install macOS Tahoe.
Tips: If you get stuck on any phase of installing macOS Tahoe on VirtualBox, a simple and quick fix is to quit VirtualBox, restart your computer, and then do this task from scratch.
Now, you have installed macOS Tahoe on VirtualBox on your Windows PC. You can set your preferences in macOS Tahoe and start running macOS Tahoe on your PC.
Conclusion
Although there are only 7 steps to install macOS Tahoe on a Windows PC with VirtualBox, it involves many precautions. Our step-by-step guide covers all the details you should pay attention to. Just take care of each of them.
By the way, running macOS Tahoe on a Windows 11, 10, 8.1, 8, or 7 computer will usually exhaust much memory and storage. We suggest you close unnecessary applications during the process and use a cleaning tool like iBoysoft DiskGeeker for Windows to keep deleting junk files on your computer to get more available space.
If you think that this post is a clear guide for installing macOS Tahoe on a Windows PC, share it with more people.
FAQs about installing macOS Tahoe on Windows
- QIs it possible to install macOS on a Windows PC?
-
A
Yes, you can install macOS on a Windows PC with virtual machine software like VirtualBox and VMware. Just download the macOS ISO, install the virtual machine tool on your PC, then use the veritual machine software to create a macOS virtual machine, set up the VirtualBox settings, run the specific command to let the later installation process smooth, and finally install macOS on VirtualBox so to reach the purpose of install and run macOS on a PC without affect on your current Windows.
- QIs it legal to install macOS on Windows?
-
A
Apple doesn't support users in installing macOS on Windows computers. It is illegal to do so according to Apple's license. Nevertheless, you can run macOS on Windows with the assistance of virtual machine software. The fact is, macOS won't run as smoothly on a PC as on a Mac device, and some features are limited on a PC.