Nowadays, using Wi-Fi to surf online has become an inseparable part of your daily work and life. If you're a Mac user, it could be a disaster if your Mac won't connect to Wi-Fi but other devices will, MacBook connected to Wi-Fi but no internet, Wi-Fi gets stuck at Wi-Fi connection, the WiFi keeps disconnecting on your MacBook, etc.
For many macOS Tahoe users, their Wi-Fi is not working after upgrading to macOS Tahoe. So do we.
Here, we provide 10 feasible ways we've tried to troubleshoot a Mac or MacBook not connecting to Wi-Fi. Don't miss this post if you have Wi-Fi problems.
Wi-Fi not working on macOS 26 Tahoe, how to fix it?
To troubleshoot the Mac not connecting to Wi-Fi problem, let's start with some basic but necessary checks:
- Turn your Wi-Fi on and off.
- Check if you're connecting to the correct network.
- Check if your router's cables are connected correctly.
- Try connecting to a different network.
- Restart your Mac and try to reconnect.
If the above steps didn't help, try the methods below to troubleshoot Mac won't connect to Wi-Fi on macOS Tahoe further:
Fix 1: Delete the registered Wi-Fi
If Mac won't connect to Wi-Fi, try removing it first and reconnecting it.
- Go to Apple menu > System Preferences > Network.
- In the left column, choose Wi-Fi.
- Click the Advanced button.
- Choose the registered Wi-Fi, then click the minus sign (-).
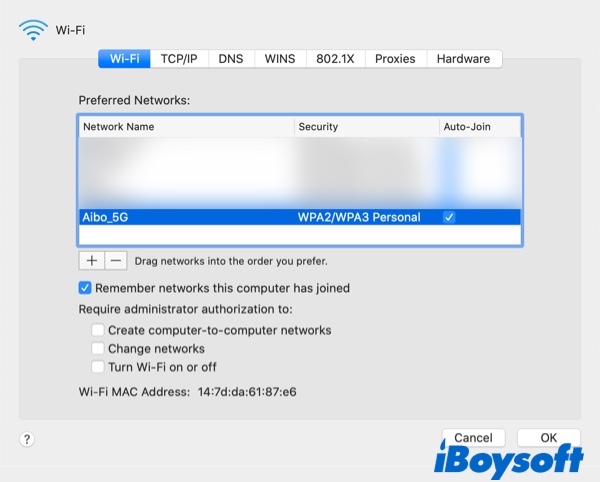
- Click the Wi-Fi icon in the status menu, find your network name, and then enter your password to reconnect to the Wi-Fi.
Fix 2: Disconnect external USB devices
On some older MacBooks, the USB and Wi-Fi modules are close together. When your Mac computer is plugged into a USB or other peripheral device, it may interfere with the Wi-Fi module's signal, causing the MacBook not to connect to Wi-Fi on macOS 26. All you need to do is disconnect all the external devices.
Fix 3: Check for any macOS updates
An old macOS may cause your MacBook to fail to connect to Wi-Fi or have an unstable Wi-Fi connection. If you are using a macOS Tahoe beta or haven't updated your operating system for a long time, you'd better upgrade your macOS. Don't forget to back up your data before updating it. To update your macOS, do the following:
- Click the Apple menu, and select About this Mac.
- Choose the Software Update button.
- Select Upgrade Now.
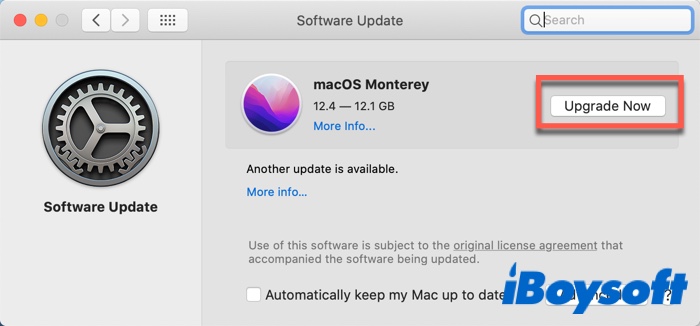
Wait for a moment to install and test your Wi-Fi again.
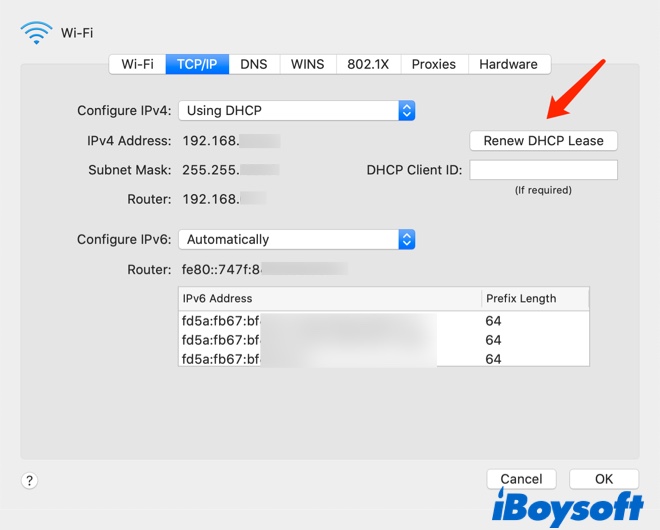
Fix 4: Renew DHCP Lease
If you have a fixed IP address, you can try to manually update the DHCP lease to solve the problem with the Wi-Fi connection on the MacBook.
- Click the Apple Menu > System Preferences > Network.
- Select Wi-Fi in the left column and then click the Advanced button in the right column.
- Select the TCP/IP option and click the Renew DHCP Lease button.
Fix 5: Change your DNS settings
It's possible that your MacBook can't connect to Wi-Fi because your ISP's Domain Name Server (DNS) isn't working properly. In cases like this, try using a free, public DNS instead. Google has a good one.
- Click the Wi-Fi icon in the top menu bar, and select the Open Network Preferences option from the drop-down list.
- Select the Advanced option at the bottom.
- Then choose the DNS tab from the menu option.
- Hit the plus icon (+) and add Google DNS addresses 8.8.8.8 or 8.8.4.4.
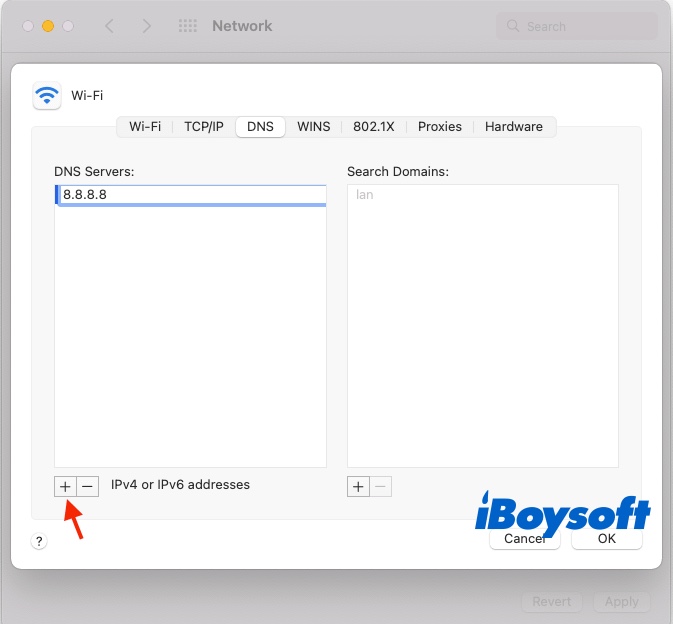
- Click OK and try reconnecting to the internet again.
Fix 6: Check the Proxy settings
To fix the Mac not connecting to Wi-Fi, make sure you have unchecked all the Proxy Settings. Here is how:
- Click the Apple logo, and go to System Preferences > Network.
- In the left column, choose Wi-Fi.
- Then, click the Advanced option and switch to the Proxies tab. You need to ensure that there's no protocol chosen.
Fix 7: Delete files from System Configuration
By deleting the System Configuration, all the configurations will be gone. It can solve the MacBook not connecting to Wi-Fi on macOS Tahoe problem resulting from corrupted configuration data.
- Open the Finder App, from the menu bar, click Go > Go to Folder.
- Type in this address in the blank box and press the Return button on the keyboard: /Library/Preferences/SystemConfiguration/
- The System Configuration folder will show up. Copy all the content to a new folder for backup.
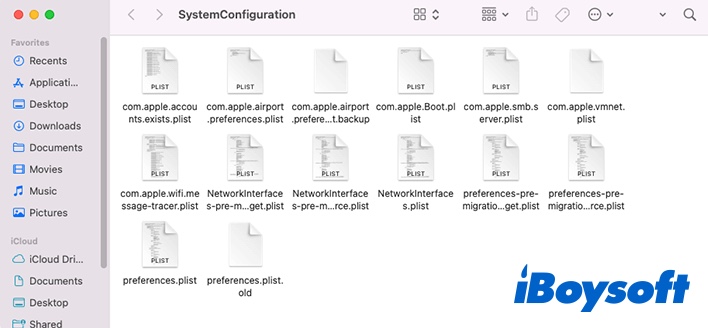
- If everything has been copied, you can delete all the files in the System Configuration folder except for com.apple.Boot.plist.
- Insert your admin password to delete.
- Restart your Mac and try to reconnect to Wi-Fi.
This solution can also help you to fix the WiFi no hardware installed problem.
Fix 8: Delete Preferences files
If deleting the System Configuration files is not helpful, then try to delete the preferences files (.plist files) related to Wi-Fi connectivity issues. This file exists in the Library folder in your Home folder. Follow the instructions below:
- Open the Finder app.
- On the top menu bar, choose Go > Go to Folder, or you can also use a shortcut by pressing Command + Shift + G.
- On the drop-down dialogue box, type in ~/Library/Preferences
- Find the preferences files:
com.apple.internetconfig.plist
com.apple.internetconfigpriv.plist - Copy and paste the preferences files into a folder to back up, then delete them from the Library folder.
- Restart your Mac computer.
Fix 9: Use Mac Wireless Diagnostics
Wireless Diagnostics is a macOS built-in Wi-Fi troubleshooting tool. When your Mac won't connect to Wi-Fi, try to use this utility to fix the problem by doing the following:
- Hold down your Option key and click the wireless icon (the Wi-Fi symbol) in the status menu at the right top of your screen.
- Select Open Wireless Diagnostics from the drop-down menu.
- Click on Continue for your Mac to run the diagnostics on your Wi-Fi connection.
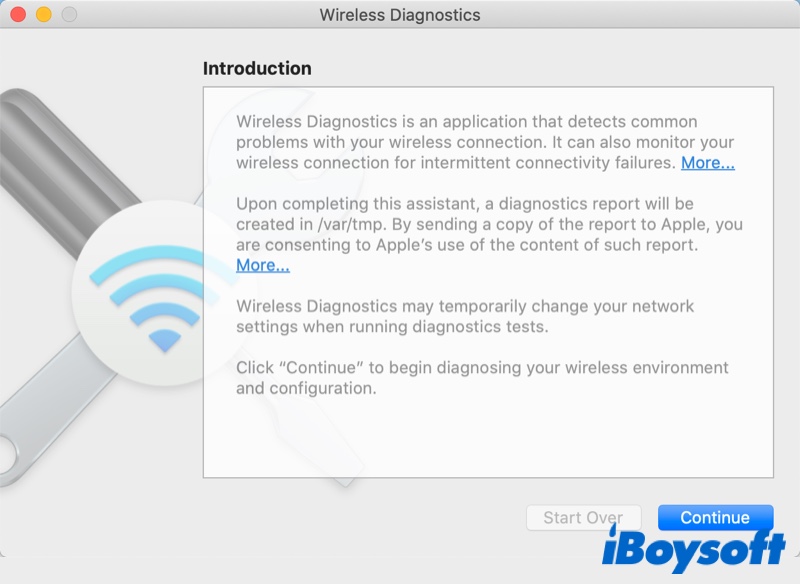
- You'll be presented with a detailed look at your network options and the computer will guide you through a series of steps to try to identify and fix your Wi-Fi problems.
Fix 10: Turn off any VPN apps
Sometimes, you might have a VPN installed to protect your network. However, it could interfere with your internet connection and cause your Mac not to connect to Wi-Fi. So if you have a VPN app or any other network security-related software you are currently connected through, consider disabling it and seeing if the Wi-Fi issue has been resolved.
If you have tried all the above-mentioned solutions but still face MacBook not connecting to Wi-Fi, it's time to ask the Apple store or the nearest Apple Authorized Service Provider for help.
Mac Connected to Wi-Fi but No Internet [Why & Fixes]
Mac connects to Wi-Fi, but no internet? This post explains why your Mac's internet isn't working even if it's connected to Wi-Fi and how to troubleshoot the issue. Read more >>
Why won't my Mac connect to Wi-Fi?
It's pretty annoying when suddenly your Mac won't connect to Wi-Fi after updating to macOS 26 Tahoe. Normally, your Mac or MacBook is not connected to Wi-Fi due to the following reasons:
- Your Mac is not in the signal range.
- The router is defective.
- Problems with the broadband.
- Problems with the Wi-Fi network.
- macOS software issue
If this post about Wi-Fi not working on macOS Tahoe gets you out of the trouble, share it with more people.
FAQs about Wi-Fi not working on macOS Tahoe
- QWhy won't my Mac connect to Wi-Fi when other devices will?
-
A
If your Mac won't connect to the Wi-Fi but other devices will, first verify that you're using the right Wi-Fi connection. You can also try checking Wireless Diagnostics, available updates, physical hardware, and DNS settings. If those don't work, consider going to the nearest Apple Authorized Service Provider for help.
- QWhat can I do if Wi-Fi says no IP address on my Mac?
-
A
1. Open the Apple menu and select System Preferences.
2. Click on Network , then select Wi-Fi and choose Advanced.
3. Remove all Wi-Fi networks one by one. To do that, select the network you wish to remove and click the minus icon.
4. Go to the TCP/IP tab and set Configure IPv6 to Link-local only.