If you enjoy managing your photos on your Mac, you may find occasions when you need to back them up to preserve cherished memories, relocate them to free up space on your Mac, or make them accessible across different devices.
There's one solution to all your needs - transferring the photos from your Mac to an external hard drive. Fortunately, the steps are quite straightforward. To ensure you can copy photos from your Mac to an external hard drive, we'll also explain what to do if you can't transfer photos from your Mac to an external drive.
| How to copy photos from MacBook to external hard drive: | Quick Steps |
| Copy Photos Library to an external hard drive | 1. Open the Pictures folder. 2. Drag and drop the Photos Library to your external drive. |
| Export photos from Mac to an external hard drive | 1. Open Photos. 2. Select the photos you want to transfer. 3. Drag and Drop them to the external drive. |
How to copy photos from Mac to external hard drive?
Decide whether you want to copy or move the whole photos library or the selected photos from your Mac to the external hard drive. Then take the appropriate steps. The following steps apply to all types of storage devices on Mac.
You'll find the answer if you want to learn how to transfer photos from Mac to Seagate external hard drive or drives from other brands, such as WD, Crucial, etc.
How to copy or move Photos Library to external hard drive on Mac?
- Insert the external hard drive into your Mac.
- Open Finder, and click your external disk listed under Locations.
- Right-click Finder on the Dock and select "New Finder Window." (Or press Command + N)
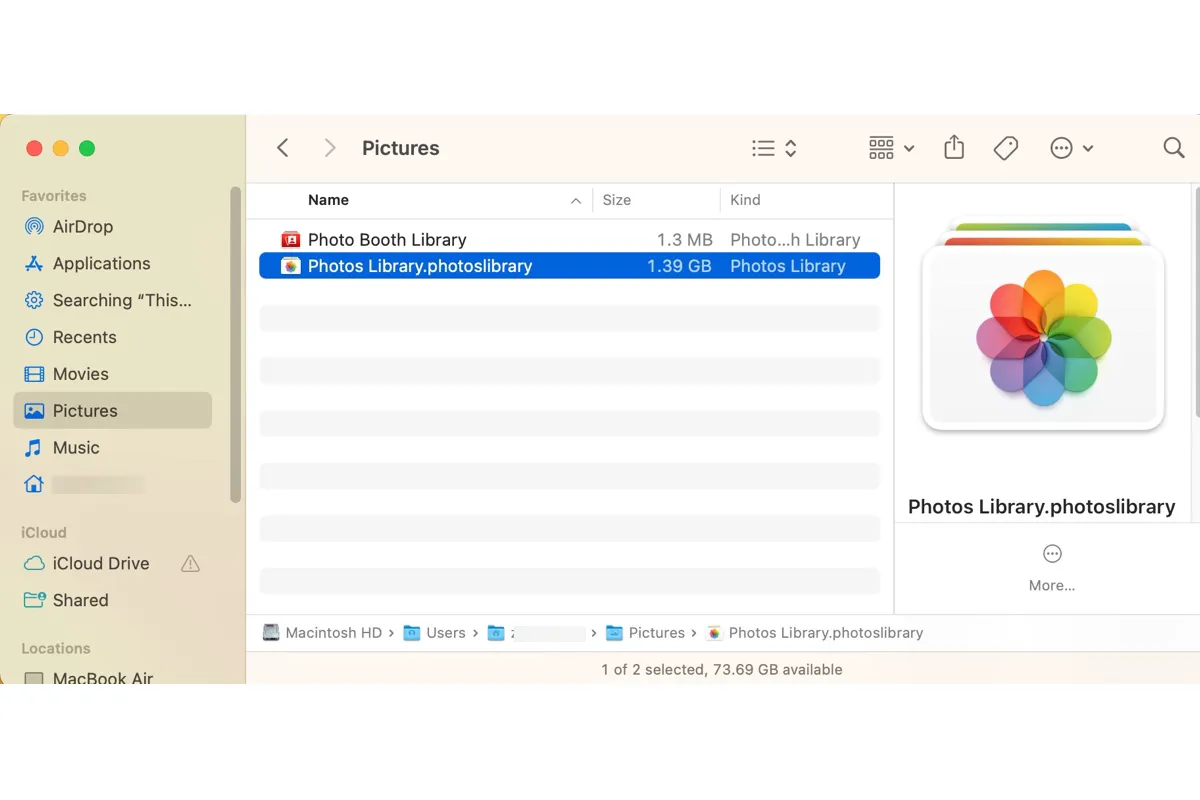
- Select the Pictures folder from the left panel.
- Drag and drop the Photos Library.photoslibrary folder to your external hard drive.
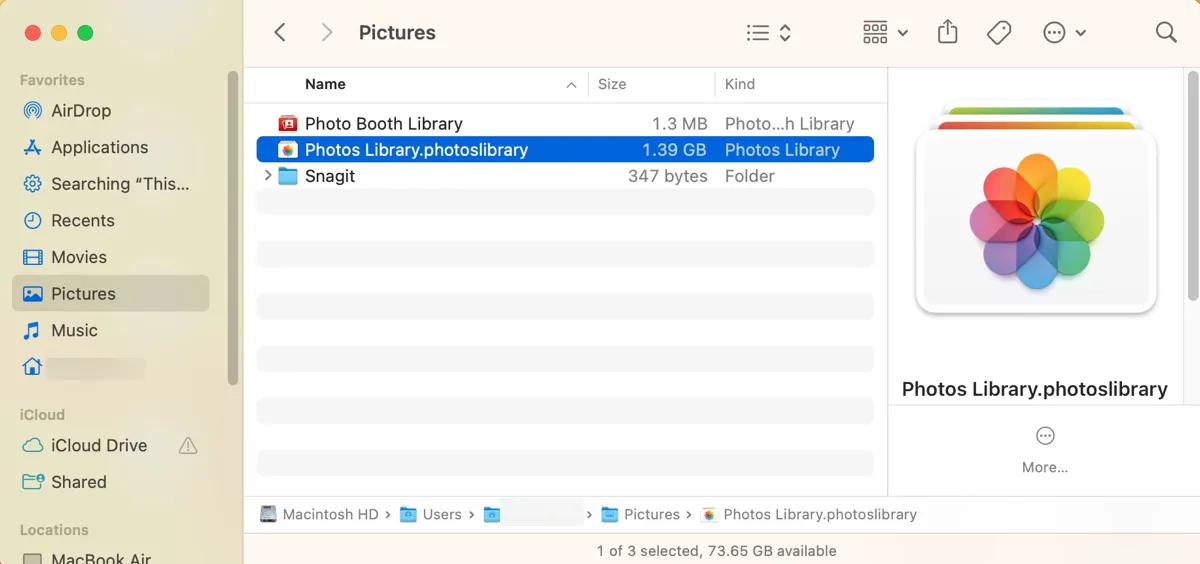
- Wait for the transfer to complete.
Note: If there's no Pictures folder in Finder, select Finder > Settings/Preferences > Sidebar from the top-left menu bar, then check the box next to Pictures.
If you don't want to keep the original Photos Library on your Mac, you can delete it from the Pictures folder now and empty the Trash to reclaim more available space.
How to view photos on external hard drive on Mac?
You can double-click the Photos Library folder on your external hard drive to view photos. If it's set as the default photo library, it will automatically open with the Photos app. If it's not, you'll be prompted to switch to it.
If you meant to move the Photos Library to your external drive on Mac and use it as the default location of your photo library, follow the steps below to configure it.
- Close the Photos app if haven't.
- Hold down the Option key while launching the Photos app.
- Click "Other Library."
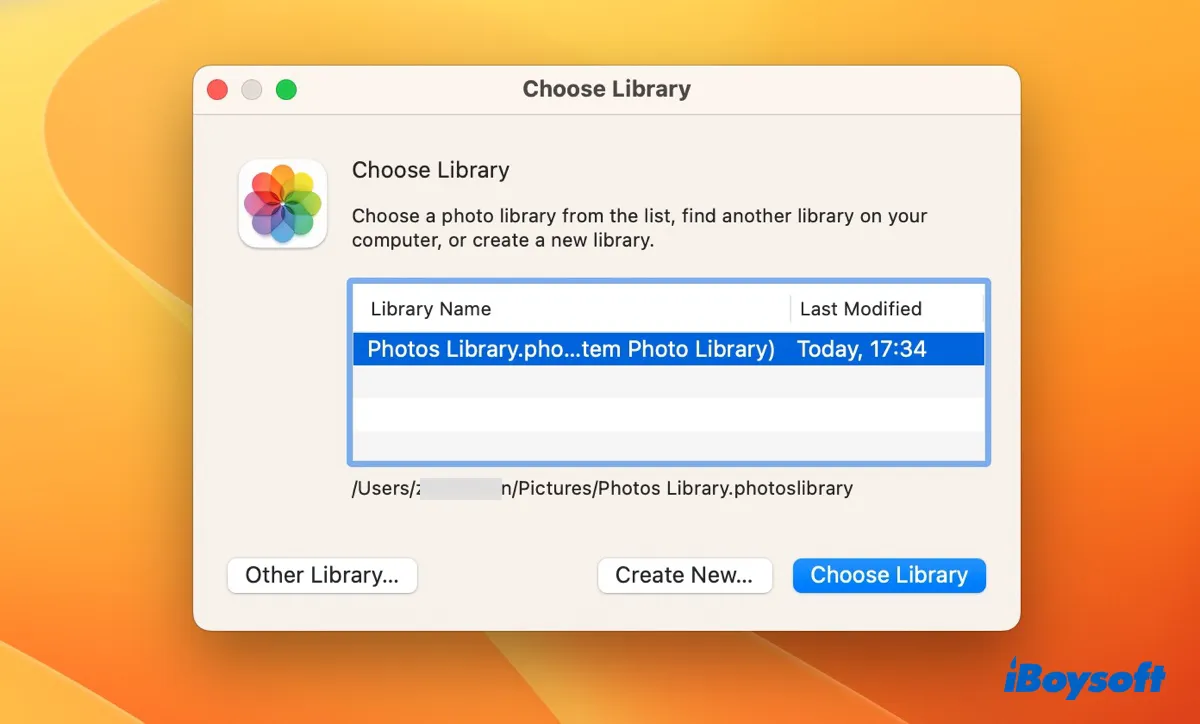
- Navigate to the copied Photos Library on your external drive.
- Select it and click Open. (From now on, this will be the default library that opens when you launch Photos.)
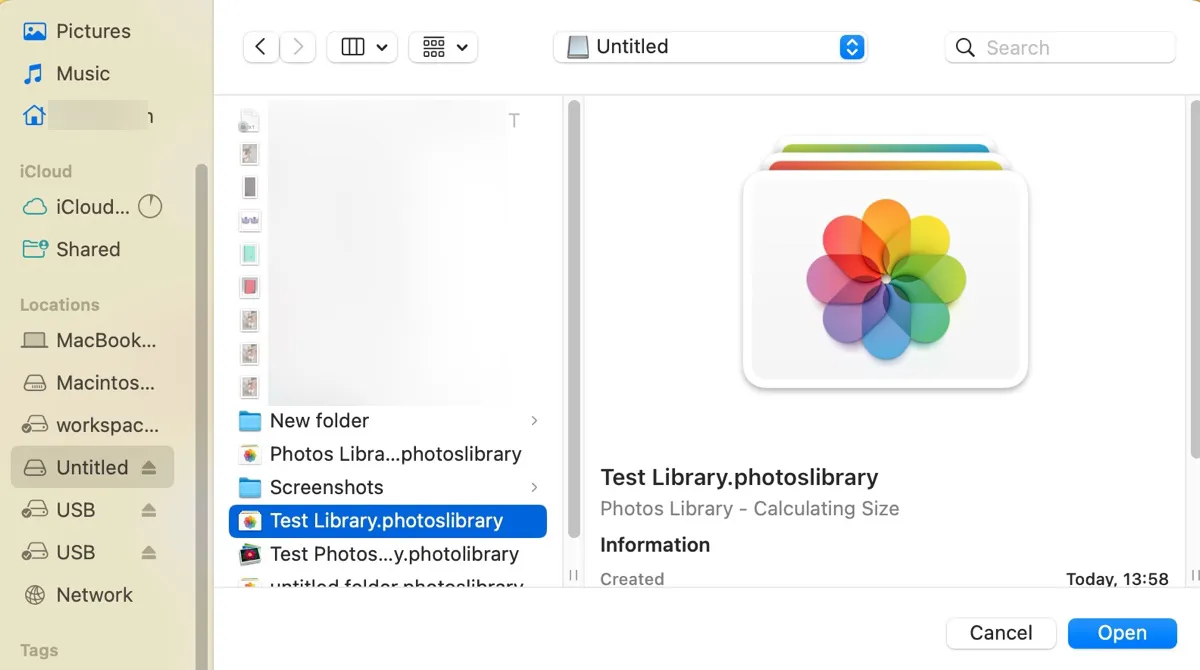
Note that you'll need to plug the disk in every time you use the Photos app to check photos on this library.
If you use iCloud Photos and want to sync with this library on your external drive:
- Click Photos > Settings/Preferences from the menu bar.
- Tap "Use as System Photo Library." (The button will become grayed out after a system library is designated.)
- Switch to the iCloud tab and ensure "iCloud Photos" is selected so that you can access your photos on all devices.
Share these steps so that others also know how to copy Photos Library to external hard drive on Mac.
How to export photos from Mac to external hard drive? (Selected Photos)
If you want to export your photos as image files, which you can double-click to view on any storage devices, without needing the Photos app, take the following steps:
- Open the Photos app.
- Select the photos you want to transfer from your Mac to a USB or external hard drive.
・Press Command while selecting photos to select multiple files that are not next to each other.
・Select a photo, then hold the Shift key and click the last file you want to select all files in between.
・To select all photos at once, press Command + A. - Drag and drop the selected photos to your external disk. (If you want to specify the format, filename, and subfolder organization settings for the exported photos, skip this step.)
- Open File > Export from the menu bar.
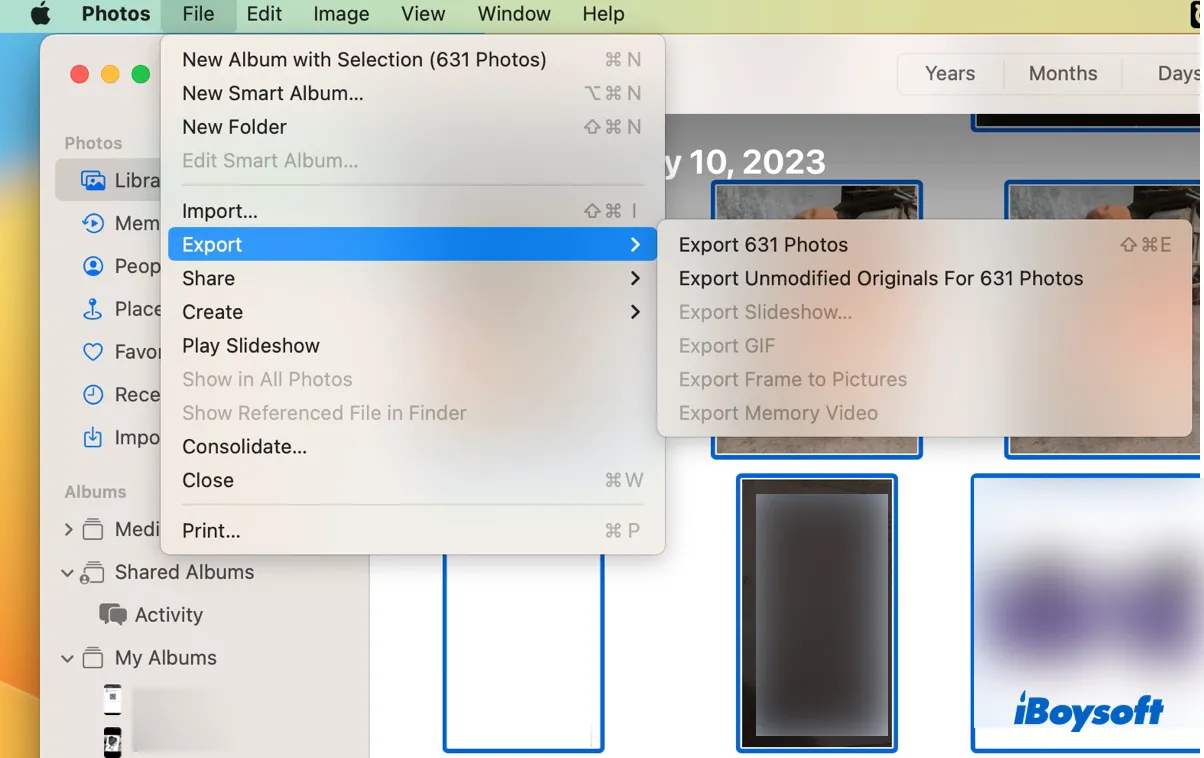
- Choose "Export (number) Photos" or "Export Unmodified Originals for (number) Photos."
- Customize the settings.
- Click Export and select the external drive as the destination.
Now that you know how to transfer photos from MacBook to external hard drive, don't forget to share it!
Why can't I transfer photos from Mac to external hard drive?
Sometimes, you may fail to transfer photos from your Mac to an external drive and receive errors like "The Finder can't complete the operation because some data in "Photos Library" can't be read or written. (Error code -36)." This may result from various reasons, such as:
- The external disk has permission issues that are preventing photos from being copied to it.
- There's not enough free space on the external drive.
- The external drive is NTFS-formatted.
- The external drive is FAT32-formatted.
- Some photos are corrupted.
- There are files with the same name in the Photos Library.
What to do if you can't transfer photos from Mac to USB/external hard drive?
In this section, we'll summarize the common issues you may encounter when you're unable to transfer photos from your Mac to an external disk and the working solutions.
Use NTFS for Mac
If your external drive is formatted with NTFS, you'll need an NTFS for Mac reader to get the photos transferred to it. That's because NTFS is a file system owned by Windows and is only readable on Mac. To copy photos to an external drive is an action of data writing, which requires write access.
You can employ iBoysoft NTFS for Mac to read and write to your NTFS drive on Mac without formatting or losing data. It will automatically mount your NTFS-formatted drive in read/write mode, allowing you to freely copy photos and other files to the drive.

After it's installed, you should be able to transfer photos to the drive.
Ignore ownership on this volume
The option "Ignore ownership on this volume" enables any user on any Mac to modify files on a drive without being restricted by the original file or folder permissions. You should keep it selected to avoid permission problems that may be preventing you from transferring photos. (This option is only available on APFS or HFS+ formatted drives.)
- Right-click on your external drive.
- Click "Get Info."
- Check if "Ignore ownership on this volume" is selected at the bottom-left corner of the window.
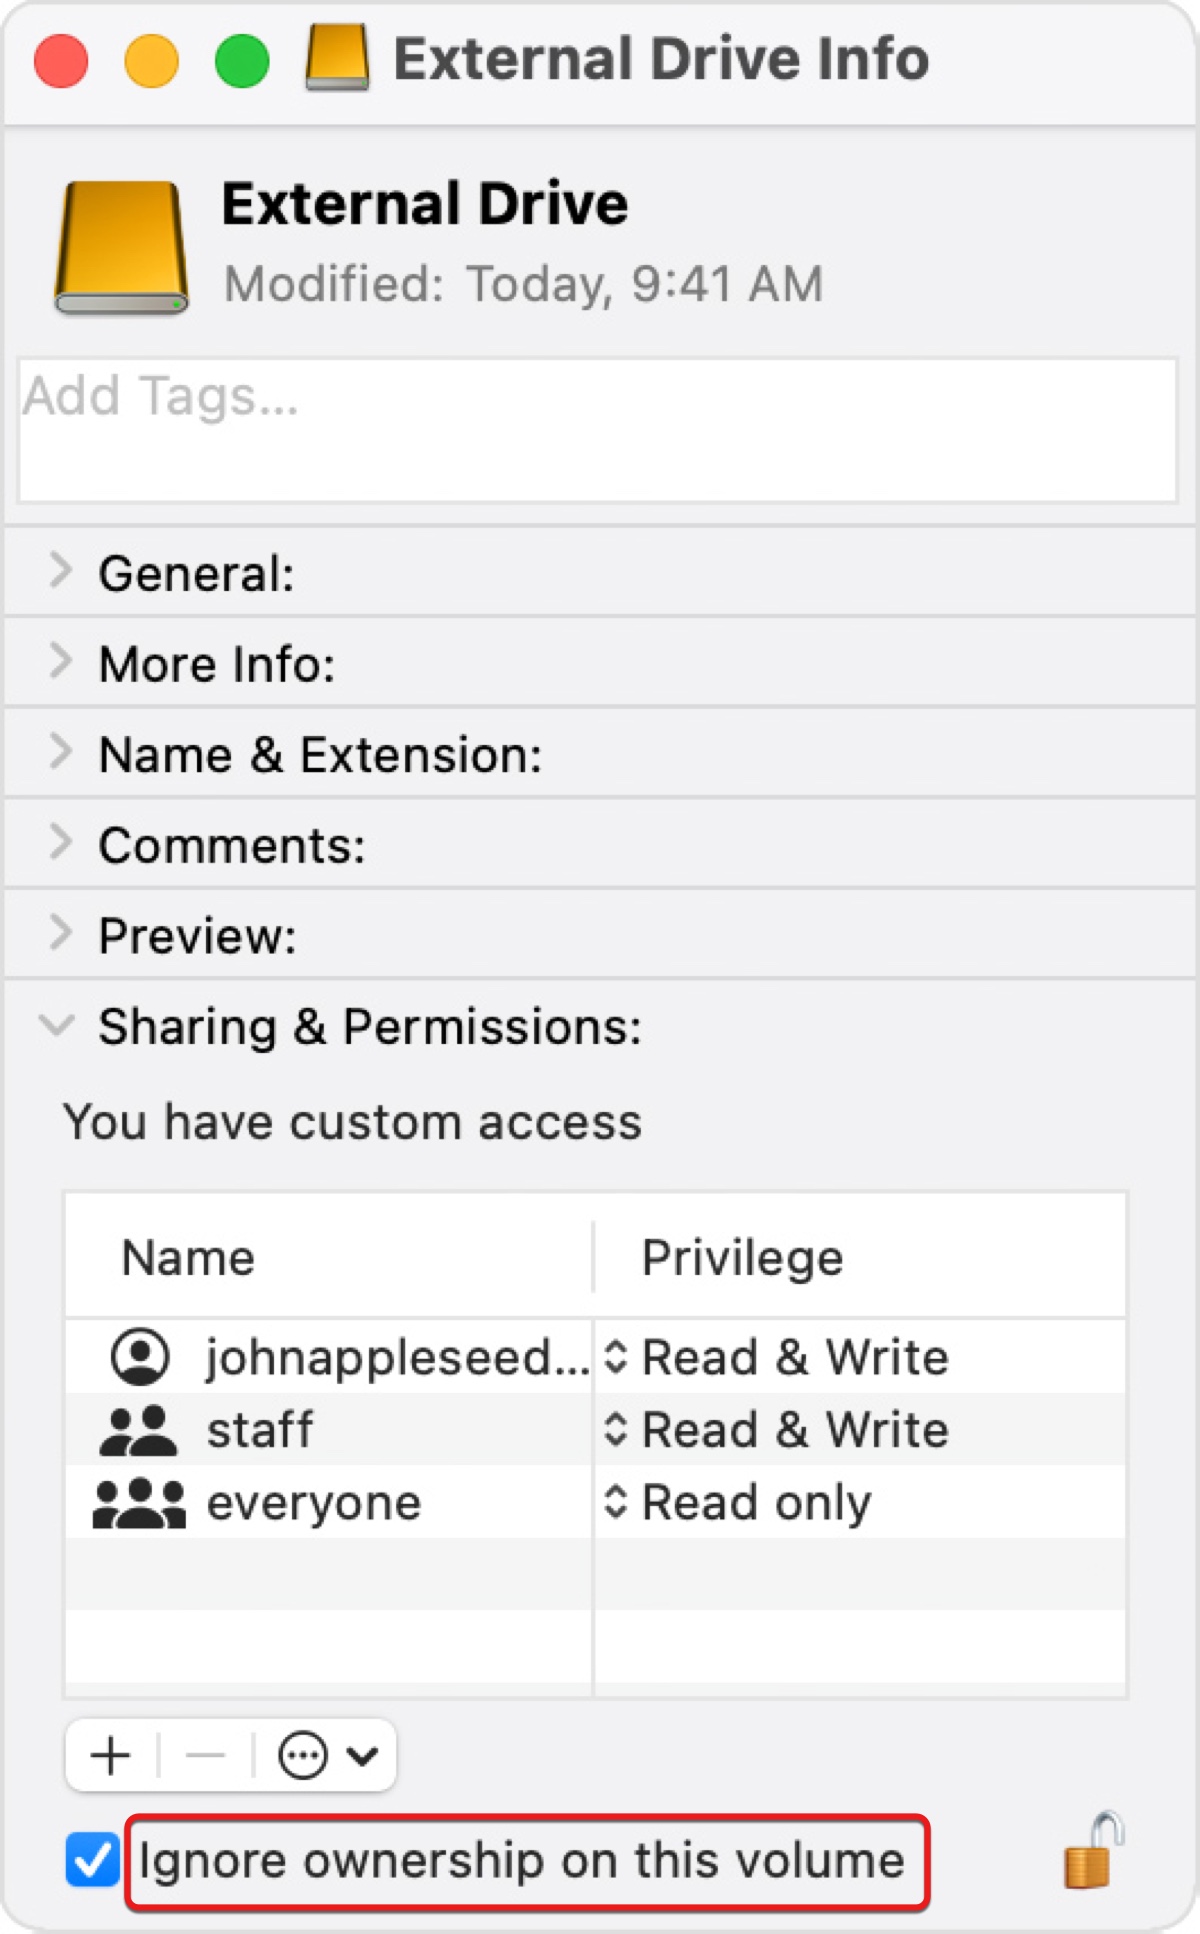
- If not, tap the yellow lock and enter your password to unlock the preference and tick it.
Format your external drive
It's also a good idea to format the external drive that you use to save the photos. This can resolve software corruption on the drive and other issues. Be reminded that this will erase everything on the drive as well. So back up files on the drive before proceeding.
- Open Disk Utility.
- Click View > Show All Devices.
- Select your external drive and click Erase.
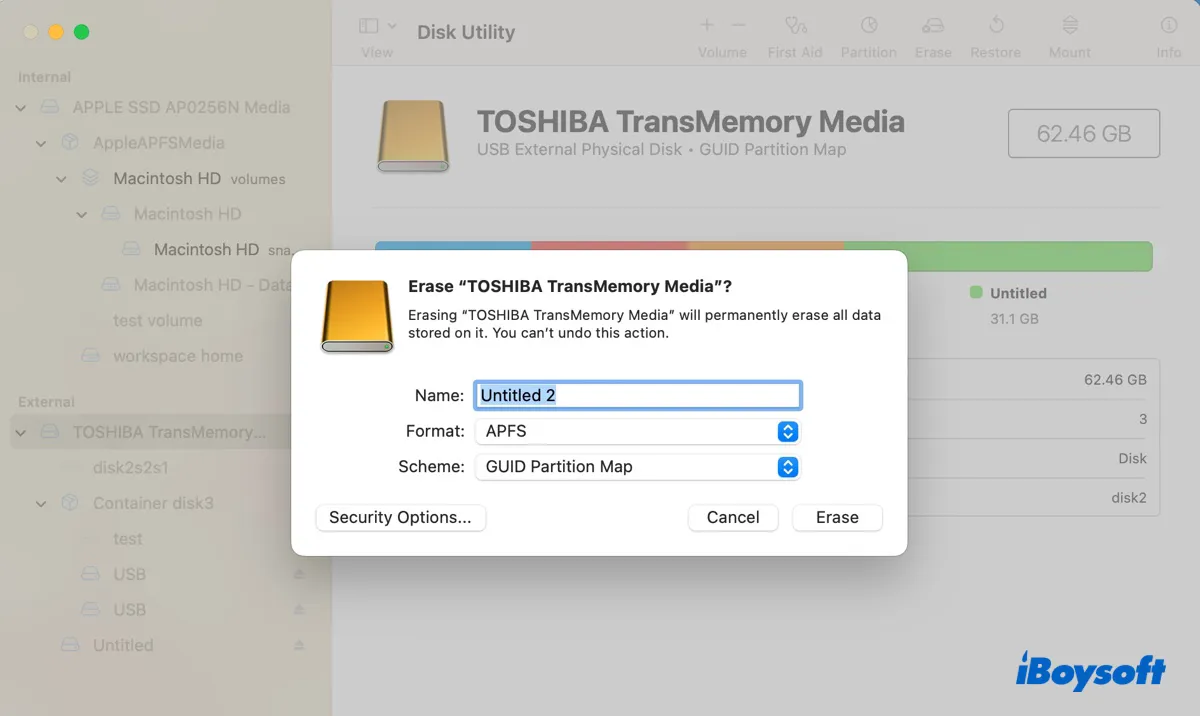
- Name the drive.
- Set the format to APFS or Mac OS Extended.
- Keep the scheme GUID Partition Map.
- Click Erase.
After it's formatted, try moving photos from your Mac to the external drive again.
Continue reading to find solutions to specific errors that are stopping the photos from being copied from Mac to your external drive.
The Finder can't complete the operation because some data in "Photos Library" can't be read or written. (Error code -36)

Error code 36 usually pops up in the middle of a copying process, indicating that certain photos or videos can't be read or written. To fix it, you just need to figure out which file(s) is causing issues and delete it.
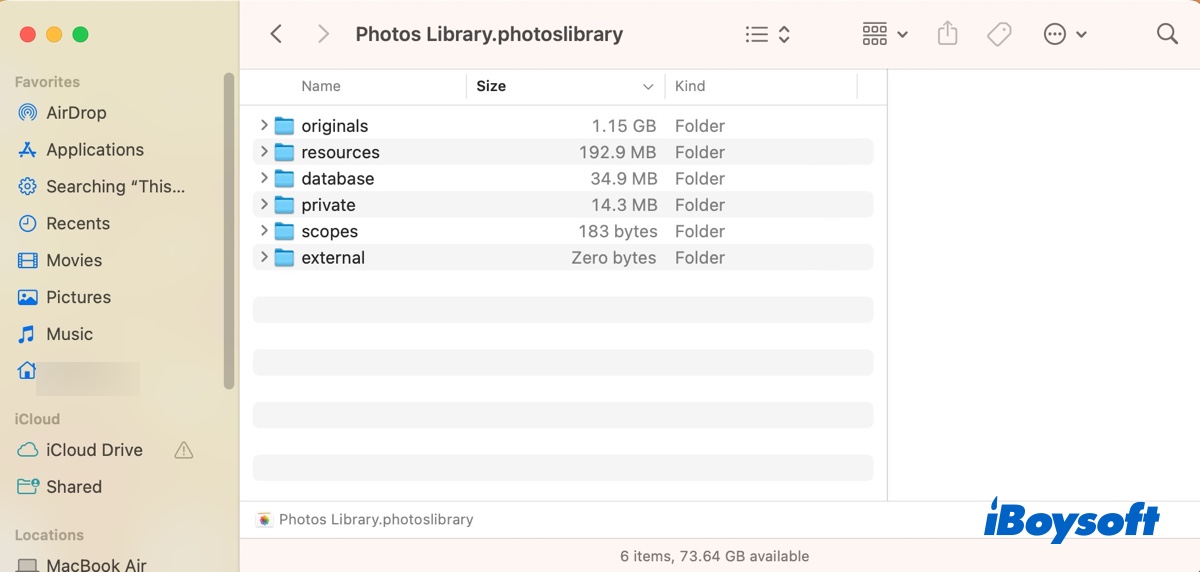
The Photos Library is a package file that consists of several folders and subfolders and a database that holds the details about them. You can open your Photos Library and copy its folder one by one to rule out the culprit.
When you get close to the corrupted photo, you'll likely get a more detailed message stating the name of the file, such as "The Finder can't complete the operation because some data in B6FA4C82-8503-472C-9C4D-8D79C7D42FE7.JPG can't be read or written."
- Open Finder.
- Create a new folder on your external drive.
- Select the Pictures folder.
- Right-click on your Photos Library and choose "Show Package Contents."
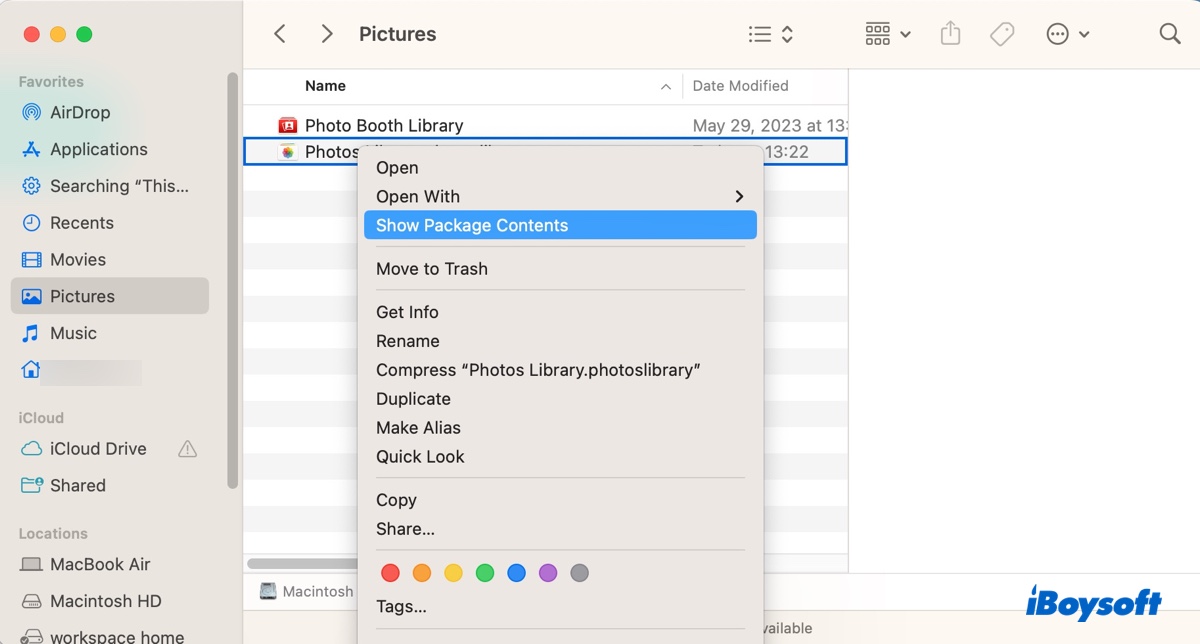
- Copy one folder to the newly-created folder on your external disk.
- If it succeeds, continue copying the rest of the folders.
- If it stops after a file is copied, the next file in order is probably the corrupted one. Or if it prompts an error about the corrupted file, you can locate and delete the file or skip it, then continue copying folders.
- After all folders are copied, rename the folder with the .photoslibrary extension. (e.g., Photos Library.photoslibrary)
Note: If you don't want to move the Photos Library to your external drive but only need to transfer the photos, you can simply copy the photos you want to the external disk. The unedited original photos reside in the Originals or Masters folder.
"Photos Library.photoslibrary" can't be copied because it is too large for the volume's format.
You'll receive this "files too large" error when copying photos to a FAT32-formatted drive, which can not keep a single file larger than 4GB. To resolve this error, you need to reformat your external drive in Disk Utility with a file system that supports your photo library size. Choose one from these two formats: APFS (max file size: 8EB), and Mac OS Extended (Journaled)(max file size: 8EB).
"You can't copy "Photos Library" because it has the same name as another item on the destination volume, and that volume doesn't distinguish between upper- and lowercase letters in filenames."

If you can't copy photos from your Mac to an external drive due to the name issue, you can rename the item that has the same name as the one at the destination volume or delete it.
Look for the offending items in your Photos Library as well. This error will also appear when there are files with the same name in your photo library, for example, Cat.jpeg and cat.jpeg. You can use the steps mentioned in error code 36 to locate the items.
Also, if you are copying the photo library from one external drive to another, it's best that both are formatted with the same format that's not case-sensitive. If the error persists, reformat your destination drive with APFS or Mac OS Extended (Journaled).
"The operation can't be completed because an item with the name "Photos Library" already exists".

When facing this error, you can delete or rename the conflicted item. Besides, try creating a new folder on the external drive where you want to save photos and copy photos to that folder.
FAQs about how to copy photos from Mac to external hard drive
- QHow do I copy my entire iPhoto library to an external hard drive?
-
A
Open Finder and select the Pictures folder. Then drag and drop your iPhoto library to the external hard drive.
- QHow to copy photos from photo library on Mac?
-
A
To copy photos from the Photos Library on Mac:
1. Open the Pictures folder in Finder.
2. Right-click on your Photos Library and select "Show Package Contents."
3. Open the Masters or Originals folder.
4. Drag and Drop photos to copy them to another location.
- QHow to transfer photos to external hard drive without a computer?
-
A
If you don't have a computer, you can transfer photos to an external hard drive with your phone or tablet. Just connect the external hard drive to your device and copy the files to it.
- QHow do you select all photos on a Mac?
-
A
You can select all photos on a Mac by pressing Command + A or choose Edit > Select All from the menu bar.
