When the Mac runs slowly or the Mac fan is so loud, then you navigate to the Activity Monitor to check the real-time activities on your Mac. Unexpectedly, the installd process is positioned at the very top of the CPU usage view. Then, you wonder what it is and why the installd uses a large amount of CPU. You can get the answer after reading.

What is installd process in macOS?
The installd process is a daemon, a background process that runs many functions but never communicates with the actual applications. Installd is a component of Apple's framework for managing programs and updates, known as PackageKit. It is, in other words, the Mac App Store's auto-update feature. The software that is installed on your computer will be listed, and it will compare every version to Apple's servers.
Generally, the installd process relates to the installation, uninstallation, and updates of the applications from the App Store and the OS-wide updates checking, updates downloading, and updates installing. That is to say when you download, delete, and updates applications and macOS, the installd process is running in the background.
Why is installd using a high CPU?
As we mentioned above, when the system performs tasks on Mac such as downloading apps from App Store, uninstalling applications on Mac, updating macOS, and so forth, it triggers the installd process, running in the background without your notice.
It needs to check the version of the app/OS on your Mac and compare it with the one on the Apple server. Such a process usually pegs your CPU. Therefore, it is normal when you find the installd process is using a high CPU in Activity Monitor.
Usually, installd will complete the task within a few minutes and then it shouldn't occupy the CPU any longer. However, there could be an exception that is Apple upgrades several sizable applications at once. In such a case, the installd process eats a high CPU and might run for a while.
What to do if installd occupies a high CPU?
You don't need to panic when you find the installd process is taking up a large CPU as we have explained it is normal and should be temporary. When such a situation occurs, you can apply the methods as follow:
Wait it out
Under normal circumstances, the installd process should exit within a few minutes, even if it upgrades a bunch of large applications simultaneously or upgrade a major macOS version such as from macOS Monterey to macOS Ventura, it could complete around ten minutes or so. How long depends on your CPU and hard disk speeds.
Kill installd process
Usually, it should not affect the performance of your Mac. But sometimes, it gobbles an extremely high CPU which may squeeze the resource of other processes, leading to the problem that Mac runs slowly. Then, you can kill installd process to release the CPU.
- Head to the Activity Monitor from the Launchpad.
- Choose the CPU tab on the toolbar.
- Select the installd process and right-click it to open its info window.
- Click the Quit button and click Quit again on the popup.
Disable automatic updates
If you have enabled automatic updates, it could automatically check and install available updates of the applications and OS on your Mac. But when the installd process runs at an unwelcome time such as you are working with a CPU-consuming program, the installd process that occupies a high CPU could be annoying. Then, you can disable automatic updates on your Mac and manually updates apps and macOS when necessary.
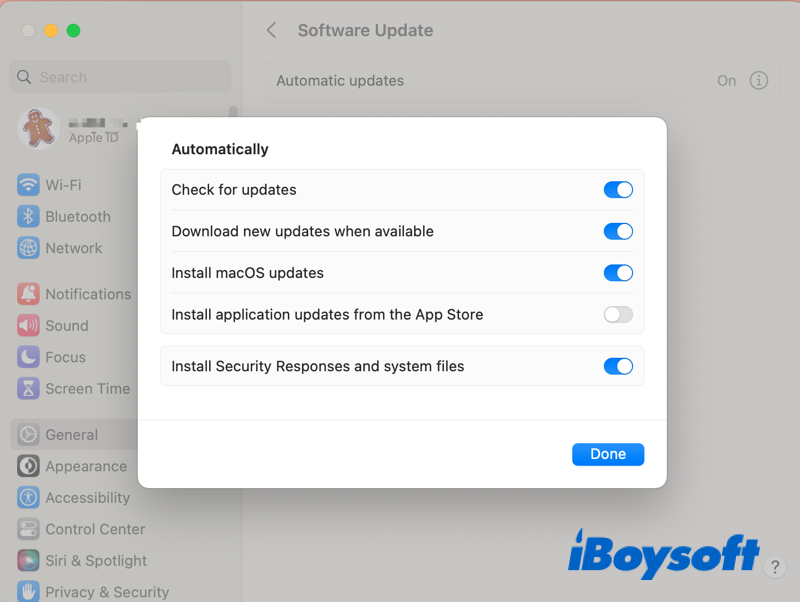
- Open the Apple menu and choose System Settings.
- Click General on the left sidebar.
- Choose Software Update on the right pane.
- Click the circle with the letter i behind Automatic Updates.
- Toggle off the buttons behind the options of macOS and application updates.
- Confirm the change with Touch ID or password when asked.
- Click on the Done button to complete.
The end
When the installd process high CPU happens to you, relax, it is not a big problem. You can just wait it out, or, you can kill the installd process in Activity Monitor and disable automatic updates on Mac. If this post is helpful, share it with more people!