Every day you may spend a lot of time browsing online, it likes that you're putting yourself up to a plethora of website trackers and cookies. Some companies typically use this hoarded data and behavioral traits to improve their own services or sell the data to third-party advertisers.
Therefore, enabling private browsing on Mac or MacBook is necessary and very important for any Mac user. It is a good way to bypass most trackers, and it's much easier and quicker to achieve than you might think. On recent macOS Sonoma, Apple has enhanced private browsing. If you don't know how to turn on private browsing on Mac, just keep reading.

The benefits to enable private browsing on Mac
When you turn on private browsing on Mac, you'll get these benefits:
- Websites you visit can't track your browsing across multiple sessions.
- Web pages you visit and your AutoFill information aren't saved.
- Your open web pages aren't stored in iCloud, so they aren't shown when you view all your open tabs from other Apple devices.
- Your recent searches aren't included in the results list when you use the Smart Search field.
- Items you download aren't included in the downloads list. (The items do remain on your computer.)
- If you use Handoff, private windows aren't handed off to your iPhone, iPad, iPod touch, or other Mac computers.
- Changes to your cookies and website data aren't kept.
- Websites can't change information stored on your Mac, so services normally available at such sites may work differently until you use a non-private window.
Would you please share this informative post with more people?
How to enable private browsing on macOS Sonoma
On June 5 2023 WWDC, Apple has already released the macOS 14 Beta for developers. The macOS Sonoma public version will come later. You can install macOS Sonoma Beta on your Mac to have firsthand experience. To enable private browsing for one time on macOS Sonoma beta, do the following:
- Open the Safari app on your Mac.
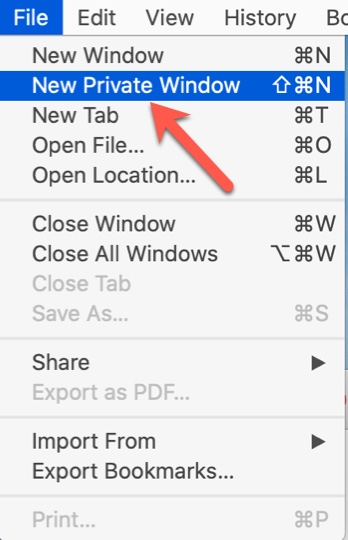
- choose File > New Private Window from the menu bar. Alternatively, you can switch to a private window that's already open.

- Then the private window will show you a dark Smart Search field with white text and remind you private browsing has been enabled.

Note: If you're using Google Chrome for browsing, simply open Chrome and choose File > New Incognito Window to turn on private browsing.
If you want to always browse privately, in Safari app on your Mac, choose Safari > Settings, then click General. Finally, click the "Safari opens with", then choose "A new private window".
How to turn off private browsing on macOS Sonoma
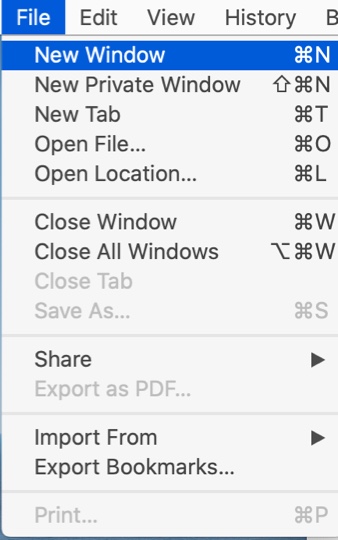
If you don't need to use a private browsing window on Mac Safari, you can turn it off. Simply open Safari, and choose File > New window. This will help you open a non-private window directly. Besides, even if you are not using a private window to browse, you can do the following to enhance privacy.

- Delete any items you downloaded while browsing.
- Clear browsing history and cookies when finishing browsing.
- Close any other private windows that are still open to prevent other people from using the Back button or Forward button to see the web pages you visited in those windows.
It's very kind of you if you can share this post on your social media.
Final thoughts
It's highly recommended to enable private browsing to protect your own privacy while browsing web pages. Luckily, macOS Sonoma now uses private browsing to lock your private browsing windows even when you're not using them. This completely blocks known trackers from loading on pages and removes tracking added to URLs as you browse.