When preparing your computer for sale or a gift, you need to securely wipe the SSD or the hard drive inside of it first so that there is no access to any private files and data stored. You may think a file deletion is OK, but I have to tell you that's not enough.
The deletion of a file does not mean that all files and data are completely erased. Instead, when retrieving files, the operating system simply cancels the pointer to the deleted files, leaving all the bits in place. Your files and documents will be inaccessible and unrecoverable until the operating system writes new data to that space and overwrites the deleted one. While no one knows when your operating system will overwrite the deleted bits.
Factory resetting your computer also does not work well because it is possible to recover files after a factory reset.
This article solves your problem by telling you how to securely wipe an SSD and HDD on Windows computers. Just keep reading.
Things you should know before you securely erase SSD
Unlike erasing an HDD, using a program to write random data sector by sector to overwrite all old files on an SSD does not work well. Because SSDs have a limited number of write cycles and multiple overwriting is fatal.
What you need is a utility that can access all the SSD data so you can wipe all of them and leave no remnants. Some SSD makers provide a secure erase feature for free and some motherboard BIOSes have built-in "secure erase" utility. These utilities effectively reset your SSD to a factory state with even the OS blocks erased.
If you have no secure erase utility from SSD makers or motherboard BIOS, this article also offers you two toolsets -- paid Parted Magic and free Diskpart to enable you to complete the secure erasure work.
Take your patience and let's dive into further operations. If you find this post informative, why not share it with more people?
How to secure erase SSD via the SSD's manufacturer's utility?
As I have mentioned, some SSD manufacturers have the native secure erase function to enable you to wipe your SSD within several clicks. You should bear in mind that if you're wiping a boot drive of your device, a bootable USB erasure tool is indispensable. Meanwhile, the methods and capabilities may vary much based on manufacturers.
Here I will show you a table and you can have a look real quick:
If your SSD comes from the makers mentioned in the table, try the utility to securely wipe your SSD or HDD without hesitation now!
How to securely erase an SSD via the SSD's motherboard BIOS?
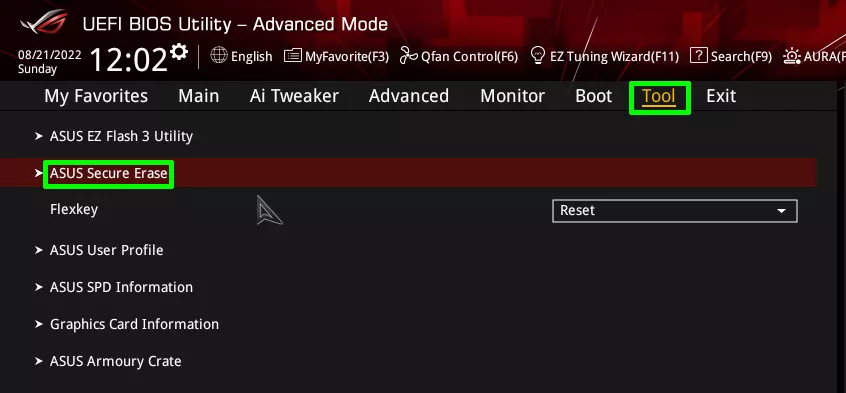
If you plan to wipe the boot drive of your computer, I'd like to suggest you wipe it in your motherboard's UEFI BIOS, which is easy and simple to carry out. Due to the branch of the motherboard, the secure erase name and location may be variable. I will take my Asus ROG motherboard as an example to show you how to securely erase an SSD:
- Enter your motherboard's UEFI BIOS.
- In the main interface of the motherboard, head to the Tool tab, and then locate the Asus Secure Erase.
- Select your drive, choose options, and then confirm your actions. You'll receive a notification and just ignore it.
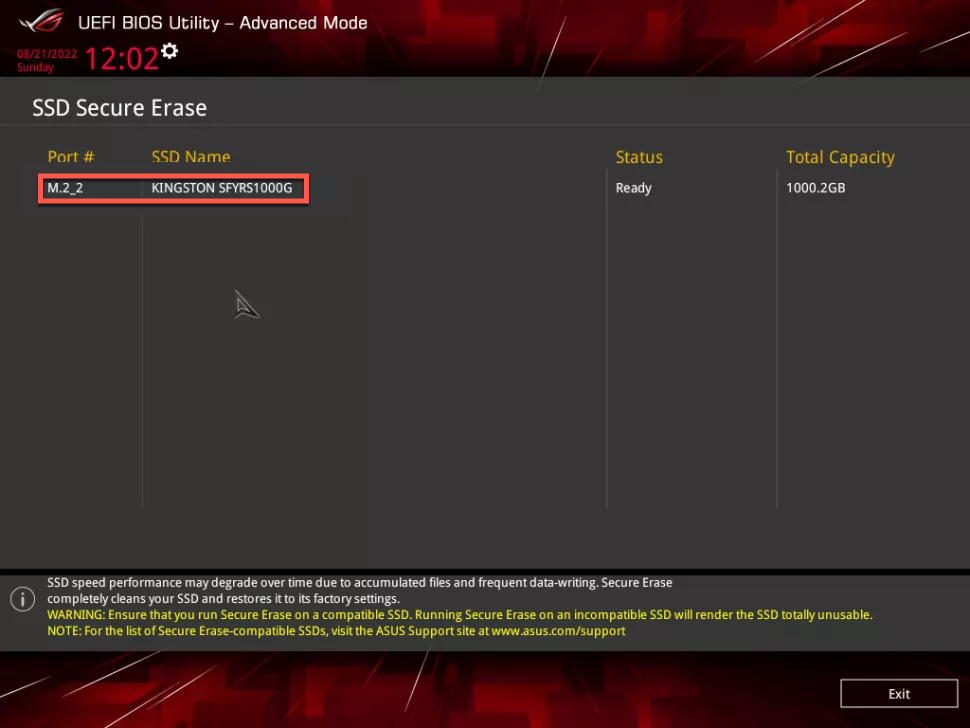
- Then the Erase Secure feature begins to work. After the process, your computer back to the factory state with no files and data.
How to securely erase an SSD with paid Parted Magic?
Parted Magic is an excellent secure erase SSD utility on the market and it really helps you out when you have no free manufacturer's utility or motherboard with a secure erase SSD feature in BIOS. Although paid, Parted Magic is worth of shot if you plan to wipe your SSD on a regular basis or want to ensure that your device OS is wiped completely.
This utility functions in the Linux environment so you need to prepare an external hard drive to create a bootable USB flash drive.
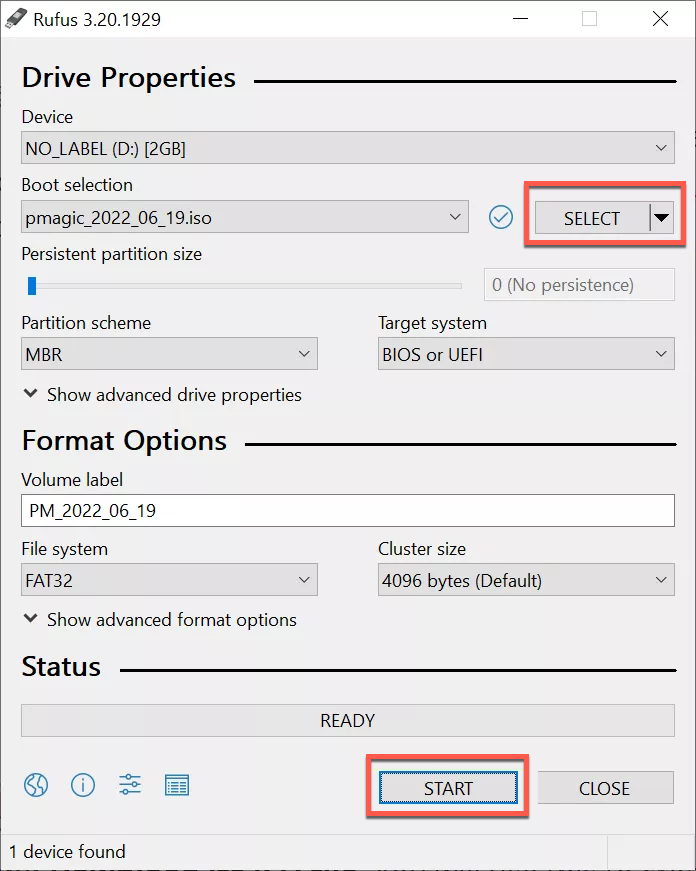
- Buy Parted Magic at $15 and download its ISO file for the bootable USB creation work.
- Create a bootable USB flash drive and we recommend Rufus a free USB flash drive utility here.
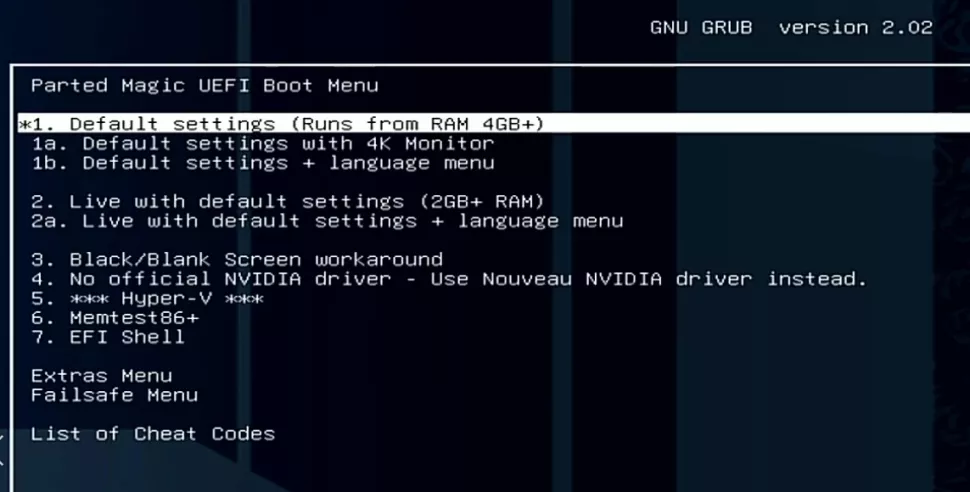
- Boot your computer from the Parted Magic USB drive.
- Hit the Enter/Return key to select Default settings (or Option 1) when prompted for a boot method. Then you will come into a Linux desktop environment.
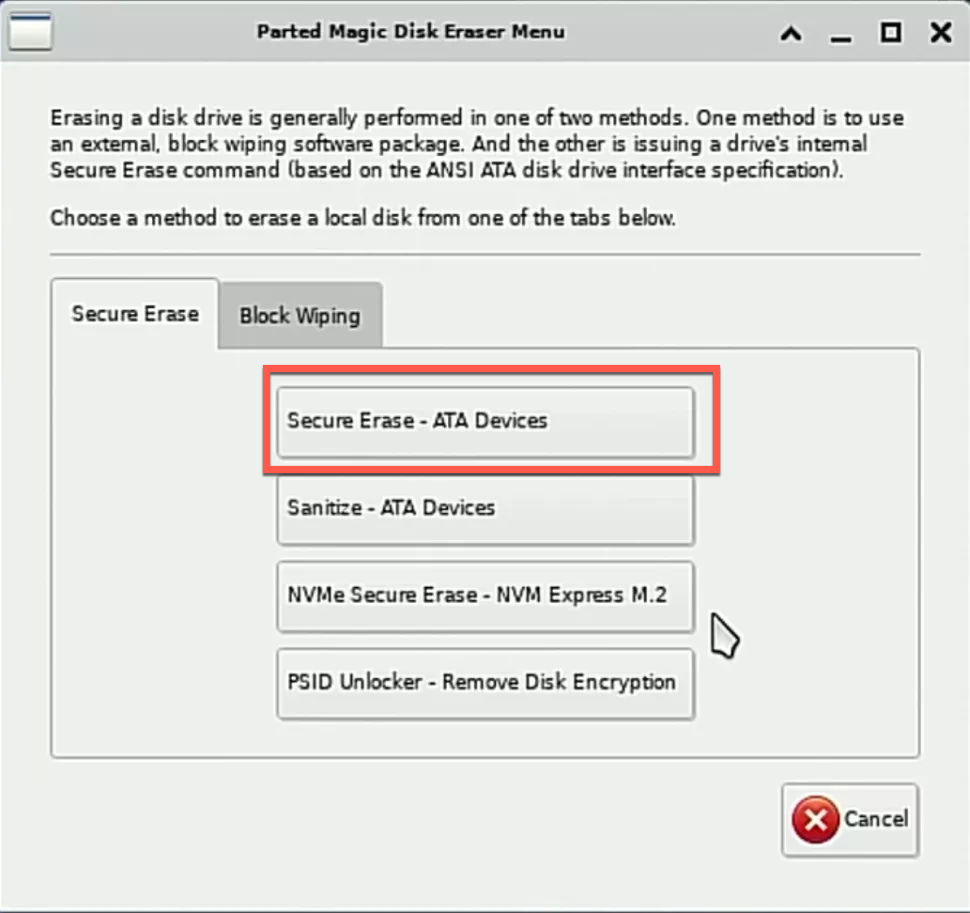
- Launch the Erase Disk app on your desktop.
- Select "NVMe Secure Erase" if you have an NVMe SSD or "Secure Erase ATA Devices" if you have a SATA SSD.
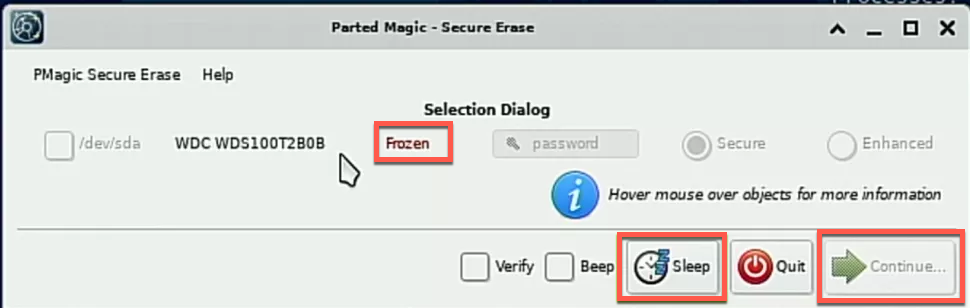
- All available disks on your computer will appear. If the disk you want to wipe is listed as "Frozen", you need to make it available by clicking the Sleep button.
- Wait for seconds when your disk is turning from Frozen to available.
- Select the drive(s) you want to erase and click Continue.
- Toggle on "I allow this utility . . ." and click Start Erase.
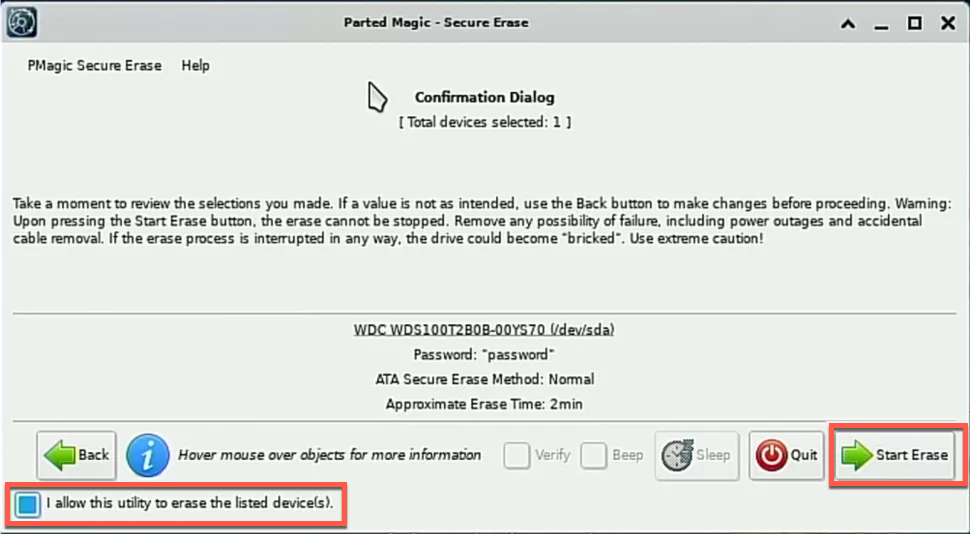
- The wiping process then begins and the progress bar will notify you of the remaining time. The whole process lasts several minutes or so.
When the secure erase SSD work is done, it will show you a box saying that the process was successful and offering you the opportunity to view logs.
You can shut down Parted Magic (or reboot the computer) as your drive has been securely erased. Many thanks if you share this article with more people!
How to securely wipe an SSD with free Diskpart?
If you don't have the manufacturer's secure erase ability or the motherboard's capacity in BIOS, or you have no intention to pay for Parted Magic, I suppose the free Diskpart will suffice.
Diskpart is the native utility in your Windows computer that allows you to wipe the boot drive of your computer as long as you boot your device from the install disk. However, Diskpart can not erase the overprovisioned blocks of your SSD which are unavailable to your device OS and may store data.
- Start your device from Windows 10 or Windows 11 install disk or just skip this step if you're going to wipe a non-boot drive.
- Launch the Command Prompt on your PC by searching for "cmd", right-click the top result, and select "Run as administrator". If you boot your computer from the install disk, hit Shift + F10 to run the Command Prompt.
- Enter diskpart in the Command Prompt window.
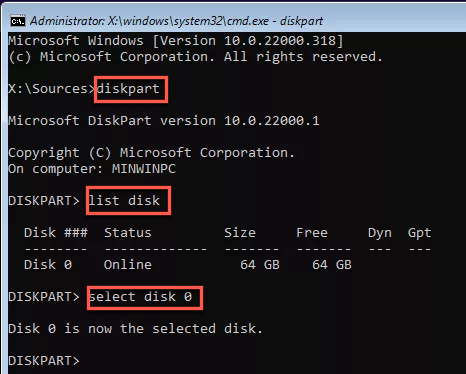
- Enter list disk to see all the disks of your PC. If you have only one disk, it will be Disk 0.
- Enter select disk (drive letter) in the Command Prompt window. This action chooses the disk that you want to wipe.
- Enter clean all in the Command Prompt window. This operation is going to wipe everything on your disk and it lasts a few minutes.
- Then your drive should now be securely wiped. Remember to close the Command Prompt after the whole process ends.
When your SSD or HDD is securely erased, you can start an OS reinstallation job. After that, give it a sale or send it as a present.
Conclusion
Securely erasing an SSD or HDD is not as easy as apple pie but it is still worth a shot. This article offers you 4 ways to perform the secure erase SSD task. If you're interested, try it now!
Also read: SSD Not Showing Up in Windows 10, Fix With Quick Ways (2022)
Share this post with others if you think this post is helpful!
FAQ about securely erasing an SSD and HDD on Windows
- QHow do I securely wipe my hard drive or SSD on my computer?
-
A
You can utilize the erasing toolset developed by drive manufacturers, hard drive motherboard BIOS, Parted Magic, and Diskpart on your computer.
- QHow to secure erase SSD from BIOS?
-
A
Step 1: Restart your system.
Step 2: Use the button configuration of your operating system to enter the BIOS.
Step 3: Navigate to the 'Security' tab.
Step 4: Select the 'Hard Drive Utilities' or 'Hard Drive Tools' option as displayed on your screen.
Step 5: Choose the 'Secure Erase' tool.