Instead of downloading the Mac OS ISO file directly from an online source, you can also create an ISO file manually with a macOS installer in the .app format. However, if you download the macOS full installer from Apple's server, you'll receive an InstallAssistant.pkg file.
"How can I convert an InstallAssistant.pkg file to an ISO file?" You may wonder. This article gives you the answer.
Tips: If you want to save time, download the macOS DMG file directly from iBoysoft DiskGeeker and then convert it into an ISO file. This tool provides DMG files for the latest macOS Tahoe to older Mac OS versions like Mac OS X 10.6 Snow Leopard. In addition, it helps you create a bootable macOS installer easily.
To download macOS DMG files:
Step 1: Free download, install, and launch iBoysoft DiskGeeker.
Step 2: Click Download Image.
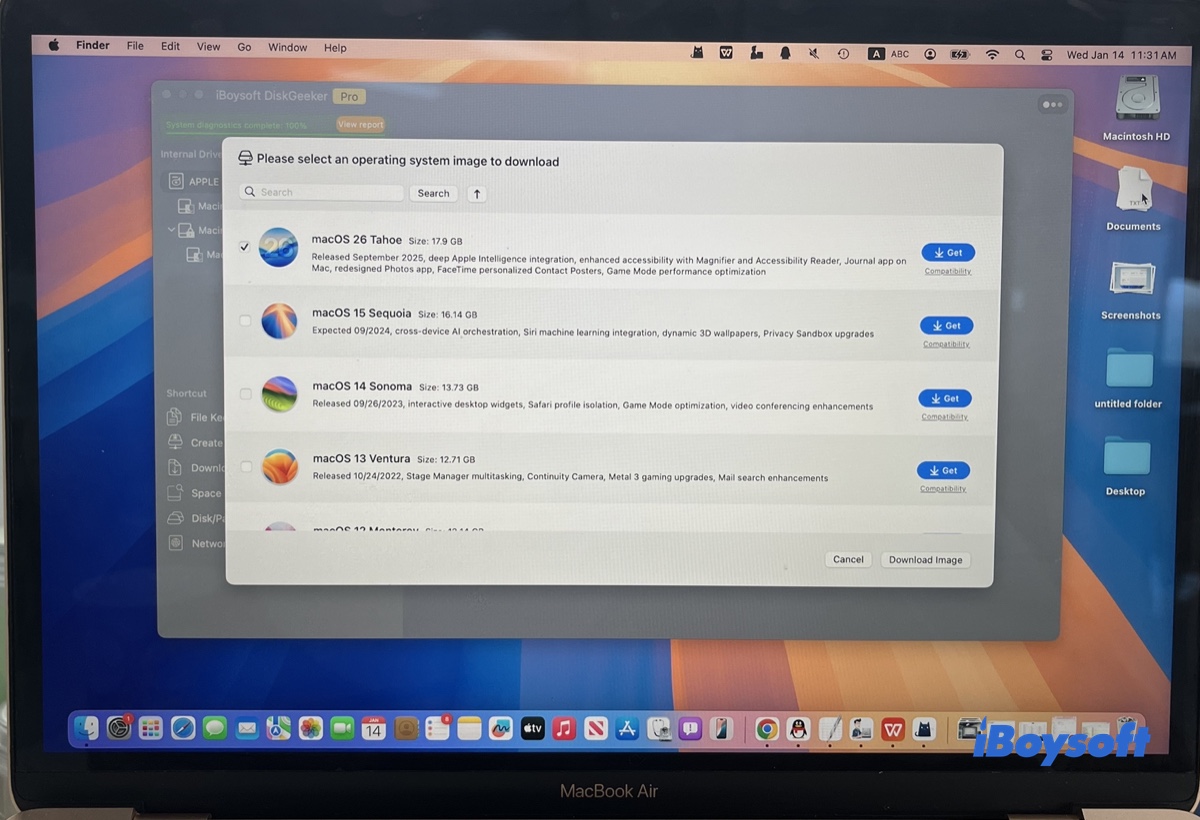
Step 3: Choose the macOS version you need and click Get.
After that, you can follow step 6 to convert .dmg to .iso.
What is InstallAssistant.pkg?
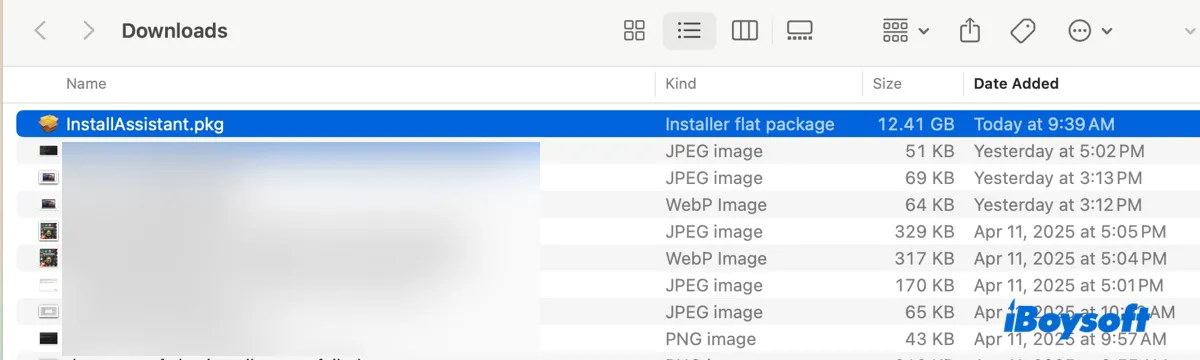
The InstallAssistant.pkg file is the same full installer that you would download from the Mac App Store, but in the .pkg format. It's stored on Apple's servers and contains the full "Install macOS xxx.app."
It was created when Apple revised the installer for macOS Big Sur. Therefore, the InstallAssistant.pkg is only available for macOS Big Sur, macOS Monterey, macOS Ventura, macOS Sonoma, and macOS Sequoia.
Note: Unfortunately, you can't convert InstallAssistant.pkg to ISO on Windows computers. If you don't have a compatible Mac, try borrowing one from a friend, a family member, your organization, or the local Apple Store.
We'll use macOS Sequoia as an example to explain how to convert InstallAssistant.pkg to .iso on Mac.
Step 1: Install the InstallAssistant.pkg file in the Applications folder
To create a bootable macOS ISO file, you need the installer in the .app format. Since InstallAssistant.pkg is a package file format, you must install it to access the full installer app.
Double-click on it to open the InstallAssistant installer, then follow the on-screen instructions to install it.
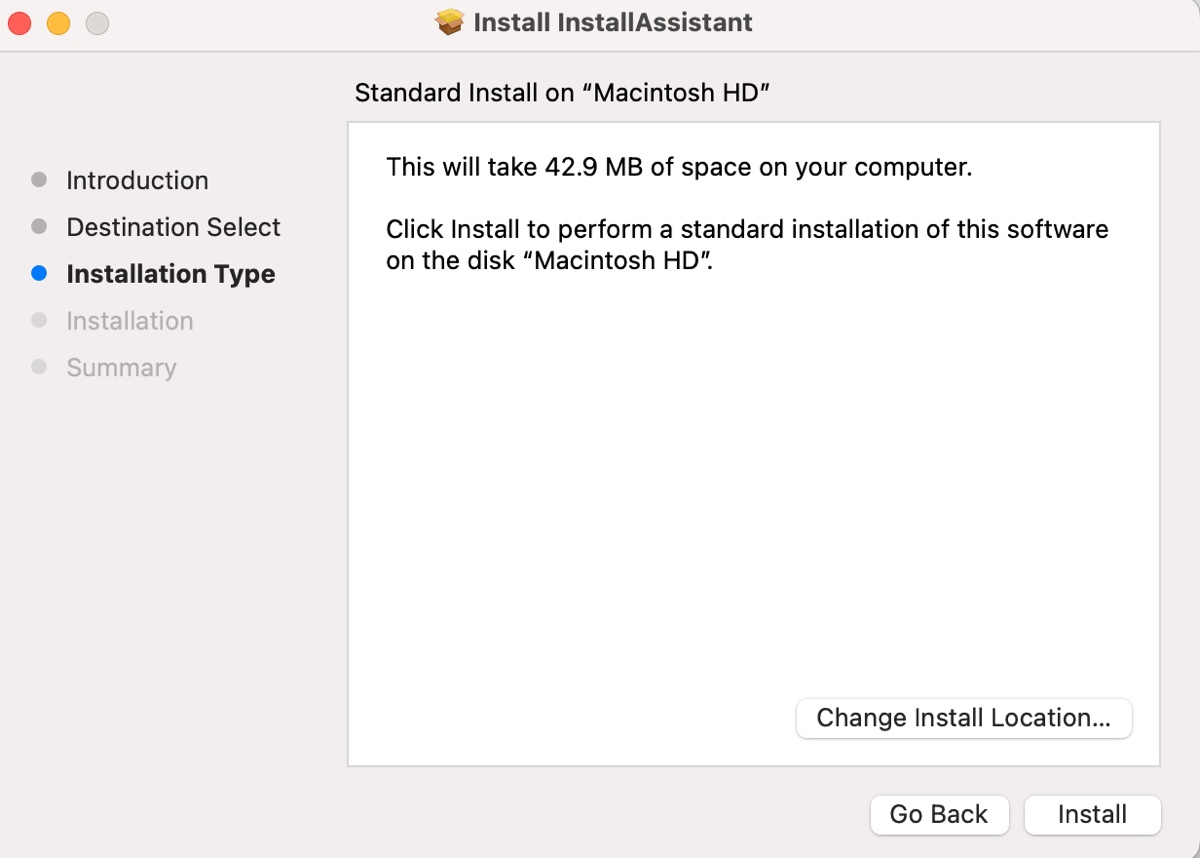
Once installed, you should find the Install macOS xxx.app (e.g., Install macOS Sequoia.app) in the Applications folder.
Step 2: Create an empty DMG file in Terminal
The next step is to create a DMG file. Then, you can convert the DMG file to ISO.
Open Terminal and execute the command below:
hdiutil create -o /tmp/Sequoia -size 13000m -volname Sequoia -layout SPUD -fs HFS+J
This command creates a 13GB disk image named "Sequoia" in the /tmp directory, using a single partition layout with the HFS+J file system. The volume name of the disk image will be "Sequoia" when it's mounted.
If you're using a different version, replace Sequoia with it and change 13000m to ensure the size of the disk image is larger than the macOS installer.
Here's a breakdown of the command:
hdiutil create: This part of the command tells hdiutil to create a new disk image.
-o /tmp/Sequoia: The -o flag specifies the output path and name for the disk image being created. In this case, the disk image will be created in the /tmp directory with the name Sequoia.
-size 13000m: This specifies the size of the disk image. The 13000m indicates that the disk image should be 13GB in size.
-volname Sequoia: The -volname flag sets the volume name of the disk image. When the image is mounted, it will appear with the name "Sequoia".
-layout SPUD: This specifies the partition layout of the disk image. SPUD stands for "Single Partition - Apple Partition Map", which is a common partition scheme used for compatibility with older Mac systems.
-fs HFS+J: The -fs flag sets the file system format for the disk image. HFS+J stands for HFS Plus with Journaling, which is a file system used by macOS that includes a journaling feature to help protect against data corruption.
Step 3: Mount the empty disk image on Mac
Then you need to mount the created disk image in the previous step with the following command:
hdiutil attach /tmp/Sequoia.dmg -noverify -mountpoint /Volumes/Sequoia
This command mounts the Sequoia.dmg disk image located in the /tmp directory to the /Volumes/Sequoia directory without verifying its integrity.
Here's a breakdown of the command:
hdiutil: This is a command-line utility in macOS used for manipulating disk images. It can perform various operations such as creating, converting, verifying, mounting, and unmounting disk images.
attach: This is a subcommand of hdiutil that is used to mount a disk image. When you attach a disk image, it becomes accessible in the file system.
/tmp/Sequoia.dmg: This specifies the path to the disk image file that you want to mount. In this case, the disk image is located in the /tmp directory and is named Sequoia.dmg.
-noverify: This option tells hdiutil not to verify the checksums of the disk image before attaching it. This can speed up the mounting process but skips the integrity check.
-mountpoint /Volumes/Sequoia: This option specifies where in the file system you want to mount the disk image. In this case, it will be mounted at /Volumes/Sequoia. The /Volumes directory is typically where macOS mounts external drives and disk images.
Step 4: Create a bootable installer on the mounted disk image
After the image is mounted, you can use the createinstallmedia utility to make the final ISO file bootable.
sudo /Applications/Install\ macOS\ Sequoia.app/Contents/Resources/createinstallmedia --volume /Volumes/Sequoia --nointeraction
This command uses sudo, which requires administrator privileges. So you'll need to enter your administrator password and hit Enter.
Step 5: Unmount the bootable disk image
When the install media is created, you can unmount the bootable image:
hdiutil detach /volumes/Install\ macOS\ Sequoia
hdiutil: This is a command-line utility on macOS for managing disk images.
detach: This is the subcommand used with hdiutil to unmount or eject a mounted disk image or volume.
/volumes/Install\ macOS\ Sequoia: This specifies the path to the volume you want to detach. In this case, it is the volume named "Install macOS Sequoia." The backslashes (\) are used as escape characters to handle spaces in the volume name. Without these escape characters, the command line would interpret the spaces as separators between different arguments.
Step 6: Convert the bootable DMG file to a CDR file
In this step, you need to convert a disk image named Sequoia.dmg from the /tmp directory into an ISO 9660 format and save it as Sequoia.cdr on the Desktop. Also, you can convert the DMG file to ISO directly.
hdiutil convert /tmp/Sequoia.dmg -format UDTO -o ~/Desktop/Sequoia.cdr
hdiutil: This is a command-line utility on macOS for manipulating disk images.
convert: This is the subcommand of hdiutil that is used to convert disk images from one format to another.
/tmp/Sequoia.dmg: This specifies the source file that you want to convert. In this case, it's a disk image file named Sequoia.dmg located in the /tmp directory.
-format UDTO: This option specifies the format to which you want to convert the source disk image. UDTO stands for "Universal Disk Image Format" (ISO 9660), which is a format that can be used for creating CD/DVD images that are widely compatible.
-o ~/Desktop/Sequoia.cdr: The -o option specifies the output file path and name. Here, it indicates that the converted file should be saved as Sequoia.cdr on the user's Desktop (~/Desktop). The ~ symbol represents the current user's home directory.
Step 7: Rename the CDR file to ISO file
Now, you can rename the file Sequoia.cdr to Sequoia.iso while keeping it in the same location.
mv ~/Desktop/Sequoia.cdr ~/Desktop/Sequoia.iso
mv: This is the command used to move or rename files and directories.
~/Desktop/Sequoia.cdr: This is the source file that you want to move or rename. The ~ symbol represents the home directory of the current user, so ~/Desktop/ refers to the Desktop folder within that user's home directory. Sequoia.cdr is the name of the file located on the Desktop.
~/Desktop/Sequoia.iso: This is the destination path and filename. In this case, it's in the same Desktop folder (~/Desktop/), but with a different file extension (Sequoia.iso).
These are the steps to convert InstallAssistant.pkg to ISO on Mac. Share them if they are useful!