Although people today prefer to use USB flash drives, external hard drives, or network drives to make data backups and share files between different devices, sometimes you need to burn a CD or DVD disc on your Mac for those purposes.

This article offers a detailed guide on how to burn a CD on a MacBook Pro. It also includes step-by-step instructions on how to burn a music CD on a MacBook Pro. Here is how to do it.
Burn a CD on a MacBook Pro: the basics
Before you dive into the steps, you need to make sure that your MacBook Pro has a built-in optical drive. Apple has discontinued DVD drives and CD drives on its MacBook Pro lineups for some years. The last Apple Mac shipped with an optical CD or DVD drive was a 13-inch MacBook Pro and it was on sale until 2016.
You can also check if you have a built-in optical drive on your MacBook Pro by going to the Apple menu > About This Mac > System Report > Disk Burning. If you don't see an optical drive listed that supports discs in CD, DVD, or Blu-Ray format, an optical drive is not available.
Without a native optical drive, you can connect an external CD burner to your Mac. If you are going to burn a DVD on your Mac, check if you have an external DVD drive (for example, an Apple USB SuperDrive) or a DVD burner.
Then you need to obtain a blank CD. Getting a blank and writable CD is very critical for storing information from a Mac to a CD. Some professionally burned CDs cannot be written over because they are burned with special methods. Get a blank CD-R (Writable for once), CD-RW (Rewritable), DVD-R, or DVD-RW disc.
How to store files on a CD on a MacBook Pro?
When you are ready to burn files from your Mac onto a CD disc, follow the steps below.
Step 1: Insert a blank disk into your optical drive, CD, or DVD burner drive.
Step 2: In the pop-up dialog choose Open Finder.
Select "Make this action the fault" if you want to open the Finder app every time you insert a blank disc. The disc will appear on your Mac desktop and Finder as an 'Untitled CD" or "Untitled DVD".
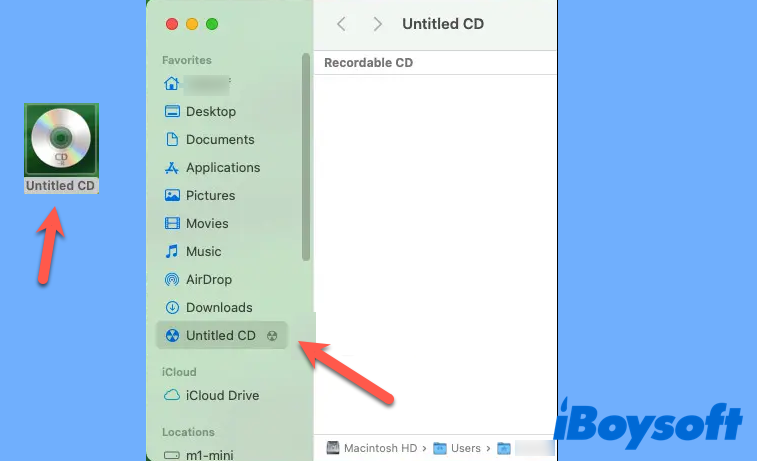
Step 3: Double-click the icon or click the sidebar shortcut to open the blank disc.
Step 4: Move the items to the disc. You can directly drag and drop files or folders to the blank disc window. Images and DMG files are supported. Change the names if necessary because you can't modify the names after they are burned.
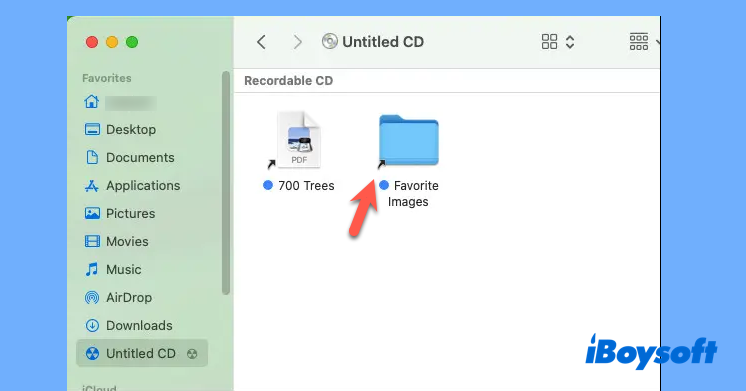
You will see all items in the disc folder have an arrow. It means that these items are temporary shortcuts and have not been written to your CD disc yet. You can also drag the files or folders to the Trash to delete them and this action won't affect your original data.
Step 5: Click the "Burn" button in the upper-right corner of the Finder window. Give the CD/DVD a name and click Burn again to permanently burn the files to the disc.
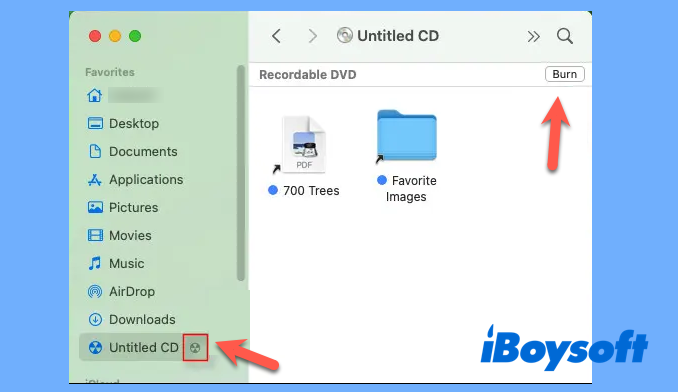
Step 6: Wait until the progress bar completes and then reject the disc.
When you connect the burned CD to a Mac or a PC again, you will see the disc in the file management tool
How to burn a music CD on a MacBook Pro?
If you are going to burn music on a CD or burn an audio CD on a Mac to be played on a CD player, you should use iTunes or whichever music playing software instead of Finder.
Follow the steps to create a CD in Music on macOS Monterey:
Step 1: Open iTunes and log in.
Step 2: Click the "File" in the menu bar and select "New Playlist".
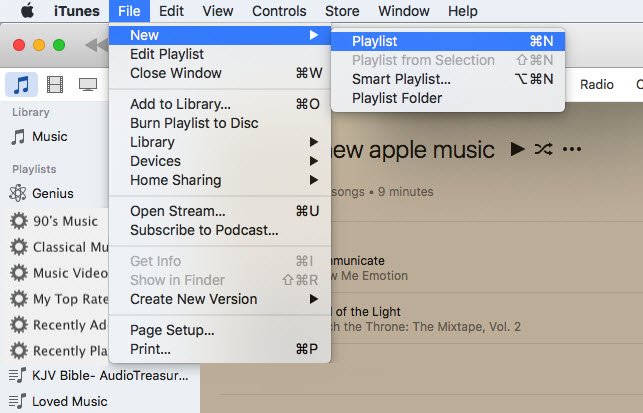
Step 3: Tick the songs you want to burn onto the CD and drag them into the newly created playlist.
Step 4: Insert the blank disc or connect the CD or DVD drive to the Mac.
Step 5: Click the playlist, then choose File in the menu bar and click "Burn Playlist to Disc".

Step 6: In the dialog window when creating an audio CD, choose your options as below:
- Preferred Speed - Maximum Possible
- Disc Format - Audio CD
- Gap Between Songs - 2 Seconds
- Tick Use Sound Check
- Tick Include CD Text
Step 7: Click "Burn" to create a Music CD on Mac.
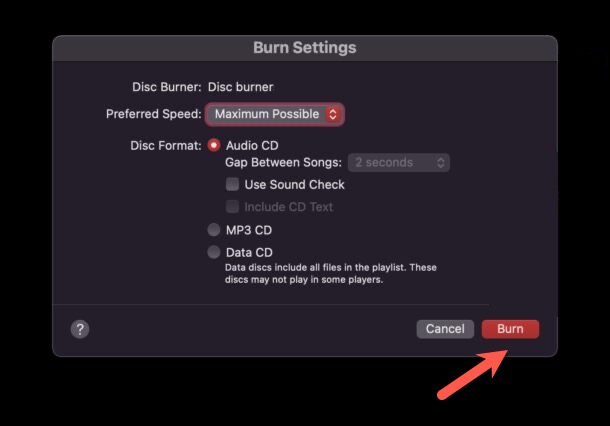
Wait for the burn to complete and the task takes a few minutes.
Why can't I burn a CD on my Mac?
There are multiple reasons why you can't burn a CD on your Mac successfully, ranging from the insufficient capacity on the disc to incompatible disc formats. Find out the solutions to the failure of a CD burn.
If you have problems burning files on your disc on Mac:
1. Check if your CD burner drive and your CD disc are fully recognized by the Mac. If not, use another device or cable.
2. Choose Apple logo > About This Mac > System Report > Disk Burning. Review the information of your optical drive or external CD burner to make sure the format of your blank CD disc is supported.
3. Delete some items or change the size or quality of items to reduce file sizes so that your CD disc has enough available space for the burn.
4. Spare 700 MB to burn a CD on your Mac's internal disk.
5. Use a CD-RW disc to store information because a CD-R disc can only be written once and it could have been recorded before.
If you have problems burning a Music CD on Mac:
1. Make sure you create a new playlist before burning a CD in Music. You can't burn a disc directly from your music library, a shared playlist, or your iPod.
2. You may have exceeded the number of times (seven) you can burn a playlist that includes iTunes Store purchases with DRM protection.
3. Authorize the Mac to play iTunes Store purchases because unauthorized songs in the playlist will cause a stop for burning a music CD.
In the End
Burning a CD means writing data on a CD. A burned CD or DVD is not a good choice for long-term backups and multiple data overwrites because they can become unreadable. To get more reliable and robust backups and file sharing, consider using a network drive, cloud storage, or Time Machine.
FAQ about burning a CD on Mac
- QHow do I burn a CD on a MacBook without a CD drive?
-
A
If you doesn't have an optical drive on your MacBook, you can get an Apple USB SuperDrive or other external disc reader that plugs into your Mac through a USB cable. Then insert a CD or DVD to it and you can access discs on your Mac for burning a CD/DVD. In addition, you can also use the built-in Remote Disc feature to use the disc inserted in another Mac as the optical driver as long as the two Macs are on the same network.
- QDoes MacBook Pro have a CD drive?
-
A
Apple has discontinued a built-in CD/DVD drive on MacBook Pro in 2012, leaving the 13-inch MacBook Pro the only laptop with a CD/DVD drive available until 2016. On newer MacBook Pro models, MacBook Pro does not have a CD drive.