A drive comes into the RAW state indicating its file system is unknown, blank, or corrupted. It is not unique to Windows but also comes to macOS with barely different ways and symptoms.
Unlike the drive directly being labeled as RAW on Windows, Mac will not name a drive as RAW whereas you can see that the RAW drive is unmounted in Disk Utility or becomes unreadable on your macOS Sonoma device.
If any of these symptoms happen to your drive, your hard drive gets RAW already. Facing this, the priority is to fetch the files and data stored on it and then fix the RAW drive on Mac immediately.
Just keep reading for more details on how to retrieve files from a RAW drive and how to fix a RAW drive on a device running macOS Sonoma, Ventura, Monterey, Big Sur, etc.
Table of Contents:
- 1. What reasons lead a hard drive to be RAW?
- 2. How to retrieve files from a RAW hard drive on macOS Sonoma?
- 3. How to fix the RAW drive on macOS Sonoma?
What reasons lead a hard drive to be RAW?
Before digging into how to grab files and folders from the RAW drive on a device running macOS Sonoma, let's have a basic knowledge of the possible culprits making the hard drive RAW.
- The hard drive is attacked by a virus.
- Unexpected power failure when you're using the disk for storage work.
- The drive has bad sectors.
- The drive is formatted or repartitioned improperly.
- A sudden disconnection of the drive from your device when it's used.
Each reason listed above is possible to corrupt the drive's file system and cause your drive to be RAW. You'd better always make a full backup of the important files and data on a storage device or you will suffer from data loss.
Why not share this article to help more people who lose files on a RAW hard drive on your social platform?
How to retrieve files from a RAW hard drive on macOS Sonoma?
Once the hard drive becomes RAW, it is inaccessible, unreadable, and corrupted on your device. So it's not easy to retrieve videos, audio, RAW files, pictures, documents, numbers, and other files with different file formats from the RAW drive. Only software with advanced disk scanning skills and fabulous data recovery algorithms can recover significant files and folders from a RAW hard drive without a hitch.
iBoysoft Data Recovery Software is an application that enables you to retrieve files from an inaccessible, unreadable, corrupted, broken, and failing hard drive. With an intuitive and user-friendly interface, you can grab any data from a hard drive with easy operations.
Best RAW Drive File Recovery Software - iBoysoft Data Recovery for Mac
- Recover deleted photos, documents, audio files, videos, emails, etc.
- Recover deleted files from HDD, SSD, flash drives, SD cards, etc.
- Support APFS, HFS+, exFAT & FAT32 formatted drives.
- macOS Sonoma, Monterey, Big Sur - Mac OS X El Capitan supported.
- T2 Chip Macs & Apple Silicon Macs supported.
- Unbootable Mac data recovery supported.
Read-only & risk-free
How to recover files from a RAW hard drive on macOS Sonoma:
Step 1: Click the Free Download button below to install iBoysoft Data Recovery Software for Mac on your device. You can put the software anywhere and it won't erase data stored provided that the drive is unreadable and unwritable.
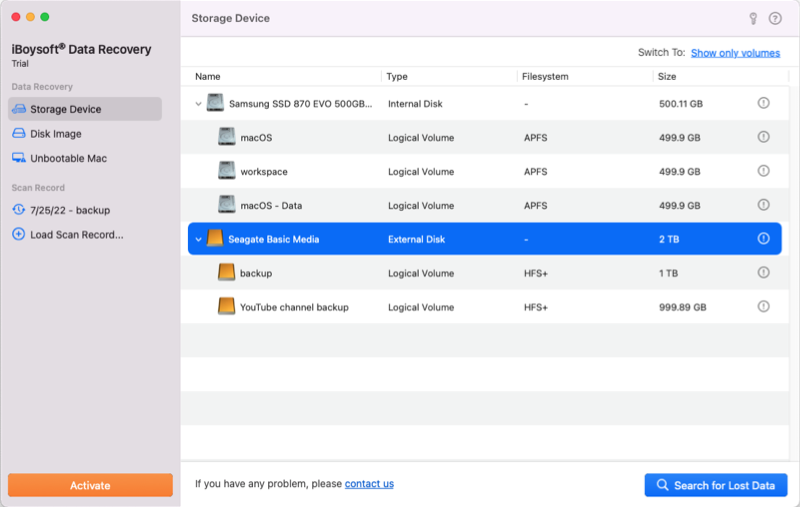
Step 2: Launch this software and select your RAW drive from the drive list for further operations.
Step 3: Click Search for Lost Data to begin drive scanning for the inaccessible files.
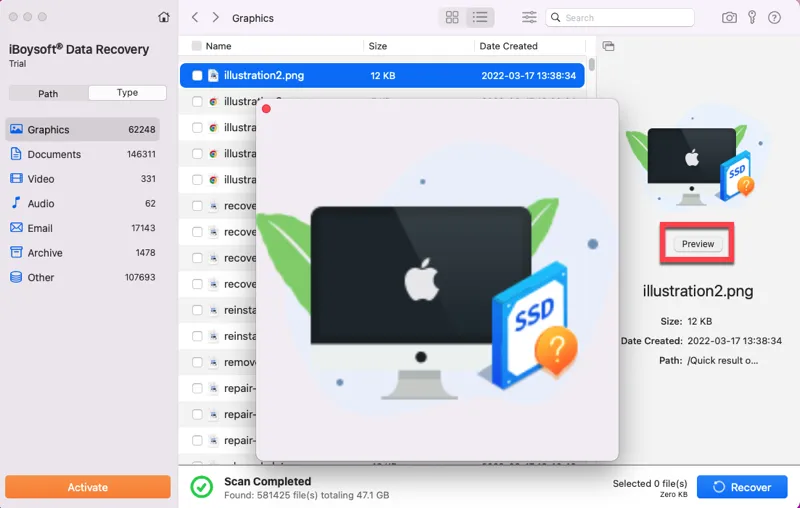
Step 4: Click Preview to check the scanned results, then check the box next to the files that you need, and click Recover to start the file retrieval task.
Step 5: Save the checked files well and it'll be best to make a backup of the files to avoid further data loss.
Let's share your joy about the founded files with your friends and families by clicking the Share button below!
How to fix the RAW drive on macOS Sonoma?
For the drive partition being RAW, you can format it to a functional file system. If you're gonna use it on Windows, NTFS is recommended. For macOS users, APFS, HFS+, and HFS are suggested. While if you want to apply the drive with RAW partition on both macOS and Windows, FAT 32, FAT16, and exFAT are available.
Besides, you can make use of iBoysoft NFFS for Mac to gain full read/write access to an NTFS formatted drive on your Mac computer and launch APFS for Windows software to perform the writing actions on a Windows.
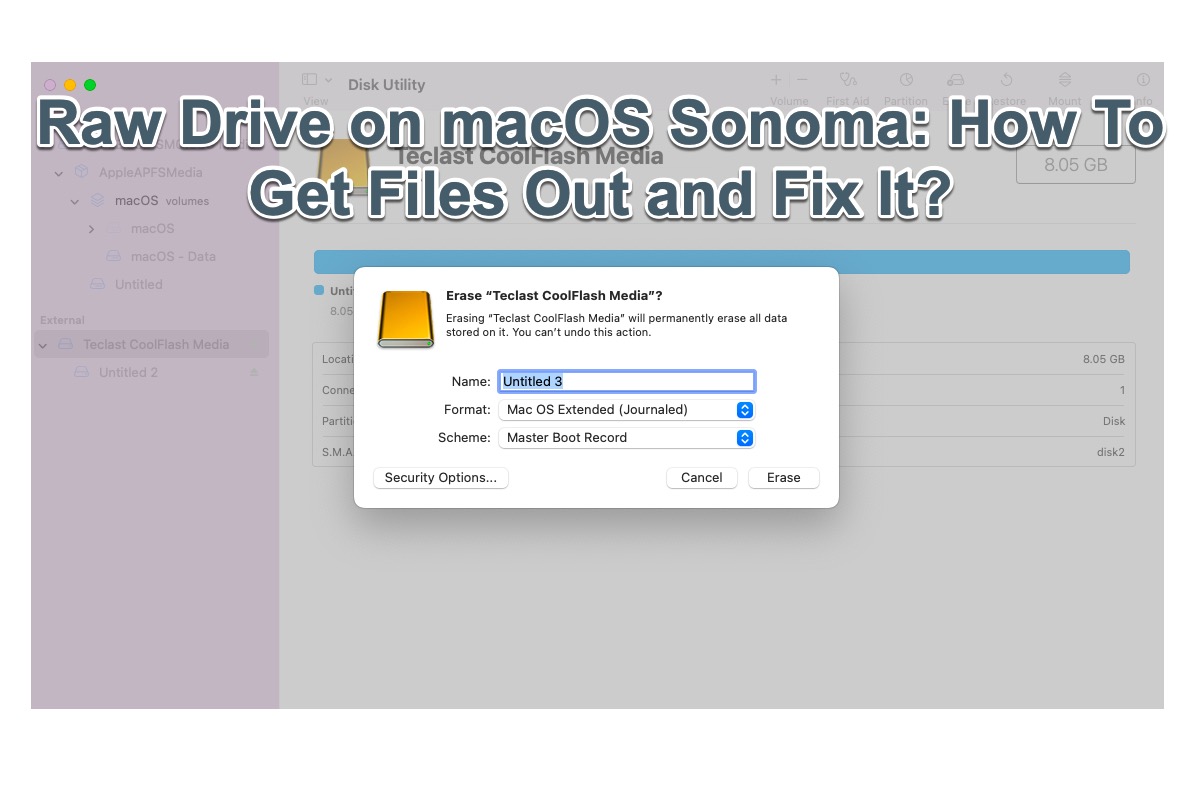
How to format a RAW drive on macOS Sonoma in Disk Utility?
You can give the RAW drive in Disk Utility on your device running macOS Sonoma, Ventura, Monterey, and earlier macOS versions, which is easy and simple. Let me show you how to do it here:
- Launch Disk Utility on your Mac computer.
- Click the View button and select Show All Devices so that every hard drive will appear.
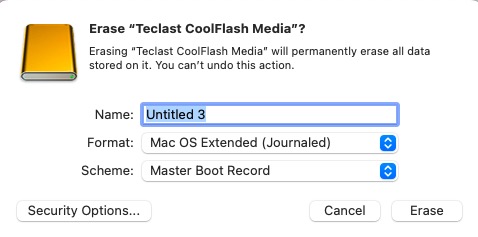
- Select the drive with RAW partition and click the Erase button in the menu bar.
- Fill in the Name box, and select a file system you want in the Format box.
- If you select APFS, GUID Partition Map is recommended in the Scheme box. For NTFS and FAT-related fils systems, you'd better choose Master Boot Record.
- Click Erase to confirm your actions and wait for Disk Utility to give you the response.
When the formatting work ends, you can use the hard drive for storage purposes on your computers.
How to format a RAW drive on macOS Sonoma via Terminal?
If you're a command line lover, formatting the RAW hard drive in Mac Terminal also works fine.
Step 1: Launchpad → Other → Terminal, and click Terminal.
Step 2: Input the following command, and press Enter to list out all your disks.
diskutil list
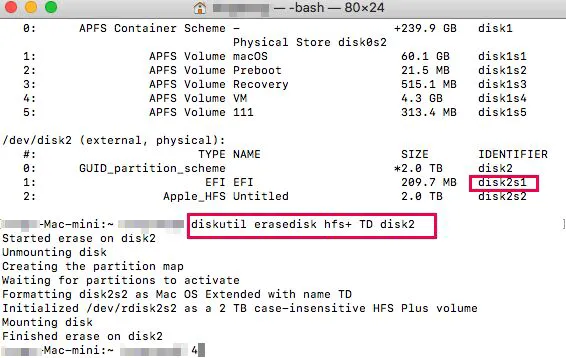
Step 3: Input the "erase" command: diskutil erasedisk + new file system + new disk name + identifier.
For example: to format the whole disk 2 to hfs+, the operating command is:
diskutil erasedisk hfs+ TD disk2
To format a single volume to hfs+, like disk2s1, the operating command is:
diskutil erasedisk hfs+ TD disk2s1
Please note that "TD" is the name that I give to the new disk and it can be replaced by any word you like. On top of that, "disk 2" is the IDENTIFIER, or rather, the target disk that I want to format.
If you successfully make the RAW drive functional by giving it a new file system, please share this article with more people!
Last word
If your hard drive becomes unmounted and unreadable, it's wise to take the RAW state into consideration before replacing it for storage purposes. You have to grab files stored on it before drive fixing while accessing files from a RAW drive on macOS Sonoma is not as tough as you imagine, since iBoysoft Data Recovery Software for Mac is always ready to help recover inaccessible and lost files, which also helps recover lost photos after the macOS Sonoma update.
Besides, formatting the RAW drive is the only solution to make it usable again, which is also covered in this article. If you have a RAW drive at hand, try this article to get the files and fix the drive right at this moment!