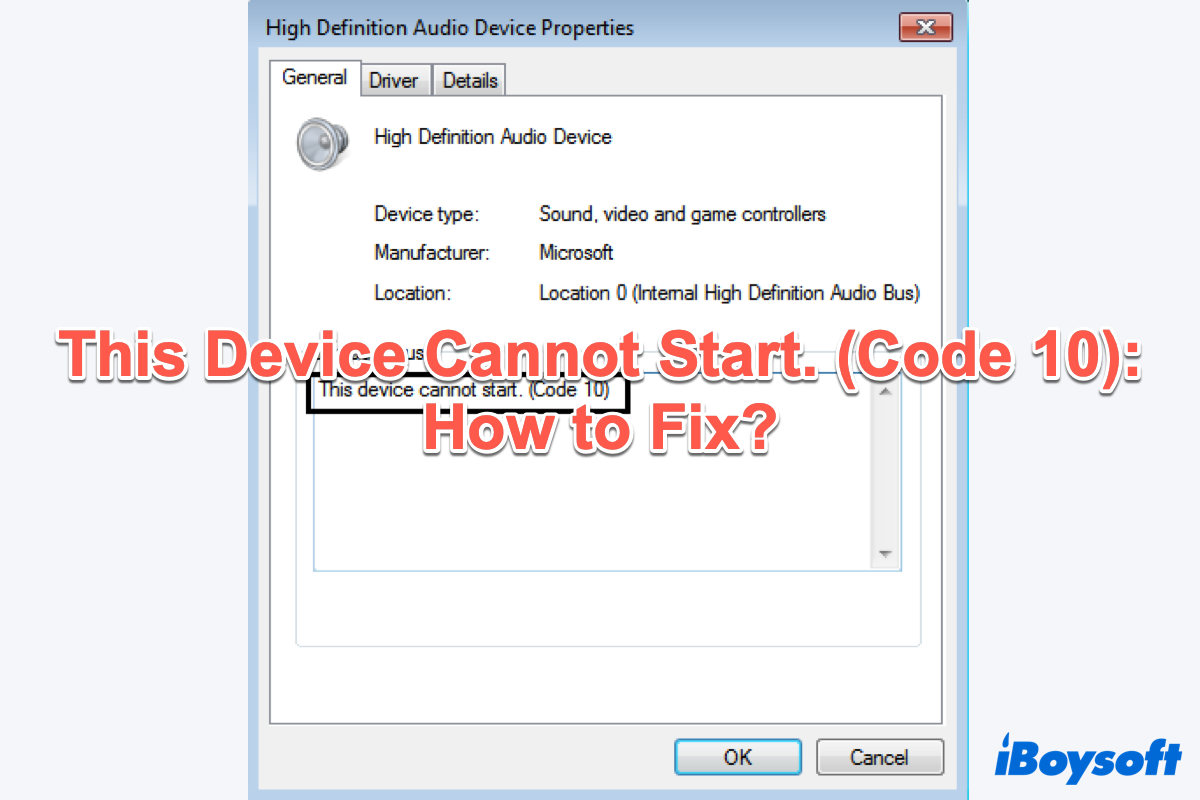
Discovering the "This Device Cannot Start. (Code 10)" error when you connect an external hard drive to your computer while finding it doesn't function well? You're in the right place. This error code happens to various versions of Windows and this article is going to walk you through 10 fixes for ruling out this trouble.
The background of 'This Device Cannot Start Code 10'
Before diving into how to deal with the error code 10 on a Windows computer, let's figure out what is it and why it appears on your device.
First of all, the Code 10 This Device Cannot Start status refers to removable devices, like a printer, a USB flash drive, or more, and often happens when your device fails to run it.
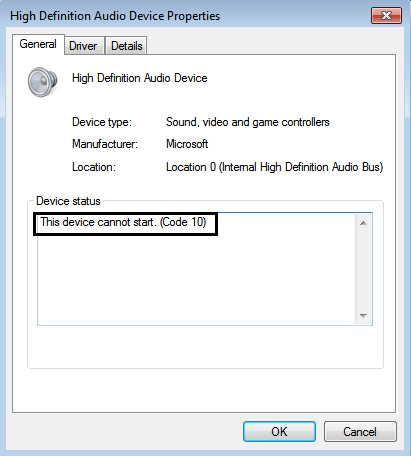
The error code 10 on Windows often hits when your computer fails to run the connected devices. To be more specific, it can appear after the Windows computer tries to install the driver for a new device, or it might make the CD drives, Bluetooth hardware, network adapters, High-Definition Audio Controllers, and storage devices invisible on This PC of your computer.
What's more, you can also head to the General tab of Device Manager to check its operation failed status.
Many thanks if you move a finger to share the helpful article on your social platform to help more people!
How to fix This Device Cannot Start Code 10 on Windows?
With a basic understanding of Code 10 This Device Cannot Start mistake, now let's concentrate on how to solve it on Windows. This article guides you with 10 certain solutions and they are elaborated down there one by one.
Fix 1: Connect the removal devices to another computer
Before trying any professional solutions, let's rule out the connection problem first. You can insert the peripheral devices into other computers to see if they also happen to you This Device Cannot Start. (Code 10) problem. If so, jump to the following solutions.
Fix 2: Restart your computer
Whatever device error or mistake you meet, the easiest and most effective way is to reboot your computer which definitely clears up kinds of errors and problems. Here, you should perform a simple device restart first. Do not forget to unplug your removal device and then plug it in gently after the restart.
If the Windows restart fails to rule out This Device Cannot Start. (Code 10) on your computer, switch to the following fixes.
Fix 3: Run the Hardware and Devices troubleshooter
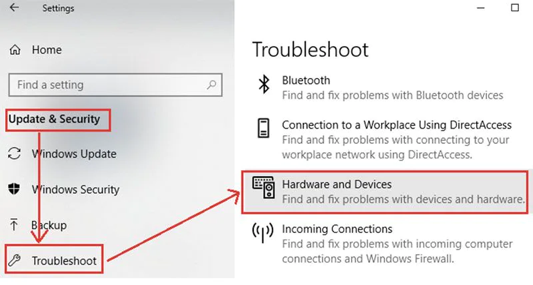
The Hardware and Devices troubleshooter is a native feature designed in Windows that finds and fixes problems with devices and hardware. Here I will show you how to launch it on your computer:
- Click Settings and select Update & Security on your PC.
- Select Troubleshoot in the Update & Security tab and click on Hardware and Devices.
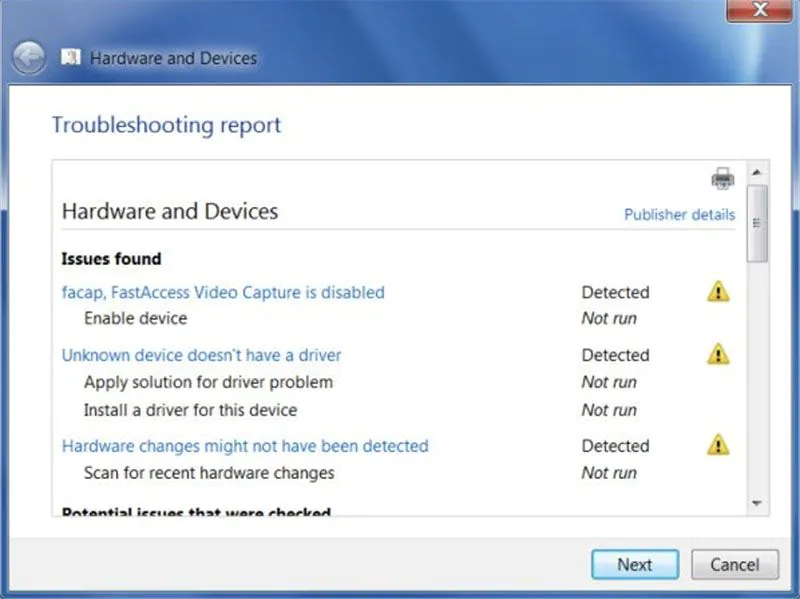
- Once the Hardware and Devices troubleshooter opens, click on Next to run it.
- The troubleshooter will scan and presents you with a report. You can select one you want to fix and click on Next to begin the repairing process.
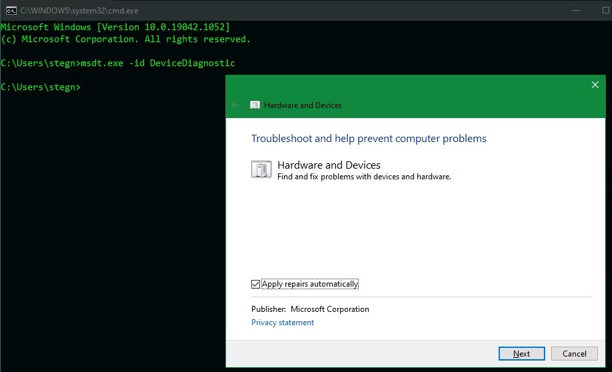
For some reason, Microsoft canceled this wonderful toolset from the Troubleshoot menu in Windows 10 and Windows 11, but you still have access to it by running Command Prompt.
Step 1: Press Win + R keys to open the Run menu and enter the following command lines:
msdt.exe -id DeviceDiagnostic
Step 2: Hit the Enter/Return key to open the troubleshooter and click Next to find and fix the problems with devices and hardware.
Fix 4: Recall the recent changes on the Device Driver
If your computer still shows you the error, recalling the recent changes you have made on the Device Driver is worth a shot. Follow the steps mentioned below:
Step 1: Disconnect all the external drives from your PC.
Step 2: Roll back the device driver on your Windows device.
- Right-click the Windows menu and select Device Manager from the dropdown menu.
- Locate the device that you want to roll back the driver.
- Click the downward-pointing arrow icon on the left side to expand the hardware menu.
- Right-click the chosen device driver and select Properties from the context menu.
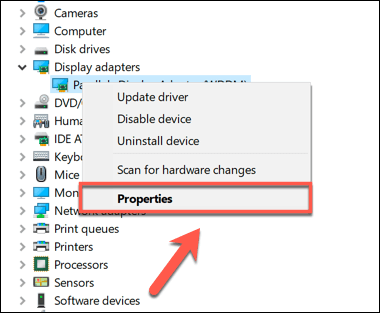
- Head to the Driver tab in the Properties section.
- Locate the Roll Back Drivers and click it to proceed.
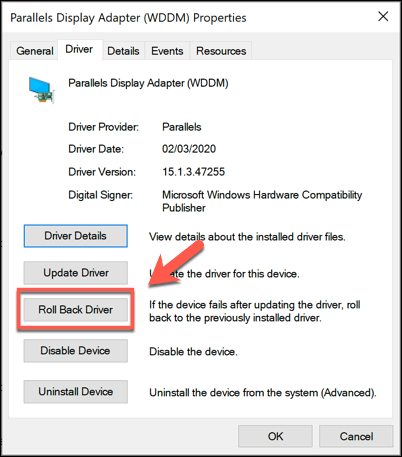
If the Roll Back Driver feature is grayed or disabled, it indicates that there are no available options for you to run it. In this case, you can jump on this solution and focus on other ones.
Fix 5: Uninstall the device from the computer system
You can also uninstall the device from your Windows system completely to solve the error code 10 status on your external hard drive.
- Launch Device Manager on your Windows computer.
- Locate the problematic drive and right-click it to select the Properties option.
- Head to the Driver tab and click Uninstall Device in the main window.
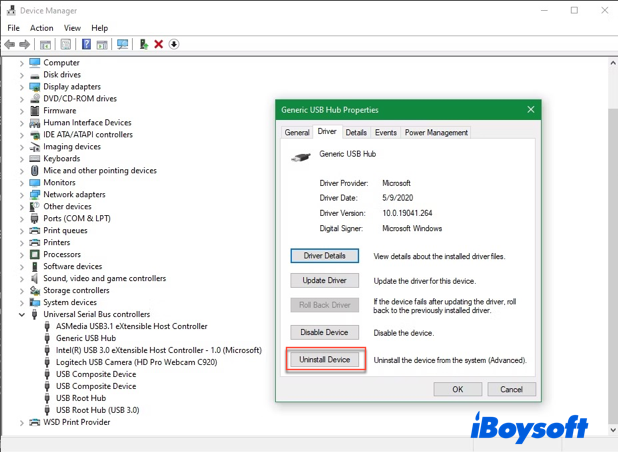
- When the process ends, restart your computer.
When Windows restarts, it should install generic drivers for some devices, such as mice and keyboards. However, you'll almost certainly have to manually reinstall any manufacturer-specific drivers, such as the gaming mice.
Fix 6: Update the device driver
An outdated driver certainly brings you some troubles like This Device Cannot Start Code 10 status so you're suggested to update the device driver in the turn of a hand.
- Press the Win + X keys together and select Device Manager from the dropdown menu.
- Locate the Universal Serial Bus controllers option and expand its menu.
- Select the Update driver software option from the pop-up list.
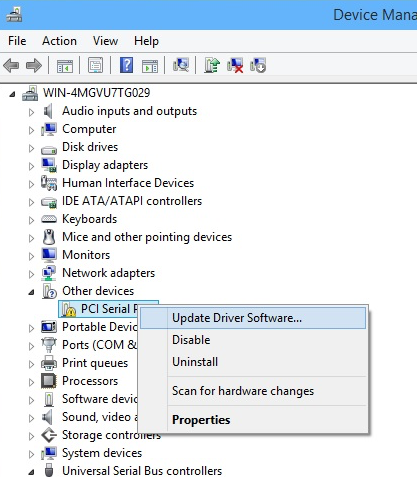
- Tap on the Search automatically for updated driver software option.
These actions make your computer search for all available updates and upgrade the old device driver automatically.
Fix 7: Update the Windows OS
A Windows OS update may troubleshoot the error code 10 status effectively because an update always fixes unknown bugs and improve computer security, and boost the user experience. Performing a Windows OS update work never comes as complex as your imagination. Follow the guidelines to check if there is any available update on your computer.
- Click the Start menu and head to the Settings tab.
- Click the Update & Security option in the Settings tab.
- Select Windows Update from the left sidebar of the Settings tab, and then tap on Check for Updates in the prompt window.
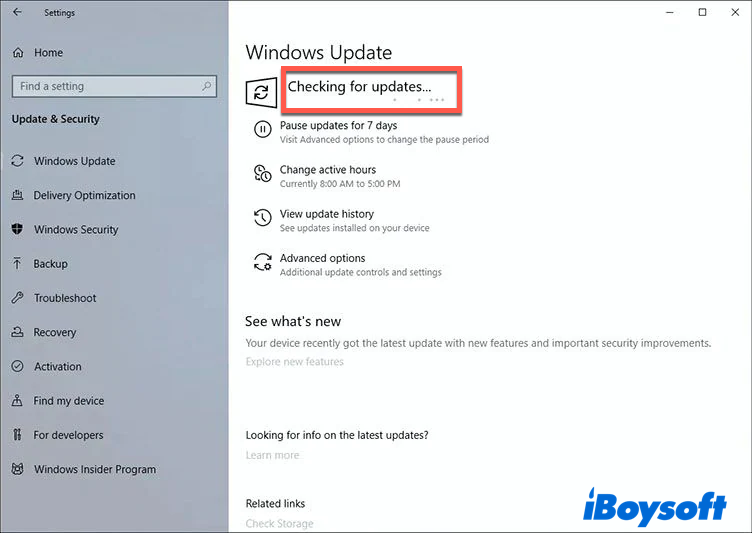
- You can see a new window telling you that the updates have begun and a progress bar reminding you of the remaining time.
- Follow the instruction to restart your computer when you're asked to do so and wait for the whole process to end.
Fix 8: Perform System Restore
Do not feel frustrated if all the mentioned above fixes fail to make the error code 10 go away and insist on performing a System Restore. System Restore is an old yet effective way to repair This Device Cannot Start error code. Follow the instructions to complete a System Restore:
- Save all your files to avoid any data loss during the restoration process.
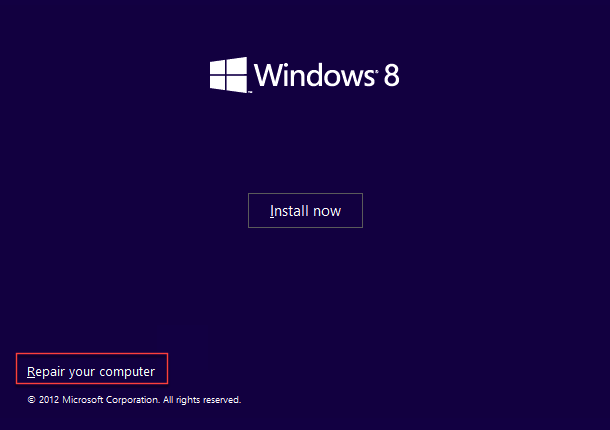
- Boot your system with Windows Installation Media and click Repair your computer.
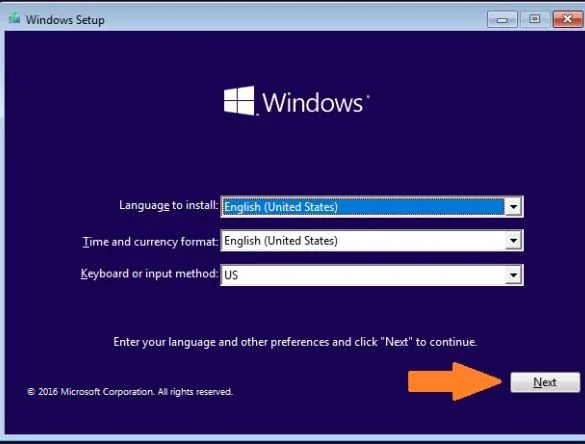
- Choose the language you usually use and click Next to go ahead.
- Click Advanced options in the Troubleshoot main window.
- Select System Restore in the Advanced options tab.
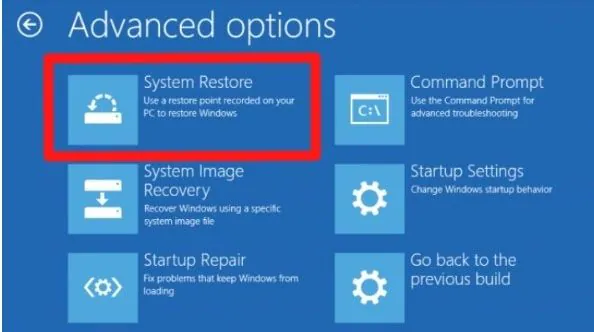
- You need to select the restore point now. Once done, click Next.
- When seeing a Confirm your restore point window, click Finish.
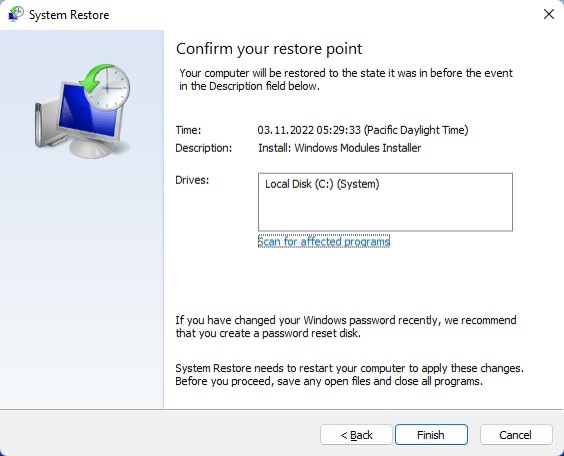
- When a window prompts you that "Once Started, System Restore cannot be interrupted. Do you want to continue?", click Yes.
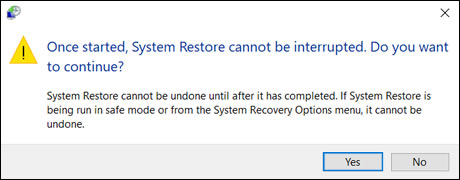
- With all these actions done, your device is going to restore to the chosen point.
Fix 9: Fix corrupted Registry entries manually
Registry Editor contains so many significant system files on your computer. It works when you want to make Windows Microsoft Defender automatically scan USB drives and fix the error code 10 problems.
When encountering This Device Cannot Start. Code 10 status, you can delete some Registry values related to filter drivers. The Registry values work between Windows and the hardware and you can fix the corrupted Registry entities to fix error code 10. Here I am gonna show you how to delete UpperFilters and LowerFilters:
Step 1: Find the relevant Registry entries on your computer
- Press Win + R to open the Run dialogue box and enter regedit to launch Registry Editor.
- Copy the following path and paste it to the navigation box on the main window of Registry Editor to the targeted location.HKEY_LOCAL_MACHINE\SYSTEM\CurrentControlSet\Control\Class
- Locate Class and expand it, then you can see many folders subordinated to it and all these GUIDs indicate different types of hardware in the Device Manager.
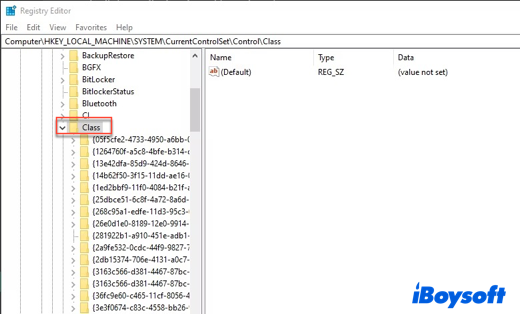
Step 2: Find the hardware value on your computer
- Launch the Device Manager and locate the device that shows This Device Cannot Start. (Code 1) status.
- Double-click or right-click the problematic device and switch to the Details tab.
- Find the Property box and change it to Class Guid.
- Then you can see a string of numbers and letters in the Value section.
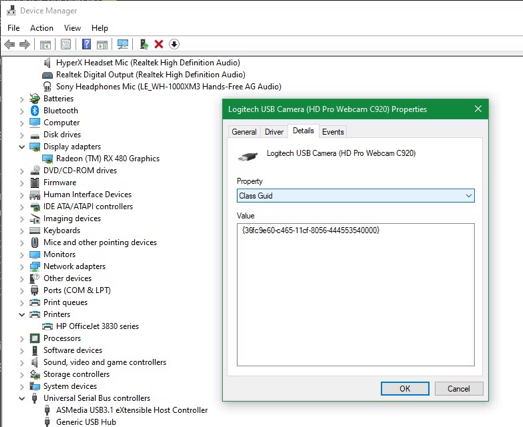
- Copy the Values information and return back to Registry Editor.
Step 3: Delete the UpperFilters and LowerFilters
- Press the Ctrl + F keys and paste the Values information that you copy to navigate the corresponding folder.
- Open the right folder and look for the UpperFilters and LowerFilters. You might find only one of them and it is Okay. If you fail to see either, check if you get the right GUID. If you're sure that the GUID is right and still don't find the UpperFilters or LowerFilters, then this method will not work for you.
- Right-click on UpperFilters or LowerFilters and click Delete.
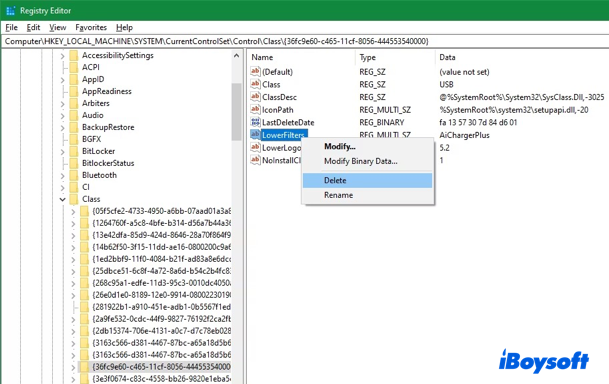
- Restart the PC and check if the hardware works properly.
Some software may function improperly after the deletion because it used those devices before. Facing this, a software reinstallation is enough to fix it.
Fix 10: Call a professional expert for help
If you have tried all the methods mentioned in the post while the error code 10 status of your drive still lies there. Give yourself a break and ask for professional help from an expert, while either the Microsoft tech support team or the computer manufacturer is OK.
Final words
This Device Cannot Start. (Code 10) status of a peripheral device really racks your mind to deal with. You can try the methods mentioned in this article to gid rid of the error code 10 on your computer. If you have tried all the methods in the post and fail to rule out it, giving up and calling a pro is more suggested.
For more error code tutorials, please read:
Don't forget to click the Share button below to share this informative post with more people!
FAQ about This Device Cannot Start Code 10
- QWhat causes This Device Cannot Start Code 10?
-
A
Generally speaking, this error code is caused by outdated or corrupted drivers.
- QWhat does This Device Cannot Start Code 10 mean on my computer?
-
A
Error code 10 is mostly referred to removable devices connected to your computer. It means that Windows can't run a piece of hardware, such as a printer or USB drive, properly.
