With the release of macOS 26 Tahoe, we notice that many Mac users are reporting issues where their Mac Tahoe external hard drive not showing up or mounting when connected to Macs in several forums. (Read about 17 other macOS Tahoe problems)
Sure, whether you are using a USB flash drive, external HDD, or SSD, the problem can disrupt your workflow and put important data at risk. How to access the files or use the drive normally again? Let us walk you through how to recover your data first and then troubleshoot and resolve both scenarios effectively. (Not showing + not mounting)
Note: When an external hard drive is not showing up on macOS 26 Tahoe, first go to Disk Utility: Open Finder > Applications > Utilities > Disk Utility, then click View > Show All Devices.
If it shows up there, run iBoysoft Data Recovery to rescue the files ASAP~
How to fix external drive not showing up on macOS 26 Tahoe
If you can't see the external drive on the desktop and the Finder sidebar, or even when trying to show all devices in Disk Utility, please try:
# 1 Enable external disks in Finder Settings
It's also possible that your Mac has recognized the external hard drive, but it's simply not visible on the desktop or in Finder, and isn't grayed out in Disk Utility. It's likely that your Mac's settings are configured to hide external disks in these areas.
- Open Finder > Click Finder on the top menu > Settings.
- Click General, and tick External disks.
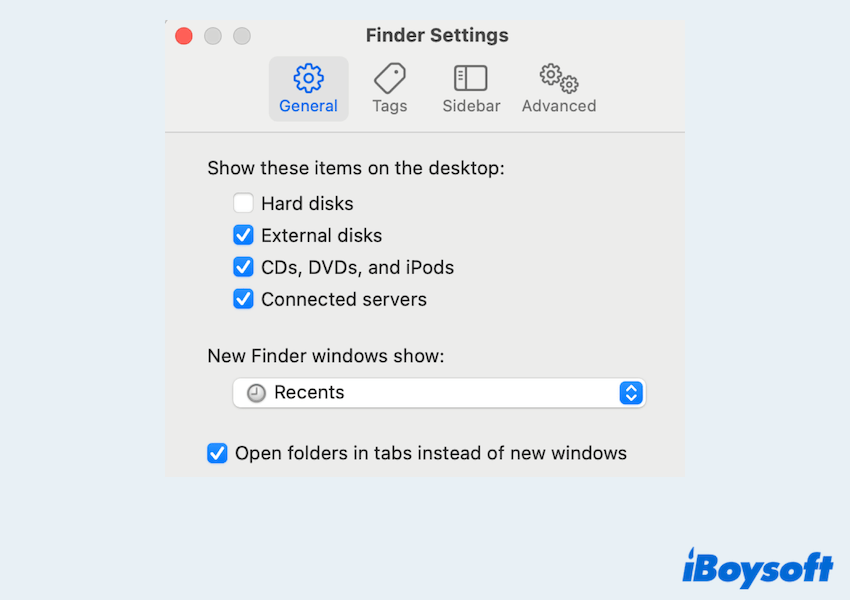
- Click Sidebar > Locations > Tick External disks.
Then you'll see the external hard drive mounted on the desktop.
# 2 Check external drive connections
External hard drives must be securely connected to your Mac to be recognized. A loose or unstable connection can prevent the drive from appearing on macOS 26 Tahoe. To ensure a solid connection:
- Use a different USB/Thunderbolt cable.
- Try plugging the drive into another USB port or a different Mac.
- Avoid using USB hubs; connect the drive directly to your Mac.
# 3 Open Disk Utility
Go to Applications > Utilities > Disk Utility to check if the drive is recognized at the system level:
- If the drive doesn't appear, it could indicate a hardware failure or a severely corrupted disk.
- If it shows up but is grayed out, it means the system detects it, but it's not mounted. Continue with the next section to troubleshoot.
# 4 Reset NVRAM and SMC
Or it might be due to misconfigured low-level settings on your Mac if you have tried the fixes above. Resetting NVRAM and SMC can help resolve hardware communication issues, including those affecting external drives.
Reset NVRAM on Intel-based Macs:
Shut down your Mac, then turn it on and immediately press and hold Option + Command + P + R. Keep holding the keys for about 20 seconds, then release.
(This step doesn't apply to Apple Silicon Macs, as they reset NVRAM automatically during startup if needed.)
Reset SMC on Intel-based Macs:
- Shut down your Mac.
- Press and hold Control + Option + Shift (right side) for 7 seconds.
- While holding those keys, press and hold the Power button as well.
- Hold all four keys for another 7 seconds, then release them.
- Wait a few seconds, then turn on your Mac.
(There's no manual SMC reset. Simply shut down your Mac, wait 30 seconds, then power it back on. The system resets SMC automatically.)
How to fix external HDD showing but not mounting on macOS Tahoe
If macOS Tahoe external drive not showing in any place, it's about a mounting issue. Here, we outline several methods to help you make the external hard drive mount on macOS 26 Tahoe.
# 1 Check for drive format compatibility
macOS Tahoe doesn't natively support Linux formats such as EXT3, EXT4, or XFS. So let's check the file formats first:
- Finder > Applications > Utilities > Disk Utility.
- Choose the drive, and you can see the file system of it.

If it's an unsupported format, macOS can't mount it. Consider using third-party drivers or connecting the drive to a Linux machine to access the data.
# 2 Mount the drive manually
Some external drives can't be mounted automatically, maybe here you have to mount them by yourself or try to mount in Terminal commands.
- Finder > Applications > Utilities > Disk Utility.
- Select the external drive from the sidebar.
- Click the Mount button at the top.
If successful, it should now be accessible in Finder. Or you can run commands in Terminal when the external hard drive not mounting on macOS 26 Tahoe in Disk Utility.
- Finder > Applications > Utilities > Terminal.
- Type diskutil list to view all connected drives.
- Find your unmounted external drive and memorize the name.
- Use the command diskutil mountDisk /dev/disk2.
(Replace /dev/disk2 with your external drive's name.)
# 3 Repair the drive with First Aid
If your external hard drive still refuses to mount on macOS Tahoe, try repairing it using First Aid in Disk Utility, which will scan the disk for issues and attempt to fix them automatically.
- Finder > Applications > Utilities > Disk Utility.
- Select the partition of your drive and click First Aid at the top.
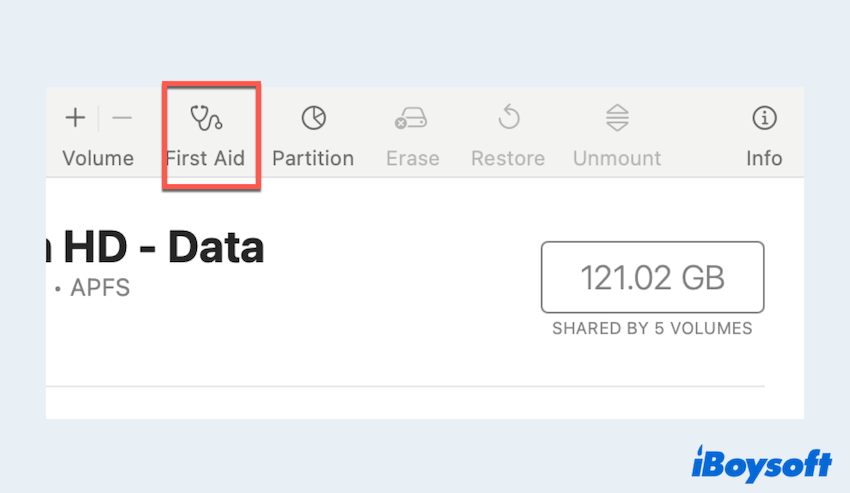
- Wait for the process to finish.
- Repeat the repair process for each volume or partition above it until you reach the physical drive.
# 4 Recover and reformat the drive
If nothing works, the drive may be corrupted or partially damaged. In that case, it's strongly advised to recover your data to avoid potential data loss. Doing so also helps you quickly get back all the data before the reformatting.
The fastest and most efficient method is using iBoysoft Data Recovery for Mac, which is fully compatible with macOS 26 Tahoe and supports recovery from unreadable, unmounted, or corrupted drives.
Let's get back your data from the external drive, then do the fixes later:
- Free download, install, and open iBoysoft Data Recovery for Mac.
- Select your external drive under Data Recovery on the left and click "Search for Lost Data" at the bottom.
- Wait for the scan, preview the files and select your wanted files, and click "Recover".
(You can select all, but remember to save them to another safe location.)
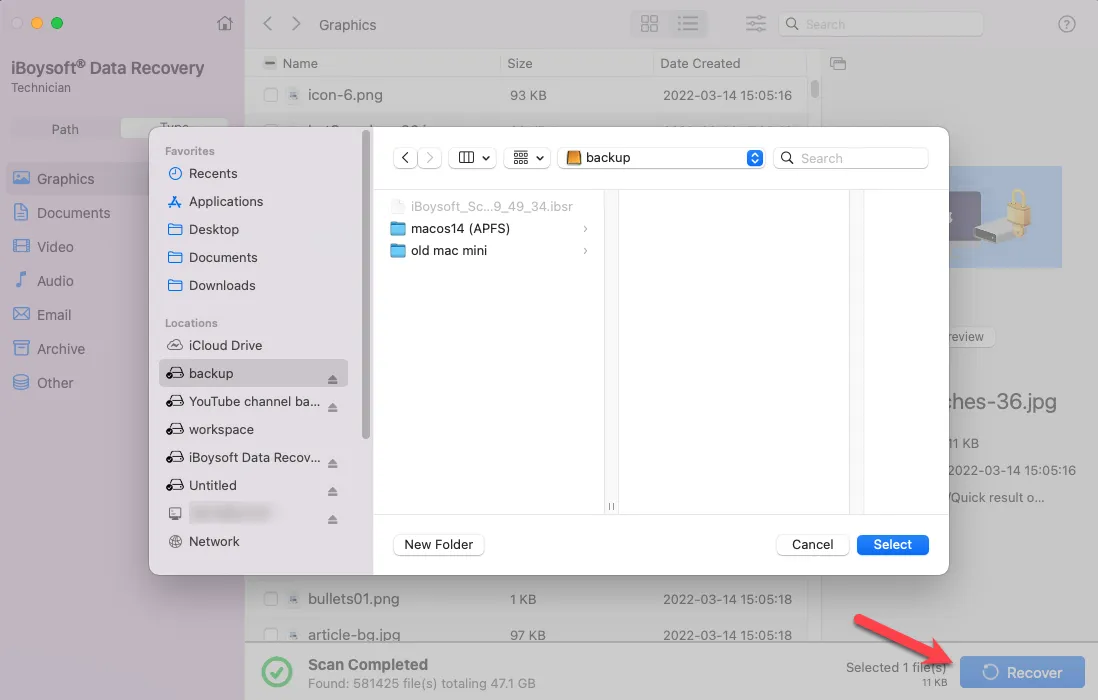
- Click "OK" after recovering, and Finder will open the results automatically.
After you've recovered your data, reformatting may be your only option. You can:
- Finder > Applications > Utilities > Terminal.
- Select the external drive.
- Click Erase.
- Choose a format like APFS or Mac OS Extended (Journaled).
- Click Erase to reformat.
Have you fixed the issue with Mac Tahoe external drives not mounting or showing? Please share our post.
FAQs about macOS Tahoe external hard drive not showing
- QWhy is the external hard drive not showing on macOS Tahoe?
-
A
It could be due to incompatible file system, USB connection issues, Finder settings, outdated NTFS drivers, or bugs in macOS Tahoe.
- QHow do I get my external hard drive to show up on my Mac desktop?
-
A
Go to Finder > Settings > General, and check the box for External disks under Show these items on the desktop.
- Q How to fix macOS Tahoe external hard drive not showing after update?
-
A
Recover data with iBoysoft Data Recovery for Mac. Then you can adjust Finder preferences, check the connections, update or downgrade macOS Tahoe, reset NVRAM and SMC, repair the drive in Disk Utility, manually mount the drive in Terminal, or reformat the drive.