To take a screenshot on your Mac, you can press the Command + Shift + 3/4/5 keys to snip a whole/part/customized screenshot of your Mac's screen. When you press Command + Shift + 4 + Spacebar together, you can grab a screenshot of a selected window, which also captures the shadow of the window as well.
The Mac window screenshot with a shadow has no influence on the key information of the screenshot, but you may not want the drop shadow to be added if you're using a screenshot in a presentation or want to modify the screenshot somehow. Here's how to remove the screenshot shadow on your Mac.

How to turn off Mac screenshot shadow while grabbing
If you want to turn off the window shadow from a particular screenshot, you can use a different shortcut variation when you take a screenshot on Mac.
First, press the Command + Shift + 4 keys on your Mac keyboard. The cursor will now turn into a crosshair. Hover over the window that you want to snip and press the Spacebar key.
The window will be selected. Now, hold the Option key when you press the Left Mouse button to take the screenshot. When you go wherever your screenshots go, you'll find that the screenshot doesn't have a shadow.
Please share this tutorial on your social media to help more people!
How to remove the screenshot drop shadow with Terminal
Using the above method, you can remove drop shadow on individual screenshots when you take them. If your purpose is to permanently remove the shadow from all screenshots you take. You need the help of Terminal.
To permanently remove the shadow of every screenshot you take, do the following:
- Launch Terminal from the Utilities folder.
- Type the below command and press the Return key:defaults write com.apple.screencapture disable-shadow -bool true

- Type in this command and press Return:killall SystemUIServer
Now grab a screenshot on your Mac, the window screenshots shouldn't have a drop shadow by default. If you want to reverse the change in the future, repeat the process, but for the first command, change "True" into "False" and then press Return.
The downside of this change is that you can't keep the border while getting rid of the drop shadow, which is useful for light-colored windows or those with white edges. Otherwise, you may need to add a border for it by yourself.
How to clean up Mac window screenshot shadow after snapping
If you've captured a screenshot with a shadow, you can use a photo-editing app to get rid of it with the crop functionality. In macOS, you can use Preview, a pre-installed macOS image-editing tool.
To remove screenshot borders with macOS Preview:
- Double-click on the screenshot you've taken, it should be opened by Preview default.
- Use the crosshair to drag to select the app window in the screenshot without the shadow.
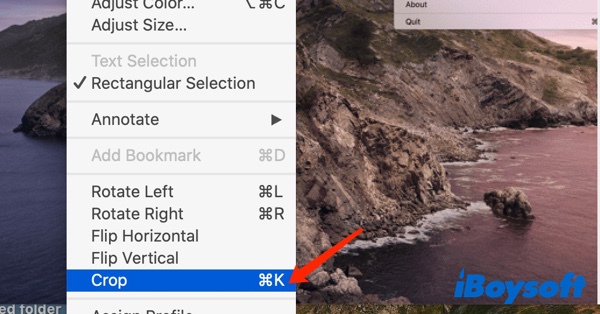
- Go to Tools > Crop in the menu bar or use the shortcut of Command + K. Now the screenshot should be a clean one without a shadow.
We'd be appreciated it if you can share this article with more people!
Final thoughts
All 3 mentioned ways should be able to help you remove Mac screenshot shadow with ease. You can choose which one to use according to your needs. If your screenshot not working on your Mac, you can use the iBoysoft MagicMenu screenshot extension to help you grab a snapshot on your Mac screen.