Many Adobe Creative Cloud users have complained of seeing a strange process or app called CCXProcess.
According to Mac users, CCXProcess may appear in Launchpad, in the error "CCXProcess.app is damaged and can't be opened," or in a crash report. It may be added to the login items without your consent or may request to use the login keychain.
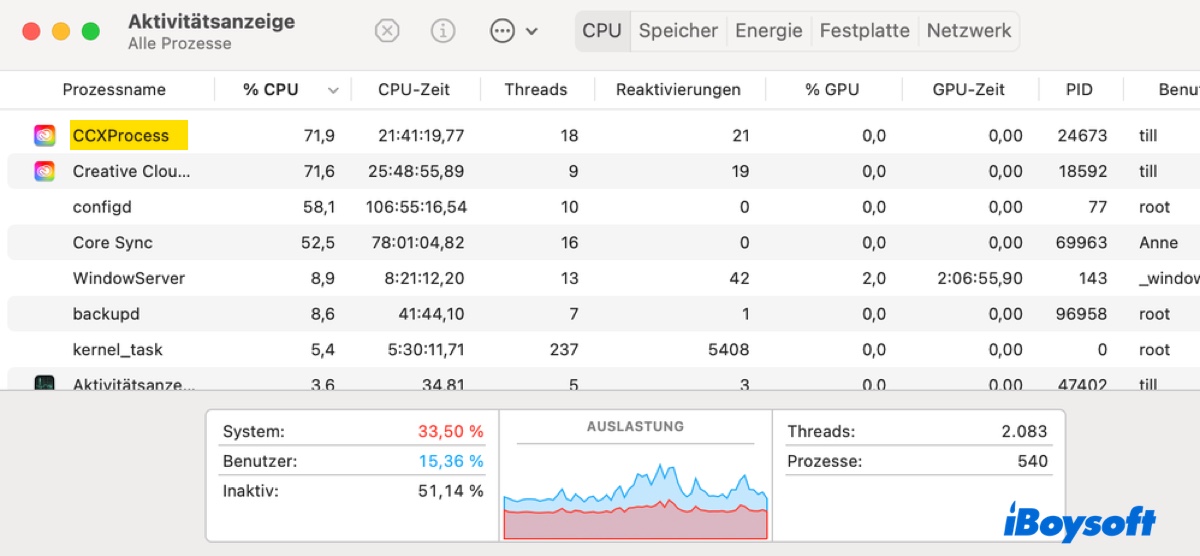
It can also render issues such as excessive bandwidth consumption, high CPU usage, or loud fan noises. Windows users, too, may notice CCXProcess.exe within an error or somewhere in the system.
In this article, we'll help you understand this process and learn how to remove it or resolve the problems it causes.
What is CCXProcess on Mac and Windows?
CCXProcess, shortened for Creative Cloud Experience Process, is a background process of the Adobe Creative Cloud suite. It launches at startup and facilitates communications between the Creative Cloud desktop app and other Creative Cloud services and products you've installed, for example, Photoshop, Lightroom, Illustrator, Premier Pro, etc.
In essence, it manages the synchronization of files, fonts, templates, custom configurations, creative libraries, and tutorials between the Adobe apps on your computer and Adobe Creative Cloud. This allows you to work seamlessly with the essential assets and custom preferences available across all your devices and Adobe CC applications.
While CCXProcess is well-behaved most of the time, it can consume excessive CPU resources, crash, or cause errors on your Mac or PC. In such a case, you can delete it from your Mac, disable it on your PC, or try other solutions.
Tips: If CCXProcess appears on your Mac without causing trouble, just leave it be. However, if you need to troubleshoot issues related to it, it's suggested to back up your essential works before proceeding.
How to fix CCXProcess using High CPU Usage on Mac?
If CCXProcess is causing a high CPU load or rapid fan speed, try the methods below to fix it.
Way 1: Update CCXProcess
Usually, a newer update will address bugs in the previous releases. If there's a new update available, consider updating your Adobe CC app. Depending on the version of your Creative Cloud desktop app, the steps for updating are slightly different.
To check and install an update, open Finder and launch the Creative Cloud desktop app from your Applications folder, then choose one of the appropriate methods below.
- From the left sidebar, select Updates in the Apps tab.
- From the right sidebar, select Apps > Manage updates.
- Click the three vertical dots at the upper-right and choose "Check for App Updates."
Way 2: Completely uninstall ad blockers
It has been found that CCXProcess will stop using excessive CPU when ad blockers like AdGuard or Avast Security are fully uninstalled. This is especially helpful if the problem results from ad blockers blocking CCXProcess.
Note that simply dragging and dropping or right-clicking an app to move it to the Trash only removes the program itself but not its files and folders scattered around your hard drive. To remove an app and its associated files, using the Uninstaller tool in iBoysoft MagicMenu is recommended.
This tool is easy to use and efficient for completely uninstalling apps on Mac. Download the tool from the button below, install the Uninstaller extension, then right-click on the ad blocker in your Applications folder and select Uninstall to get rid of it for good.
If the methods help resolve the issue of CCXProcess's high CPU usage on Mac, share them!
How to fix 'CCXProcess.app is damaged and can't be opened' on Mac?
If the message "CXProcess.app is damaged and can't be opened" constantly pops up on your Mac, give the following methods a try.
Way 1: Allow CCXProcess to open
A common reason why the CCXProcess.app can't be opened on your Mac is that macOS blocks apps that are not signed by an identified developer, stopping them from running. To fix it, you need to manually accept the CCXProcess.app as a safe item in System Settings/Preferences.
Related reading: Fix 'File/App is damaged and cannot be opened' on Mac
Way 2: Uninstall Adobe CC and reinstall the latest version
If you still encounter the error with CCXProcess, try uninstalling all the Creative Cloud apps and then the Creative Cloud desktop app and reinstalling the latest version of them. In the case of Adobe CC apps not uninstalling, use the Creative Cloud Cleaner tool.
How to remove CCXProcess from Mac?
Another way to resolve different problems caused by CCXProcess is to delete it from your Mac. Be reminded that this may influence the features that rely on CCXProcess to deliver, although some users have managed to remove the app without much consequence.
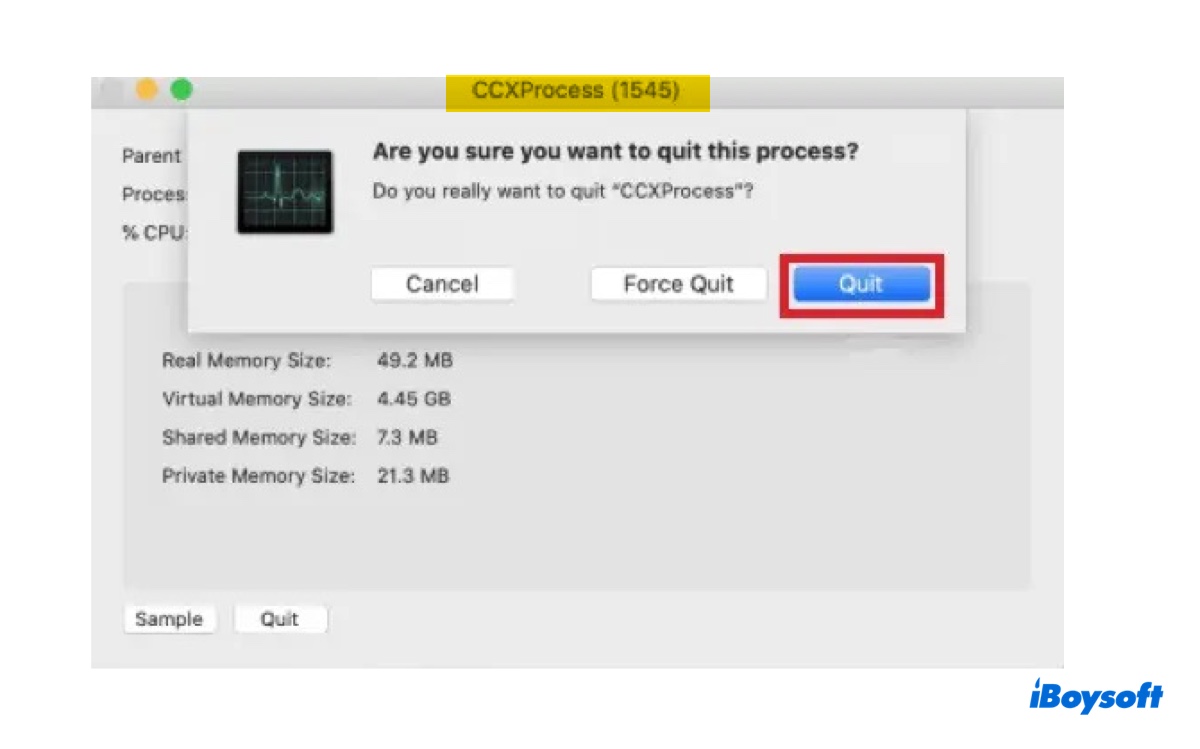
Try this method if you want to keep your Adobe CC files but need to fix the problem it renders. Before deleting the CCXProcess.app, you must quit the process in Activity Monitor; otherwise, the action will fail with the error "The item "CCXProcess.app" can't be moved to the Trash because it's open.
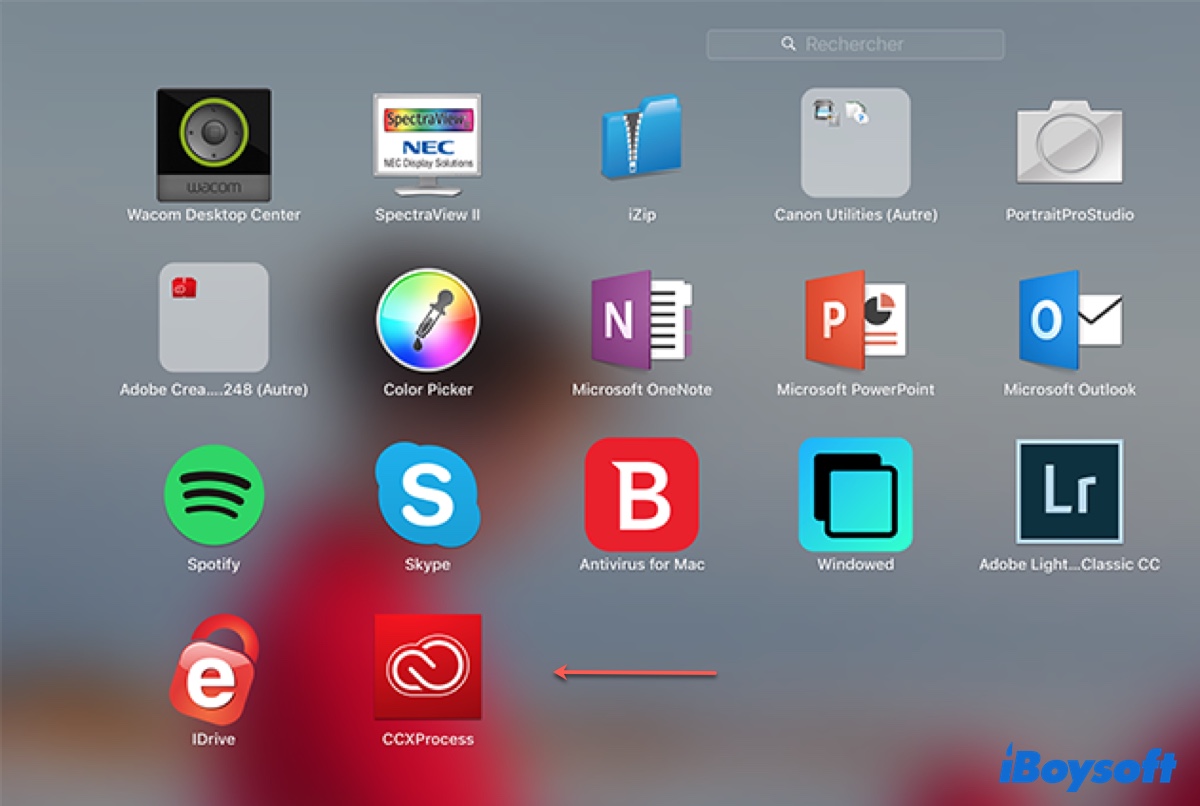
- Open Finder, then launch Activity Monitor from Applications > Utilities.
- Search for the CCXProcess process.
- Double-click the process and select Quit twice.
- Open Finder again to locate the CCXProcess app in Applications > Utilities > Abode Creative Cloud Experience > CCXProcess > CCXProcess.app.
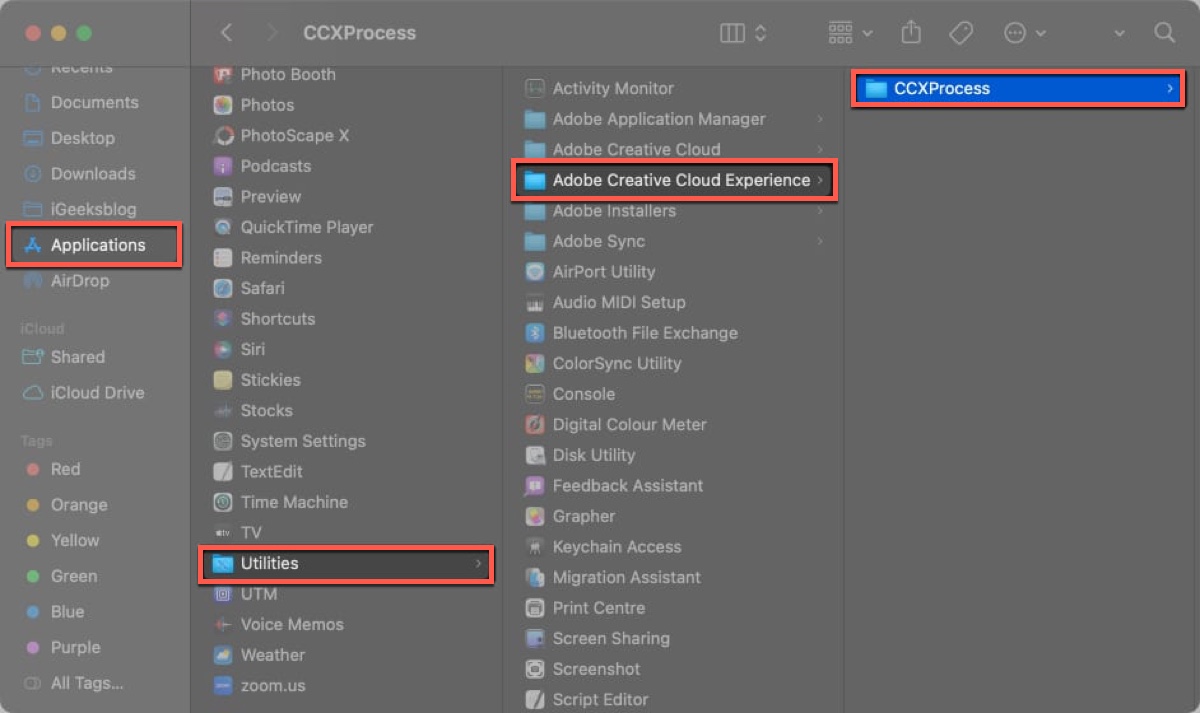
- Right-click on the app and select Move to Trash.
- Empty your Trash.
Share these steps to help others uninstall CCXProcess on Mac.
How to disable CCXProcess on startup for Mac and Windows?
You can also prevent CCXProcess from launching at startup. This won't affect its functionality but simply disallows it from opening when you start your computer.
How to disable CCXProcess on startup for Mac:
- Go to the Apple logo > System Settings/Preferences.
- In the search bar, type "Login Items."
- If Creative Cloud is in the list, select it and click the ( - ) icon to remove it.
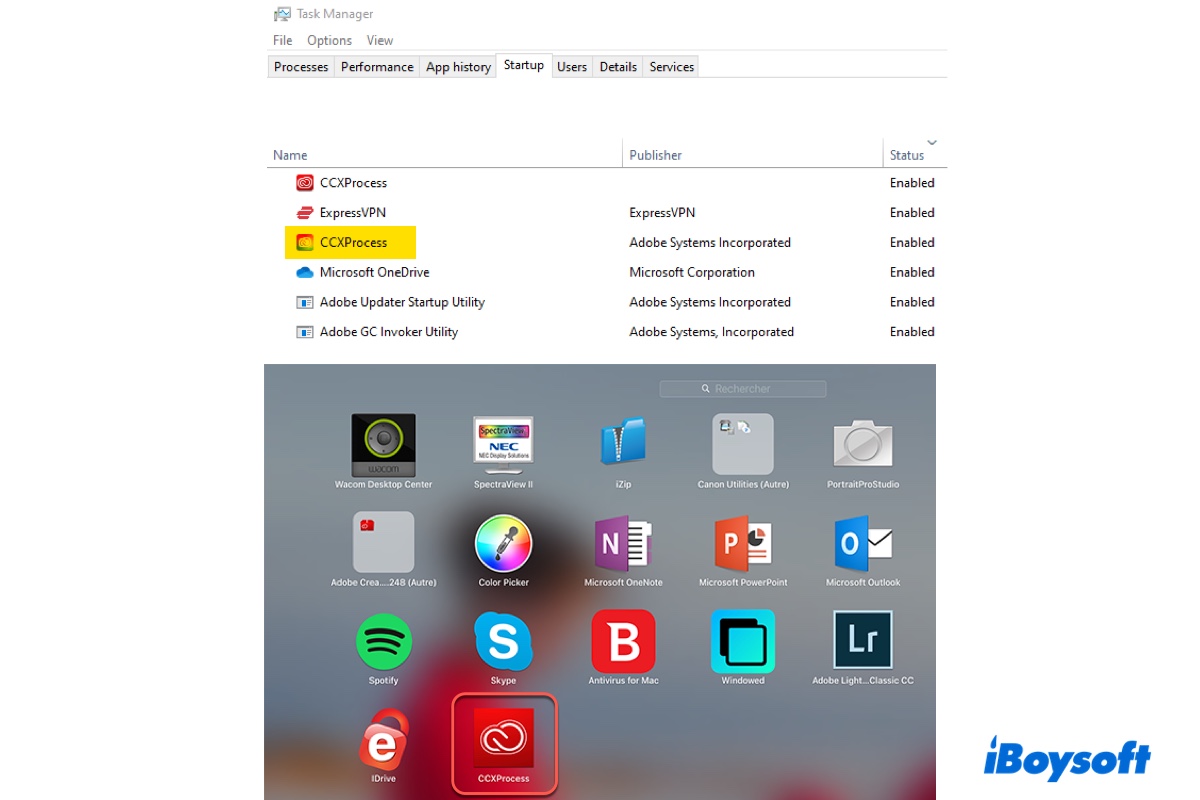
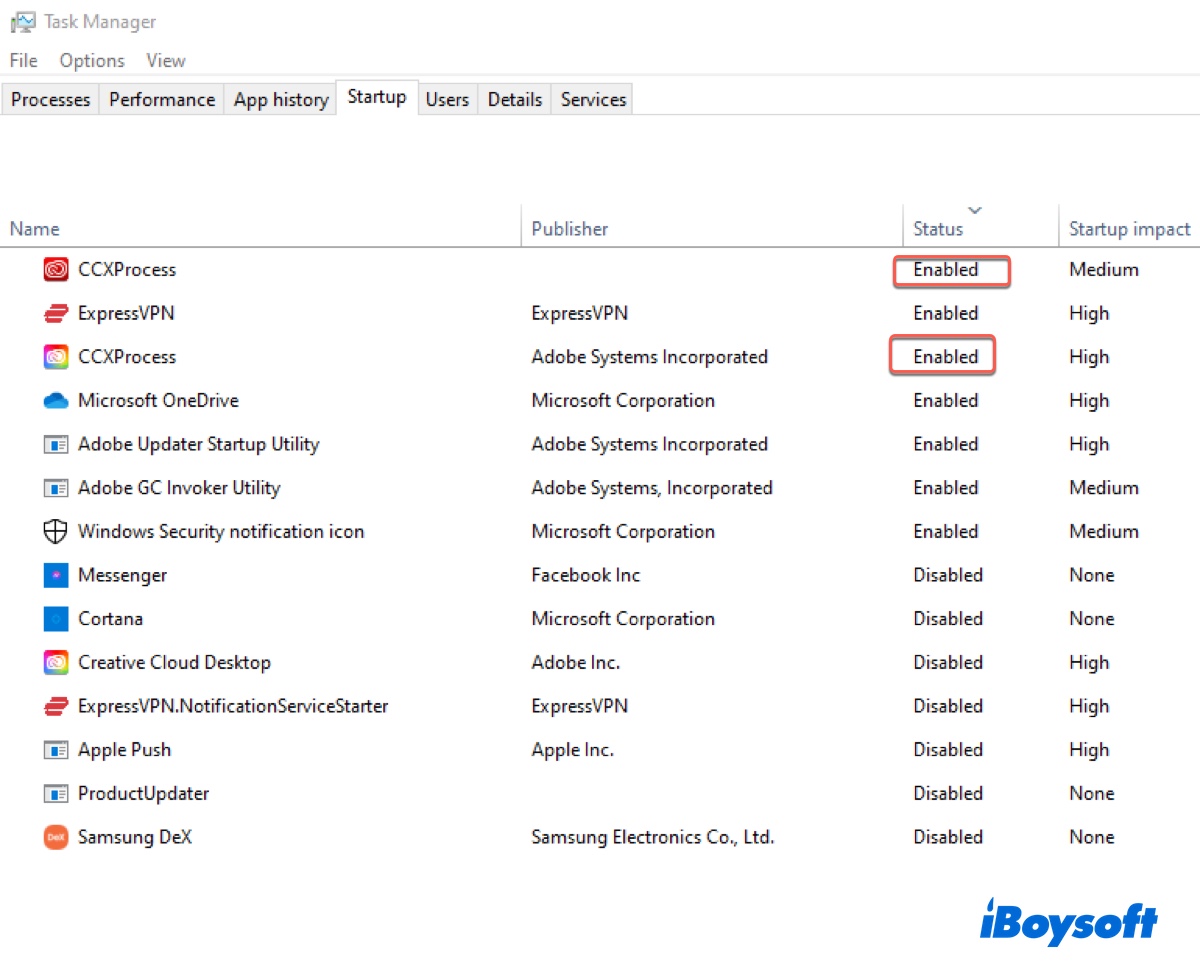
How to disable CCXProcess on startup for Windows 10 or other versions:
- Press Ctrl + Shift + Esc to open Task Manager.
- Select the Startup tab.
- Choose CCXProcess and click Disable.
Now that you know how to disable CCXProcess on startup for your Mac and Windows PC, don't forget to share it with others!
FAQs about CCXProcess
- QIs it OK to remove CCXProcess?
-
A
Removing CCXProcess may impact features like synchronization between Adobe CC apps. However, if you have tried other methods in this article with no avail, it's worth trying after backing up your Adobe files. After all, the worse case of scenario is to uninstall all Adobe apps and reinstall them.
- QCan I disable CCXProcess from startup?
-
A
Yes, you can disable CCXProcess from startup.
- QIs CCXProcess a virus?
-
A
CCXProcess is a legitimate process that belongs to the Adobe CC applications. However, if you don't have any Adobe apps installed when seeing the process, it may be a concern.