
Since Microsoft has been working to switch the Windows 11 file system from NTFS to ReFS, the ReFS file system is receiving more attention. If you want to convert NTFS to ReFS for testing its features, you can follow the steps in this article to convert your hard drive from NTFS to ReFS.
NTFS Vs. ReFS
As a Windows user, you are probably familiar with Microsoft FAT32, exFAT, and NTFS file systems. The Resilient File System (ReFS) was not developed by Microsoft in recent years; in fact, it was first introduced with Windows Server 2012 and later implemented in Windows 8.1 in 2013. NTFS remains the default file system in most Windows installations, while ReFS is typically found in higher-end Windows editions and server environments.
ReFS offers improved data integrity, scalability, and resilience features compared to the older NTFS file system. It is designed to be a next-generation file system for Windows operating systems to replace NTFS. Now, you can install Windows 11 on a ReFS partition. However, this does not mean NTFS will be replaced immediately.
Is the information in this article helpful? Share it to support us. Thank you!
Can you convert NTFS to ReFS?
Before you can use the ReFS file system as a file system for a storage device, the ReFS file system must be enabled manually. There is no direct command or method to convert an NTFS partition to ReFS. It is important to note that Windows 8.1 and Windows 10 can't run on a ReFS-formatted partition so you cannot change the boot partition's format from NTFS to ReFS.
The ReFS file system is natively supported on the Enterprise, Education, and Workstation editions of Windows 11 on the system drive during the Windows setup process.
ReFS is not supported on the computer if it runs Windows 8 or an earlier version of Windows. Thus, it is not possible to convert NTFS to ReFS.
We will appreciate it if you can help us reach more viewers by clicking one of the buttons below.
How to convert NTFS to ReFS
Before you convert an NTFS partition to ReFS, you need to secure your important files saved on the partition first as the file system conversion contains partition formatting which will result in the deletion of all files.
Connect your NTFS disk to a Windows PC and manually move files to the computer or another external storage media or create a disk clone. If your NTFS hard drive is corrupted and all files become inaccessible, download iBoysoft Data Recovery for Windows to recover data from the NTFS drive for backup.
Let's start converting your NTFS partition to ReFS now.
Step 1. Enabling ReFS with the Registry Editor
The ReFS file system is a hidden feature on Windows 8.1 and Windows 10, and it can be enabled in the system registry. The following steps describe how to enable the ReFS file system on Windows 10.
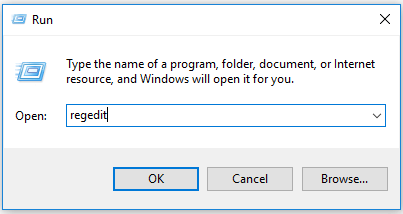
1. Press Windows key + R on your keyboard to launch the Run prompt.
2. Type regedit.exe and hit Enter to open Registry Editor.
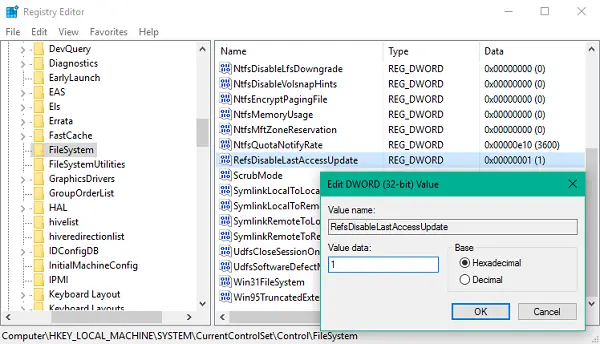
3. Navigate to the below path on the left side pane:
HKEY_LOCAL_MACHINE\SYSTEM\CurrentControlSet\Control\FileSystem
4. In the right part of the Registry Editor window, create a DWORD (32-bit), with the name "RefsDisableLastAccessUpdate" and 1 as a value, and click OK.
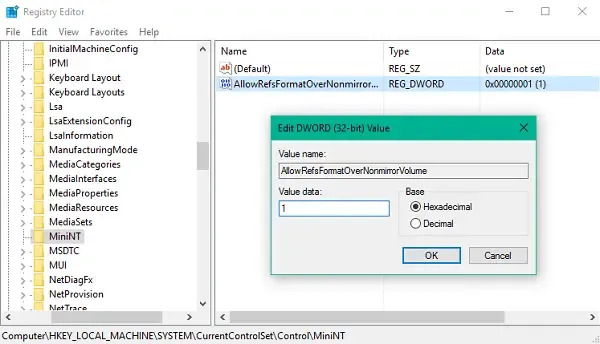
5. Navigate to the below path on the left side pane:
HKEY_LOCAL_MACHINE\SYSTEM\CurrentControlSet\Control\MiniNT
If you can't find the folder named MiniNT, you can create it using right-click >New > Key and name it MiniNT.
6. In the right panel, create a new DWORD (32-bit), set the name as AllowRefsFormatOverNonmirrorVolume and set its value as 1, and click OK.
7. Restart your computer and sign in to make the changes effective.
Step 2. Format NTFS to ReFS
After the ReFS file system has been enabled, it is easy to switch an NTFS partition to ReFS in Disk Management.
1. Right-click on the Windows logo at the bottom-left corner of your screen and then choose Disk Management from the context menu.
2. Connect the external disk that contains the NTFS volume if you want to change the format of an external drive from NTFS to ReFS.
3. Right-click on the NTFS drive or partition and choose Format.
4. Name it in the Volume Label, choose REFS in the file system options, and keep the Allocation unit size as Default.
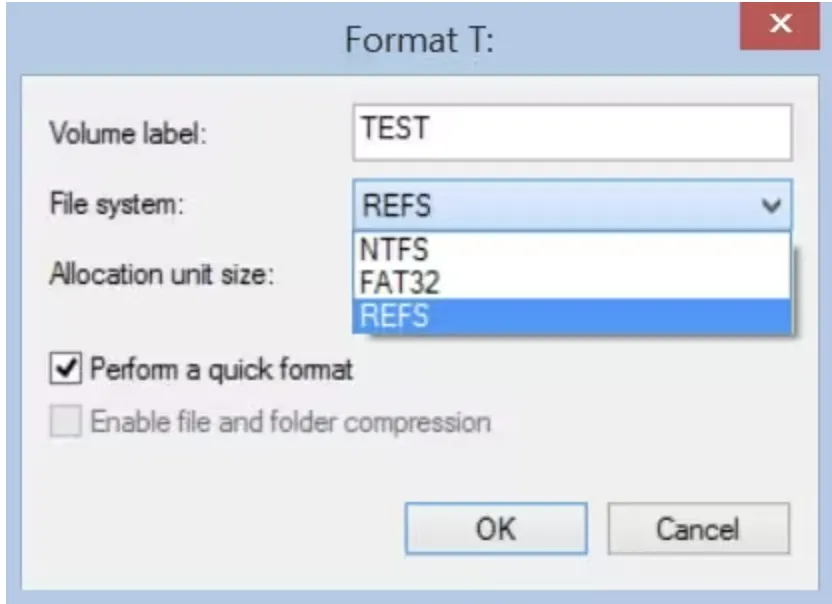
5. Click Ok to let Windows format your NTFS disk to the ReFS file system.
If you find these steps useful, please share them on your social media.
Conclusion
Microsoft is attempting to make ReFS the new Windows default file system. Follow this guide to convert NTFS to ReFS to get a sense of how ReFS performs. Before converting, make sure all files on the NTFS volume are backed up.